
Tasmota (Gosund SP111)
Web-UI
Nach dem Flashvorgang mit dem Tasmota WLAN verbinden, SSID-Name zb tasmota-1021. Danach die url
http://192.168.4.1aufrufen und mit vorhandenem WLAN verbinden
Statische IP
In Tasmota Console statische IP-Adresse eingeben:
savedata 1
ipaddress1 192.168.1.50
savedata 0
Quelle: https://www.smarthome-tricks.de/esp8266/tasmota-feste-ip-adresse-zuweisen/
Gosund SP111 v1.1 Tasmota Template
unter Configuration > Configure Other bei Template eingeben:
{"NAME":"SP111 v1.1","GPIO":[56,0,158,0,132,134,0,0,131,17,0,21,0],"FLAG":0,"BASE":45}unter Configuration > Configure Module das SP111 v1.1 auswählen.
Quelle: https://templates.blakadder.com/gosund_SP111_v1_1
MQTT senden bei Änderung der Leistungsmessung um 10%
Console > PowerDelta 10
Quelle: https://tasmota.github.io/docs/Commands/#powerdelta und https://github.com/arendst/Tasmota/discussions/14933
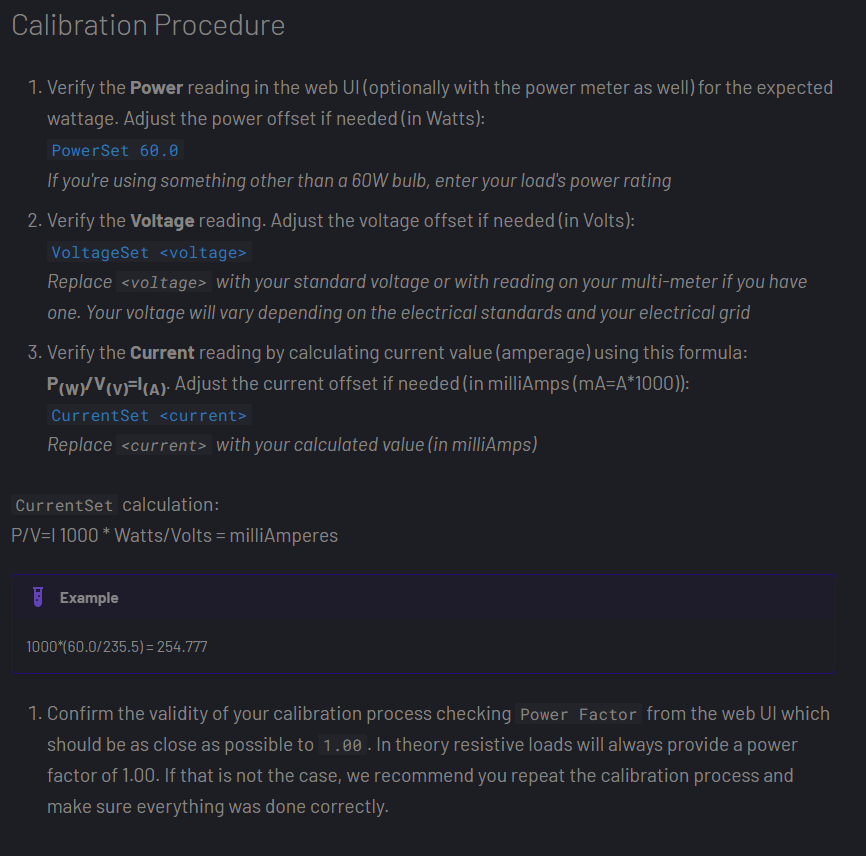
Energiemessung kalibrieren
https://tasmota.github.io/docs/Power-Monitoring-Calibration/#setup
Tasmota Updaten
Beim Updaten folgende Reihenfolge der Versionen einhalten:

Links zum kopieren:
http://ota.tasmota.com/tasmota/release-7.2.0/tasmota-lite.bin
http://ota.tasmota.com/tasmota/release-8.5.1/tasmota-lite.bin
http://ota.tasmota.com/tasmota/release-9.1.0/tasmota-lite.bin.gz
http://ota.tasmota.com/tasmota/release/tasmota.bin.gz
Quelle: https://tasmota.github.io/docs/Upgrading/#upgrade-flow
Link der tasmota.bin kopieren und in die Web-UI unter Firmware Upgrade > OTA Url eintragen
zb:
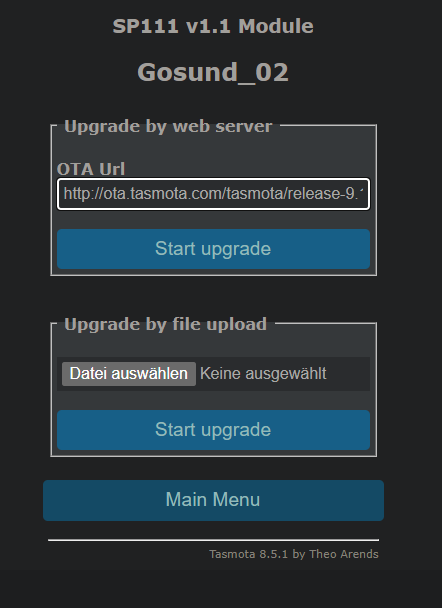
start upgrade.
BACKUP VON GOSUND_02 IM ANHANG DIESES EINTRAGS
No comments to display
No comments to display