# TrueNAS
# Nextcloud
# Nextcloud als App in TrueNAS installieren
### 1) TrueNAS den Nameserver vom Netzwerk mitteilen, damit man Apps laden kann:
[](https://bookstack.eike-f.de/uploads/images/gallery/2023-02/PYximage.png)
### 2) Apps > Nextcloud > Install
Beim Installieren ueber TrueNAS Apps den Hostnamen bei der lokalen IP belassen (wird spaeter ueber nginx und die config.php erledigt):
[](https://bookstack.eike-f.de/uploads/images/gallery/2023-02/Z6mimage.png)
username / passwort kann auch spaeter geaendert werden, sollte man sich fuer die erste Anmeldung aber merken
### 3) Installed Apps > Nextcloud > Web Portal:
[](https://bookstack.eike-f.de/uploads/images/gallery/2023-02/vmnimage.png)
Anmeldedaten aus Truenas > Apps > drei punkte bei nextcloud > Edit entnehmen
[](https://bookstack.eike-f.de/uploads/images/gallery/2023-02/eiwimage.png)
# HDD Burn-In Test
## Burn-In Testskript mit Badblocks
Skript performs these steps:
1. Run SMART short test
2. Run `badblocks`
3. Run SMART extended test
Schritte:
1. Skript (unten kopieren) auf Server (z.B. Proxmox) erstellen:
```
cd /home/
nano /home/burn-in.sh
```
2. Skript als root ausführen mit tmux ([https://tmuxcheatsheet.com/](https://tmuxcheatsheet.com/)), damit Prozesse nach Schließen der Konsole erhalten bleiben
1. Pro HDD ein tmux-Fenster
2. Test-Run ohne Daten zu schreiben/überschreiben: ```bash
sh burn-in.sh -b 4096 /dev/sdb
#Blocksize -b 4096 sollte für HDDs bis 16TB reichen, falls Fehlermeldung blocksize auf -b 8192 erhöhen
```
3. Full-Test, löscht alle Daten auf HDD!!!!
```
sh burn-in.sh -b 4096 -f /dev/sdb
```
3. Logfiles werden im selben Ordner erstellt und prüfen
Achtung: Bei FreeBSD Systemen (FreeNAS) folgenden Befehl ausführen, damit badblocks alle Sektoren schreiben darf:
### Burn-In-Skript:
[https://github.com/Spearfoot/disk-burnin-and-testing](https://github.com/Spearfoot/disk-burnin-and-testing)
Stand: 20.07.2023
```bash
#!/bin/sh
################################################################################
#
# disk-burnin.sh
#
################################################################################
################################################################################
# PRE-EXECUTION VALIDATION
################################################################################
# Check if running as root
if [ "$(id -u)" -ne 0 ]; then
echo "ERROR: Must be run as root" >&2
exit 2
fi
# Check required dependencies
readonly DEPENDENCIES="awk badblocks grep sed sleep smartctl"
for dependency in ${DEPENDENCIES}; do
if ! command -v "${dependency}" > /dev/null 2>&1; then
echo "ERROR: Command '${dependency}' not found" >&2
exit 2
fi
done
readonly USAGE=\
"NAME
$(basename "$0") -- disk burn-in program
SYNOPSIS
$(basename "$0") [-h] [-b ] [-c ] [-e] [-f] [-o ] [-x]
DESCRIPTION
A script to simplify the process of burning-in disks. Only intended for use
on disks which do not contain any data, such as new disks or disks which
are being tested or re-purposed.
The script runs in dry-run mode by default, so you can check the sleep
durations and to insure that the sequence of commands suits your needs. In
dry-run mode the script does not actually perform any SMART tests or invoke
the sleep or badblocks programs.
In order to perform tests on drives, you will need to provide the -f option.
OPTIONS
-h Show help text
-e Show extended help text
-b Override block size (defaults to 8192)
-c Override concurrent number of blocks tested
-f Force script to run in destructive mode
ALL DATA ON THE DISK WILL BE LOST!
-o Write log files to (default: $(pwd))
-x Run full pass of badblocks instead of exiting on first error
Disk to burn-in (/dev/ may be omitted)
EXAMPLES
$(basename "$0") sda
run in dry-run mode on disk /dev/sda
$(basename "$0") -f /dev/sdb
run in destructive, non-dry mode on disk /dev/sdb
$(basename "$0") -f -o ~/burn-in-logs sdc
run in destructive, non-dry mode on disk /dev/sdc and
write the log files to ~/burn-in-logs directory
"
readonly USAGE_2=\
"EXIT STATUS
exit 0: script finishes successfully
exit 2: dependencies are missing
not running as 'root'
illegal options are provided
NOTES
Be warned that:
1> The script runs badblocks in destructive mode, which erases any data
on the disk.
!!!!!!!!!!!!!!!!!!!!!!!!!!!!!!!!!!!!!!!!!!!!!!!!!!!!!!!!!!!!!!!!!!
!!!! ALL DATA ON THE DISK WILL BE LOST! BE CAREFUL! !!!!
!!!! DO NOT RUN THIS SCRIPT ON DISKS CONTAINING VALUABLE DATA !!!!
!!!!!!!!!!!!!!!!!!!!!!!!!!!!!!!!!!!!!!!!!!!!!!!!!!!!!!!!!!!!!!!!!!
2> Run times for large disks can be several days. Use tmux or screen
to test multiple disks in parallel.
3> Must be run as 'root'.
4> The script has the following dependencies:
smartmontools, available at https://www.smartmontools.org
Uses: grep, awk, sed, sleep, badblocks
Performs this test sequence:
1> Run SMART short test
2> Run badblocks
3> Run SMART extended test
The script sleeps after starting each SMART test, using a duration based on
the polling interval reported by the disk, after which the script will poll
the disk to verify the self-test has completed.
Full SMART information is pulled after each SMART test. All output except
for the sleep command is written to both stdout and the log.
You should monitor the burn-in progress and watch for errors, particularly
any errors reported by badblocks, or these SMART errors:
5 Reallocated_Sector_Ct
196 Reallocated_Event_Count
197 Current_Pending_Sector
198 Offline_Uncorrectable
These indicate possible problems with the drive. You therefore may wish to
abort the remaining tests and proceed with an RMA exchange for new drives or
discard old ones. Please note that this list is not exhaustive.
The script extracts the drive model and serial number and forms a log file-
name of the form 'burnin-[model]_[serial number].log'.
badblocks is invoked with a block size of 8192, the -wsv options, and the
-o option to instruct it to write the list of bad blocks found (if any) to
a file named 'burnin-[model]_[serial number].bb'.
Before using the script on FreeBSD systems (including FreeNAS) you must
first execute this sysctl command to alter the kernel's geometry debug
flags. This allows badblocks to write to the entire disk:
sysctl kern.geom.debugflags=0x10
Also note that badblocks may issue the following warning under FreeBSD /
FreeNAS, which can safely be ignored as it has no effect on testing:
set_o_direct: Inappropiate ioctl for device
Tested operating systems:
FreeNAS 9.10.2 (FreeBSD 10.3-STABLE)
FreeNAS 11.1-U7 (FreeBSD 11.1-STABLE)
FreeNAS 11.2-U8 (FreeBSD 11.2-STABLE)
Ubuntu Server 16.04.2 LTS
CentOS 7.0
Tiny Core Linux 11.1
Tested disks:
Intel
DC S3700 SSD
Model 320 Series SSD
HGST
Deskstar NAS (HDN724040ALE640)
Ultrastar 7K4000 (HUS724020ALE640)
Ultrastar He10
Ultrastar He12
Western Digital
Black (WD6001FZWX)
Gold
Re (WD4000FYYZ)
Seagate
IronWolf NAS HDD 12TB (ST12000VN0008)
VERSIONS
Written by Keith Nash, March 2017
KN, 8 Apr 2017:
Added minimum test durations because some devices don't return accurate
values.
Added code to clean up the log file, removing copyright notices, etc.
No longer echo 'smartctl -t' output to log file as it imparts no useful
information.
Emit test results after tests instead of full 'smartctl -a' output.
Emit full 'smartctl -x' output at the end of all testing.
Minor changes to log output and formatting.
KN, 12 May 2017:
Added code to poll the disk and check for completed self-tests.
As noted above, some disks don't report accurate values for the short
and extended self-test intervals, sometimes by a significant amount.
The original approach using 'fudge' factors wasn't reliable and the
script would finish even though the SMART self-tests had not completed.
The new polling code helps insure that this doesn't happen.
Fixed code to work around annoying differences between sed's behavior
on Linux and FreeBSD.
KN, 8 Jun 2017
Modified parsing of short and extended test durations to accommodate the
values returned by larger drives; we needed to strip out the '(' and ')'
characters surrounding the integer value in order to fetch it reliably.
KN, 19 Aug 2020
Changed DRY_RUN value so that dry runs are no longer the default
setting.
Changed badblocks call to exit immediately on first error.
Set logging directory to current working directory using pwd command.
Reduced default tests so that we run:
1> Short SMART test
2> badblocks
3> Extended SMART test
MS, 9 Sep 2020
Add .editorconfig to streamlime editor behavior for developers.
Remove dependencies on pcregrep and tr.
Add documentation to functions and complex statements.
Reduce code duplication, simplify and decouple code where possible.
Improve portability and resiliency.
Check availability of dependencies during runtim.
Check for root privileges during runtime.
Add option parsing, most notably (-h)elp and -f for non-dry-run mode.
Add dry_run_wrapper() function.
Add disk type detection to skip badblocks for non-mechanical drives.
KN, 5 Oct 2020
Added -x option to control the badblocks -e option, allowing extended testing.
Added smartctl to the list of dependencies.
Changed disk type detection so that we assume all drives are mechanical drives
unless they explicitly return 'Solid State Drive' for Rotational Rate.
Removed datestamp from every line of log output, only emitting it in log headers.
Minor reformatting.
KY, 30 May 2022
Added -b & -c options to control respective badblocks options."
# badblocks default -e option is 1, stop testing if a single error occurs
BB_E_ARG=1
# badblocks default -b option is 1024, but we default to 8192. This allows overriding if desired.
BB_B_ARG=8192
# badblocks default -c option is 64, and this allows overriding
BB_C_ARG=64
# parse options
while getopts ':hefo:b:c:x' option; do
case "${option}" in
h) echo "${USAGE}"
exit
;;
e) echo "${USAGE}"
echo "${USAGE_2}"
exit
;;
f) readonly DRY_RUN=0
;;
o) LOG_DIR="${OPTARG}"
;;
b) BB_B_ARG="${OPTARG}"
;;
c) BB_C_ARG="${OPTARG}"
;;
x) BB_E_ARG=0
;;
:) printf 'Missing argument for -%s\n' "${OPTARG}" >&2
echo "${USAGE}" >&2
exit 2
;;
\?) printf 'Illegal option: -%s\n' "${OPTARG}" >&2
echo "${USAGE}" >&2
exit 2
;;
esac
done
shift $(( OPTIND - 1 ))
if [ -z "$1" ]; then
echo "ERROR: Missing disk argument" >&2
echo "${USAGE}" >&2
exit 2
fi
################################################################################
# CONSTANTS
################################################################################
readonly BB_E_ARG
readonly BB_B_ARG
readonly BB_C_ARG
# Drive to burn-in
DRIVE="$1"
# prepend /dev/ if necessary
if ! printf '%s' "${DRIVE}" | grep "/dev/\w*" > /dev/null 2>&1; then
DRIVE="/dev/${DRIVE}"
fi
readonly DRIVE
if [ ! -e "$DRIVE" ]; then
echo "ERROR: Disk does not exist: $DRIVE" >&2
echo "${USAGE}" >&2
exit 2
fi
# Set to working directory if -o wasn't provided
[ -z "${LOG_DIR}" ] && LOG_DIR="$(pwd)"
# Trim trailing slashes
LOG_DIR="$(printf '%s' "${LOG_DIR}" | awk '{gsub(/\/+$/, ""); printf $1}')"
readonly LOG_DIR
# System information
readonly HOSTNAME="$(hostname)"
readonly OS_FLAVOR="$(uname)"
# SMART static information
readonly SMART_INFO="$(smartctl --info "${DRIVE}")"
readonly SMART_CAPABILITIES="$(smartctl --capabilities "${DRIVE}")"
##################################################
# Get SMART information value.
# Globals:
# SMART_INFO
# Arguments:
# value identifier:
# !!! Only TWO WORD indentifiers are supported !!!
# !!! Querying e.g. "ATA Version is" will fail !!!
# - Device Model
# - Model Family
# - Serial Number
# Outputs:
# Write value to stdout.
##################################################
get_smart_info_value() {
# $1=$2=""; select all but first two columns
# gsub(/^[ \t]+|[ \t]+$/, ""); replace leading and trailing whitespace
# gsub(/ /, "_"); replace remaining spaces with underscores
# printf $1 print result without newline at the end
printf '%s' "${SMART_INFO}" \
| grep "$1" \
| awk '{$1=$2=""; gsub(/^[ \t]+|[ \t]+$/, ""); gsub(/ /, "_"); printf $1}'
}
##################################################
# Get SMART recommended test duration, in minutes.
# Globals:
# SMART_CAPABILITIES
# Arguments:
# test type:
# - Short
# - Extended
# - Conveyance
# Outputs:
# Write duration to stdout.
##################################################
get_smart_test_duration() {
# '/'"$1"' self-test routine/ match duration depending on test type arg
# getline; jump to next line
# gsub(/\(|\)/, ""); remove parantheses
# printf $4 print 4th column without newline at the end
printf '%s' "${SMART_CAPABILITIES}" \
| awk '/'"$1"' self-test routine/{getline; gsub(/\(|\)/, ""); printf $4}'
}
# Get disk model
DISK_MODEL="$(get_smart_info_value "Device Model")"
[ -z "${DISK_MODEL}" ] && DISK_MODEL="$(get_smart_info_value "Model Family")"
[ -z "${DISK_MODEL}" ] && DISK_MODEL="$(get_smart_info_value "Model Number")"
readonly DISK_MODEL
# Get disk type; unless we get 'Solid State Device' as return value, assume
# we have a mechanical drive.
DISK_TYPE="$(get_smart_info_value "Rotation Rate")"
if printf '%s' "${DISK_TYPE}" | grep -i "solid_state_device" > /dev/null 2>&1; then
DISK_TYPE="SSD"
fi
readonly DISK_TYPE
# Get disk serial number
readonly SERIAL_NUMBER="$(get_smart_info_value "Serial Number")"
# SMART short test duration
readonly SHORT_TEST_MINUTES="$(get_smart_test_duration "Short")"
readonly SHORT_TEST_SECONDS="$(( SHORT_TEST_MINUTES * 60))"
# SMART extended test duration
readonly EXTENDED_TEST_MINUTES="$(get_smart_test_duration "Extended")"
readonly EXTENDED_TEST_SECONDS="$(( EXTENDED_TEST_MINUTES * 60 ))"
# Maximum duration the completion status is polled
readonly POLL_TIMEOUT_HOURS=4
readonly POLL_TIMEOUT_SECONDS="$(( POLL_TIMEOUT_HOURS * 60 * 60))"
# Sleep interval between completion status polls
readonly POLL_INTERVAL_SECONDS=15
# Form log file names
readonly LOG_FILE="${LOG_DIR}/burnin-${DISK_MODEL}_${SERIAL_NUMBER}.log"
readonly BB_File="${LOG_DIR}/burnin-${DISK_MODEL}_${SERIAL_NUMBER}.bb"
################################################################################
# FUNCTIONS
################################################################################
##################################################
# Log informational message.
# Globals:
# LOG_FILE
# Arguments:
# Message to log.
# Outputs:
# Write message to stdout and log file.
##################################################
log_info() {
# now="$(date +"%F %T %Z")"
# printf "%s\n" "[${now}] $1" | tee -a "${LOG_FILE}"
printf "%s\n" "$1" | tee -a "${LOG_FILE}"
}
##################################################
# Log emphasized header message.
# Arguments:
# Message to log.
##################################################
log_header() {
log_info "+-----------------------------------------------------------------------------"
log_info "+ $1: $(date)"
log_info "+-----------------------------------------------------------------------------"
}
##################################################
# Ensure log directory exists and remove old logs.
# Globals:
# LOG_DIR
# LOG_FILE
# Arguments:
# None
##################################################
init_log() {
mkdir -p -- "${LOG_DIR}" || exit 2
[ -e "${LOG_FILE}" ] && rm -- "${LOG_FILE}"
}
##################################################
# Remove redundant messages from log.
# Globals:
# LOG_FILE
# OS_FLAVOR
# Arguments:
# None
##################################################
cleanup_log() {
if [ "${OS_FLAVOR}" = "Linux" ]; then
sed -i -e '/Copyright/d' "${LOG_FILE}"
sed -i -e '/=== START OF READ/d' "${LOG_FILE}"
sed -i -e '/SMART Attributes Data/d' "${LOG_FILE}"
sed -i -e '/Vendor Specific SMART/d' "${LOG_FILE}"
sed -i -e '/SMART Error Log Version/d' "${LOG_FILE}"
fi
if [ "${OS_FLAVOR}" = "FreeBSD" ]; then
sed -i '' -e '/Copyright/d' "${LOG_FILE}"
sed -i '' -e '/=== START OF READ/d' "${LOG_FILE}"
sed -i '' -e '/SMART Attributes Data/d' "${LOG_FILE}"
sed -i '' -e '/Vendor Specific SMART/d' "${LOG_FILE}"
sed -i '' -e '/SMART Error Log Version/d' "${LOG_FILE}"
fi
}
##################################################
# Log command in dry-run mode, run command otherwise.
# Globals:
# DRY_RUN
# Arguments:
# Command to run.
##################################################
dry_run_wrapper() {
if [ -z "$DRY_RUN" ]; then
log_info "DRY RUN: $*"
return 0
fi
eval "$@"
}
##################################################
# Log runtime information about current burn-in.
# Globals:
# HOSTNAME
# OS_FLAVOR
# DRIVE
# DISK_TYPE
# DISK_MODEL
# SERIAL_NUMBER
# SHORT_TEST_MINUTES
# SHORT_TEST_SECONDS
# EXTENDED_TEST_MINUTES
# EXTENDED_TEST_SECONDS
# LOG_FILE
# BB_File
# Arguments:
# None
##################################################
log_runtime_info() {
log_info "Host: ${HOSTNAME}"
log_info "OS: ${OS_FLAVOR}"
log_info "Drive: ${DRIVE}"
log_info "Disk Type: ${DISK_TYPE}"
log_info "Drive Model: ${DISK_MODEL}"
log_info "Serial Number: ${SERIAL_NUMBER}"
log_info "Short test duration: ${SHORT_TEST_MINUTES} minutes"
log_info " ${SHORT_TEST_SECONDS} seconds"
log_info "Extended test duration: ${EXTENDED_TEST_MINUTES} minutes"
log_info " ${EXTENDED_TEST_SECONDS} seconds"
log_info "Log file: ${LOG_FILE}"
log_info "Bad blocks file: ${BB_File}"
}
##################################################
# Poll repeatedly whether SMART self-test has completed.
# Globals:
# DRIVE
# POLL_INTERVAL_SECONDS
# POLL_TIMEOUT_SECONDS
# Arguments:
# None
# Returns:
# 0 if success or failure.
# 1 if timeout threshold exceeded.
##################################################
poll_selftest_complete() {
l_poll_duration_seconds=0
while [ "${l_poll_duration_seconds}" -lt "${POLL_TIMEOUT_SECONDS}" ]; do
smartctl --all "${DRIVE}" \
| grep -i "The previous self-test routine completed" > /dev/null 2>&1
l_status="$?"
if [ "${l_status}" -eq 0 ]; then
log_info "SMART self-test succeeded"
return 0
fi
smartctl --all "${DRIVE}" \
| grep -i "of the test failed\." > /dev/null 2>&1
l_status="$?"
if [ "${l_status}" -eq 0 ]; then
log_info "SMART self-test failed"
return 0
fi
sleep "${POLL_INTERVAL_SECONDS}"
l_poll_duration_seconds="$(( l_poll_duration_seconds + POLL_INTERVAL_SECONDS ))"
done
log_info "SMART self-test timeout threshold exceeded"
return 1
}
##################################################
# Run SMART test and log results.
# Globals:
# DRIVE
# LOG_FILE
# Arguments:
# Test type:
# - short
# - long
# Test duration in seconds.
##################################################
run_smart_test() {
log_header "Running SMART $1 test"
dry_run_wrapper "smartctl --test=\"$1\" \"${DRIVE}\""
log_info "SMART $1 test started, awaiting completion for $2 seconds ..."
dry_run_wrapper "sleep \"$2\""
dry_run_wrapper "poll_selftest_complete"
dry_run_wrapper "smartctl --log=selftest \"${DRIVE}\" | tee -a \"${LOG_FILE}\""
log_info "Finished SMART $1 test"
}
##################################################
# Run badblocks test.
# !!! ALL DATA ON THE DISK WILL BE LOST !!!
# Globals:
# BB_File
# DISK_TYPE
# DRIVE
# Arguments:
# None
##################################################
run_badblocks_test() {
log_header "Running badblocks test"
if [ "${DISK_TYPE}" != "SSD" ]; then
dry_run_wrapper "badblocks -b ${BB_B_ARG} -wsv -c ${BB_C_ARG} -e ${BB_E_ARG} -o \"${BB_File}\" \"${DRIVE}\""
else
log_info "SKIPPED: badblocks for ${DISK_TYPE} device"
fi
log_info "Finished badblocks test"
}
##################################################
# Log extensive SMART and non-SMART drive information.
# Globals:
# DRIVE
# LOG_FILE
# Arguments:
# None
##################################################
log_full_device_info() {
log_header "Drive information"
dry_run_wrapper "smartctl --xall --vendorattribute=7,hex48 \"${DRIVE}\" | tee -a \"${LOG_FILE}\""
}
##################################################
# Main function of script.
# Globals:
# SHORT_TEST_SECONDS
# EXTENDED_TEST_SECONDS
# Arguments:
# None
##################################################
main() {
init_log
log_header "Started burn-in"
log_runtime_info
# test sequence
run_smart_test "short" "${SHORT_TEST_SECONDS}"
run_badblocks_test
run_smart_test "long" "${EXTENDED_TEST_SECONDS}"
log_full_device_info
log_header "Finished burn-in"
cleanup_log
}
# Entrypoint
main
```
# Truenas-Installation mit Partitionierung in boot und data
Am Besten nur die Festplatten anschließen, die als boot verwendet werden sollen.
Bootfähigen USB-Stick mit Truenas Scale-Image/Iso erstellen.
PC neu starten und vom USB-Stick booten.
Im ersten Auswahlmenü 'Truenas Installer' auswählen
Im nächsten Menü mit 4 Unterpunkten 'shell' auswählen
1. Truenas-Installationsskript anpassen. Folgende Befehle in der shell: ```bash
# Pfeiltasten aktivieren
bash
# truenas-install Skript finden
find / -name truenas-install
# vi editor nutzen :(
vi /usr/sbin/truenas-install
# Folgende Code-Zeile finden (ca. line 386).
# In vi mit ':.=" Current Line unten anzeigen
...
create_partition()
{
...
# Create boot pool
if ! sgdisk -n3:0:0 -t3:BF01 /dev/${_disk}; then
return 1
fi
...
#Partitionierung in 64GiB disk.
# Nachfolgende Befehle fürs editieren nutzen:
# Vi-Tastenbefehle: 'x' löschen an cursor-Stelle
# 'i' edit mode
# 'u' undo, falls irgendwas verkackt mit der Zeile
# 'ESC' exit edit mode
# ':wq:' eingeben zum Änderung zu speichern
...
# Create boot pool
if ! sgdisk -n3:0:+64GiB -t3:BF01 /dev/${_disk}; then
return 1
fi
...
# Skript ausführen
/usr/sbin/truenas-install
```
2. Install/Upgrade auswählen und Festplatten für Installation auswählen (Ich hatte 2 Festplatten fürs mirroring). Installer folgen.
3. Restlichen Speicher der Festplatte partitionieren und zu einem Pool hinzufügen. Nach der Installation von Truenas muss in der GUI SSH unter Einstellungen -> Services aktiviert werden. Ich habe den Root-Account genutzt für die nachfolgenden Befehle (ggfls. Password unter Credentials -> Local users -> root setzen). ```bash
# Boot-Pool ausfindig machen
zpool status boot-pool
# +
fdisk -l
# Bei den boot-Laufwerken sollten 3 Unterpartitionen (4 wenn Swap eingerichtet wurde) zu sehen sein z.b. /dev/sda1, /dev/sda2, /dev/sda3 ...). Bei mir waren die beiden Festplatten als sda und sdb bezeichnet.
# no swap
sgdisk -n4:0:0 -t4:BF01 /dev/sda
sgdisk -n4:0:0 -t4:BF01 /dev/sdb
# swap
sgdisk -n5:0:0 -t5:BF01 /dev/sdX
sgdisk -n5:0:0 -t5:BF01 /dev/sdY
# update the linux kernel table
partprobe
# UUID der neuen Partition herausfinden
fdisk -lx /dev/sda
fdisk -lx /dev/sdb
# Beispiel der Konsolenausgabe
Device Start End Sectors Type-UUID UUID Name Attrs
/dev/sdb1 4096 6143 2048 21686148-6449-6E6F-744E-656564454649 3EDDE409-829A-4CFD-AD28-E76FADAD9D40 LegacyBIOSBootable
/dev/sdb2 6144 1054719 1048576 C12A7328-F81F-11D2-BA4B-00A0C93EC93B EEDB9E96-BF0B-4CF3-9D86-7032C6BC8C09
/dev/sdb3 1054720 134217728 133163009 6A898CC3-1DD2-11B2-99A6-080020736631 14F8F26A-EA8E-484A-9AEF-C82DAEC27D58
/dev/sdb4 134219776 976773134 842553359 6A898CC3-1DD2-11B2-99A6-080020736631 AE77275A-6B71-4FC1-917B-B3C6C995AC8F
# zpool erstellen
# [uuid_from fdisk -lx disk1] von sda4 bzw. sdb4 = Spalte UUID = AE77275A-6B71-4FC1-917B-B3C6C995AC8F
# Achtung: UUID ist case-sensitive. Ich musste alle Buchstaben klein schreiben, weil die Partitionsordner im Verzeichnis '/dev/dis/by-partuuid/' ebenfalls kleingeschrieben waren.
# Kann mit 'cd /dev/dis/by-partuuid/' und 'ls' gecheckt werden
zpool create -f ssd-storage mirror /dev/disk/by-partuuid/[uuid_from fdisk -lx disk1] /dev/disk/by-partuuid/[uuid_from fdisk -lx disk2]
# zpool exportieren
zpool export ssd-storage
```
4. ssd-storage in der webGUI importieren. Dazu unter 'Storage -> Import-Pool' oben anklicken und ssd-storage sollte da zu sehen sein!
# Truenas VM mit bridge für VMs
#### Bridge erstellen
Vor oder nach dem Erstellen der VM, brdige mode konfigurieren::
##### [https://www.truenas.com/docs/scale/scaletutorials/virtualization/accessingnasfromvm/](https://www.truenas.com/docs/scale/scaletutorials/virtualization/accessingnasfromvm/)
#### Iso-Image hochladen
Ordner für Image muss Lese-Berechtigung für local user 'libvirt-qemu' haben, z.B. extra image-dataset erstellen und für 'libvirt-qemu' freigeben.
!!!Achtung: Bei mir musste ich die ISO auf einen anderen pool kopieren, sonst stuck in der VM shell gewesen (möglicherweise wegen Partionierung in ssd-boot und ssd-storage).
[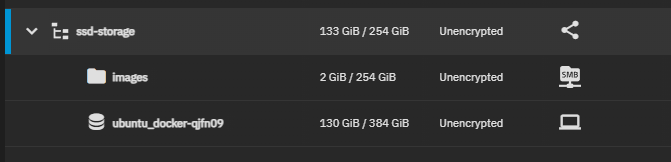](https://wiki.folkerts.it/uploads/images/gallery/2023-07/LgWimage.png)
#### VM erstellen
Einstellung nach Wunsch. Meine Settings:
[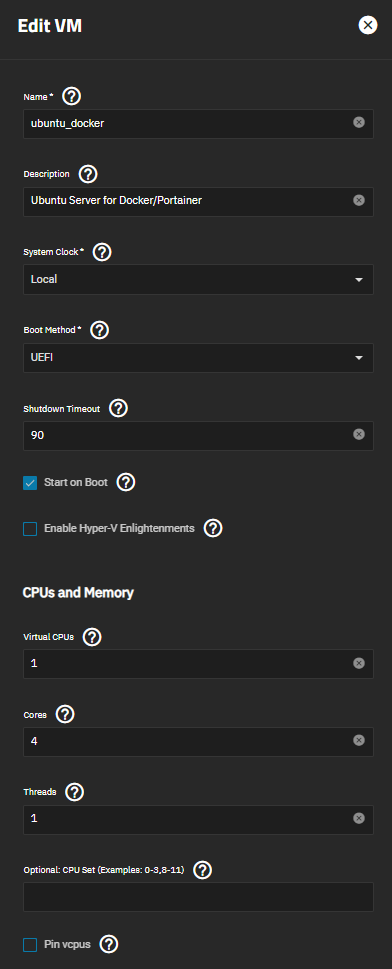](https://wiki.folkerts.it/uploads/images/gallery/2023-07/9Xdimage.png)[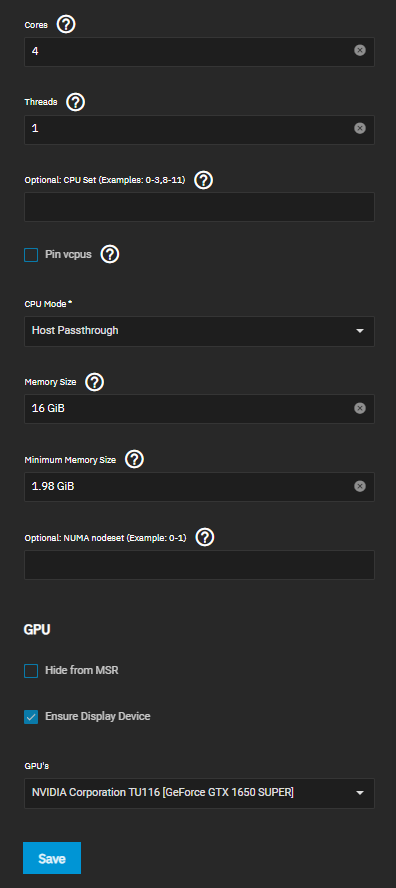](https://wiki.folkerts.it/uploads/images/gallery/2023-07/mdvimage.png)
NIC und DISK:
Bei NIC ist hier der bridge bereits konfiguriert worden. Beim erstmaligen Erstellen der VM einfach irgendwas auswählen, wenn kein br0 verfügbar.
[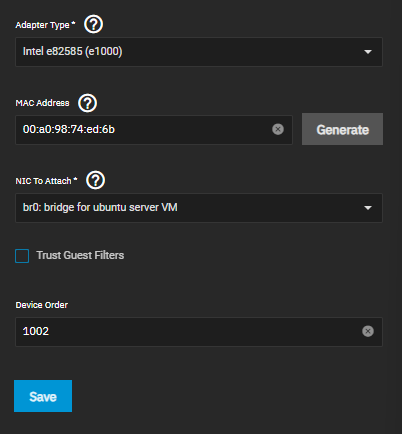](https://wiki.folkerts.it/uploads/images/gallery/2023-07/7aximage.png)[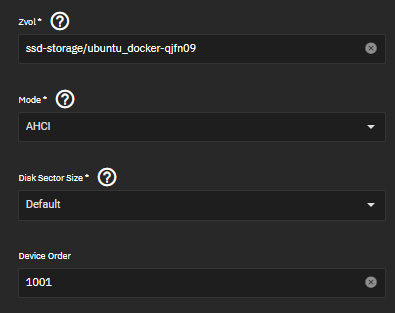](https://wiki.folkerts.it/uploads/images/gallery/2023-07/M0Ximage.png)
# Disk Spindown Script + Check Status
Scale Skript:
[https://github.com/ngandrass/truenas-spindown-timer#tested-truenas--freenas-versions](https://github.com/ngandrass/truenas-spindown-timer#tested-truenas--freenas-versions)
CLI:
```bash
# Shows last status. IDLE_A,_B standby, IDLE_Z=spindown
for drive in /dev/sd?; do smartctl --nocheck standby -i $drive | grep '^Power mode was:'; echo $drive; done
# Smart Attribute ausgeben
smartctl -a /dev/sda
```
# Boot-Partition der VM vergrößern/wiederherstellen
Falls beim Vergrößern der Partition verkackt, SystemRescue downloaden und in der VM in CD-Rom Laufwerk einbinden.
```bash
# QEMU-Fenster öffnen und Systemrescue mit default-options starten
# Testdisk starten
testdisk
# Laufwerk auswählen
disk /dev/sda
# Partition table type
EFI GPT
# Fehlersuche und Partition wiederherstellen
Analyse
```
Partition vergrößern (noch nicht getestet):
[https://www.truenas.com/community/threads/expanding-vm-disk-size.104040/](https://www.truenas.com/community/threads/expanding-vm-disk-size.104040/)
https://unix.stackexchange.com/questions/134796/how-to-increase-the-size-of-dev-sda2-in-suse-running-on-vmware
# Nextcloud über Docker/Portainer in TrueNAS-Ubuntu-VM
1. #### NFS-Freigabe
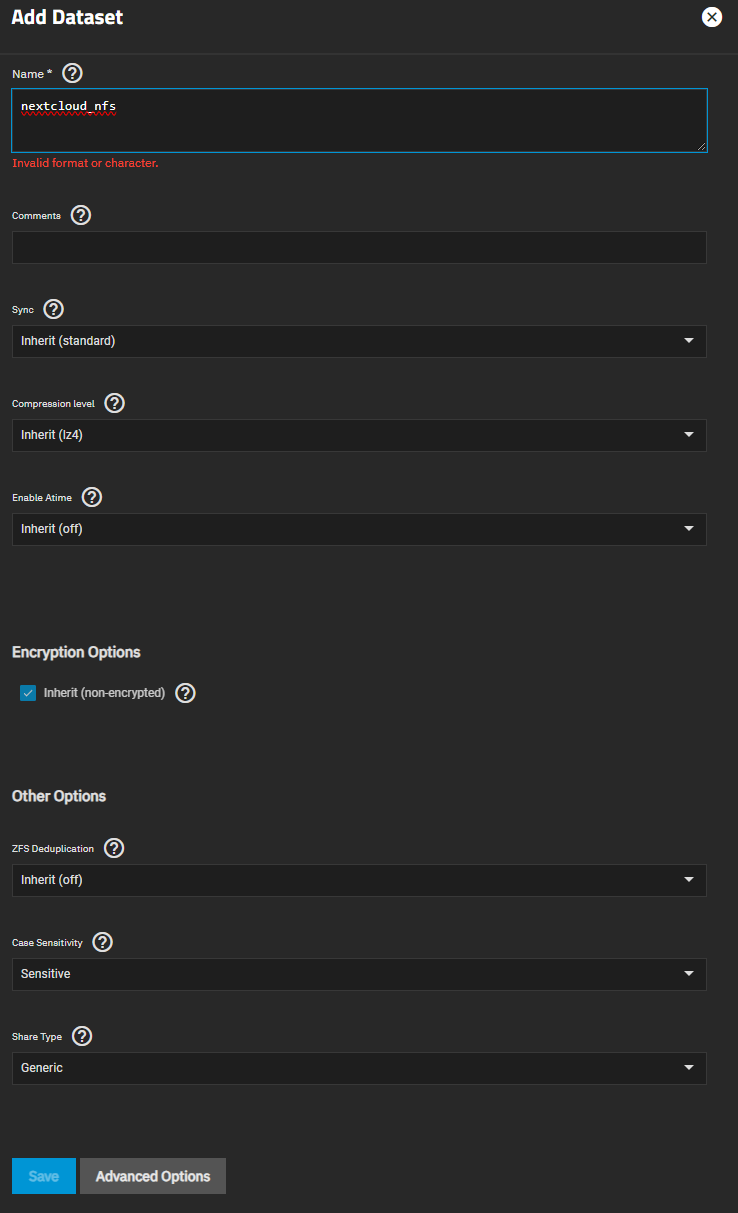
Um die Daten von Nextcloud auf dem NAS auszulagern, muss ein Dataset für Nextcloud angelegt und über eine NFS-Freigabe mit dem Benutzer 'www-data' als Besitzer gemountet werden.
- Dataset erstellen (TrueNAS -> Dataset -> Add Dataset): Share Type: Generic
[](https://wiki.folkerts.it/uploads/images/gallery/2023-09/bPaimage.png)
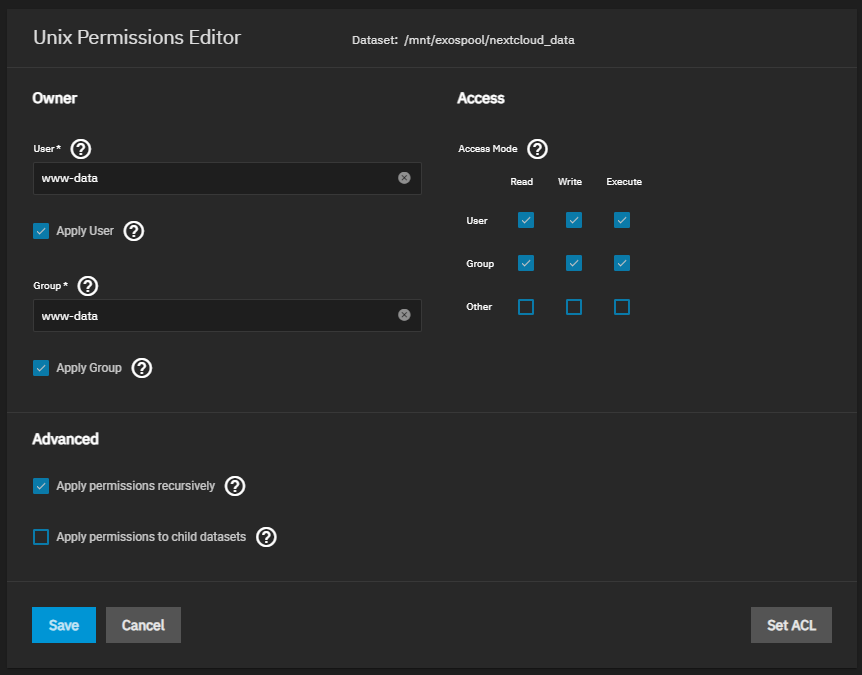
- Permissions/Rechte vom Dataset auf www-data ändern (TrueNAS -> Dataset -> Permissions -> Edit):
Apply User/Group und sicherheitshalber recursively anlicken
[](https://wiki.folkerts.it/uploads/images/gallery/2023-09/Trzimage.png)
- NFS Share Share für Ordner einstellen und aktivieren (TrueNAS -> Shares -> NFS): [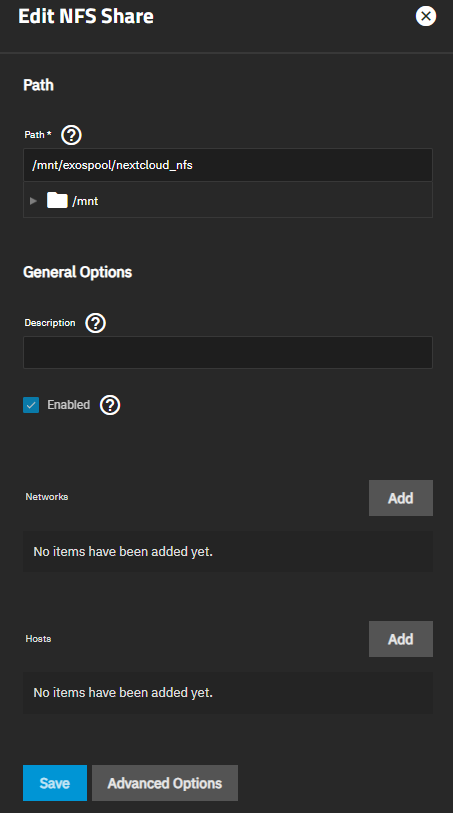](https://wiki.folkerts.it/uploads/images/gallery/2023-09/kW0image.png)
2. #### Docker-Compose File
Quelle: [https://hub.docker.com/\_/nextcloud/](https://hub.docker.com/_/nextcloud/):
"This setup provides **no ssl encryption** and is intended to run behind a proxy."
Passwörter eintragen NICHT VERGESSEN:
```yaml
version: '2'
volumes:
nextcloud:
db:
nextcloud_nfs:
driver: local
driver_opts:
type: "nfs"
o: "addr=192.168.178.201,nolock,soft,rw"
device: ":/mnt/exospool/nextcloud_data"
services:
db:
image: mariadb:10.6
restart: always
command: --transaction-isolation=READ-COMMITTED --log-bin=binlog --binlog-format=ROW
volumes:
- db:/var/lib/mysql
environment:
- MYSQL_ROOT_PASSWORD=
- MYSQL_PASSWORD=
- MYSQL_DATABASE=nextcloud
- MYSQL_USER=nextcloud
app:
image: nextcloud
restart: always
ports:
- 8180:80
links:
- db
volumes:
- nextcloud:/var/www/html
- nextcloud_nfs:/var/www/html/data
# Optional, wenn Apps, etc. auch auf NAS gespeichert werden soll. Ich habe auf SSD gelassen.
# Schreibt aber direkt ins Stammverzeichnis (unordentlich). Ggfls. Subdatasets?
#- clouddata_nfs:/var/www/html Main folder, needed for updating
#- clouddata_nfs:/var/www/html/custom_apps installed / modified apps
#- clouddata_nfs:/var/www/html/config local configuration
#- clouddata_nfs:/var/www/html/data the actual data of your Nextcloud
#- clouddata_nfs:/var/www/html/themes/ theming/branding
environment:
- MYSQL_PASSWORD=
- MYSQL_DATABASE=nextcloud
- MYSQL_USER=nextcloud
- MYSQL_HOST=db
```
3. #### Zulässige Domain in nextcloud config.php hinzufügen
z.B. Putty + nano /var/lib/docker/volumes/nextcloud\_nextcloud/\_data/config/config.php
```php
...
'trusted_domains' =>
array (
0 => '192.168.178.202:8180',
1 => 'mynextcloud.domain.de'
),
...
```
4. #### Sicherheitsfehler: "You are accessing your instance over a secure connection, however your instance is generating insecure URLs."
Folgenden Zeilen in nextcloud config.php hinzufügen
```php
...
'trusted_proxies' =>
array (
0 => 'mynextcloud.domain.de',
),
'overwrite.cli.url' => 'https://mynextcloud.domain.de',
'overwriteprotocol' => 'https',
...
```