Linux
- Ubuntu Server Installation: Static IP
- Ubuntu Netplan Static IP
- .deb package forcieren
- Eigene Applikation erstellen
- .AppImage Dateien dauerhaft installieren
- SD-Karte formatieren
- CPU Stresstest Linux
- Java unter Linux mit sdkman installieren
- Screen shortcuts
- Ubuntu Server root pw
- ctop unter Ubuntu 24.04 (Noble Numbat) installieren
- Hetzner apt update: failed to fetch
- Basiskonfiguration Ubuntu vServer
- Große Ordner löschen (rm -rf)
- rclone: OneDrive, SFTP & Co. unter Linux einrichten
- rsync
- LVM resize
- Intel N150 GPU aktivieren: Kernel-Update
- Cloud-init
- sshfs
- Desktop Environment + VNC für Ubuntu Server installieren
- SSH: Permissions too open
- Zorin OS
- CLI-Tools
- Zeitzone ändern
- scp
- SSH Keys & SSH-Config
- GMKTec EVO-X2
- Proxmox PVE statische IP
- SSH-Agent mit Bitwarden
- Omarchy
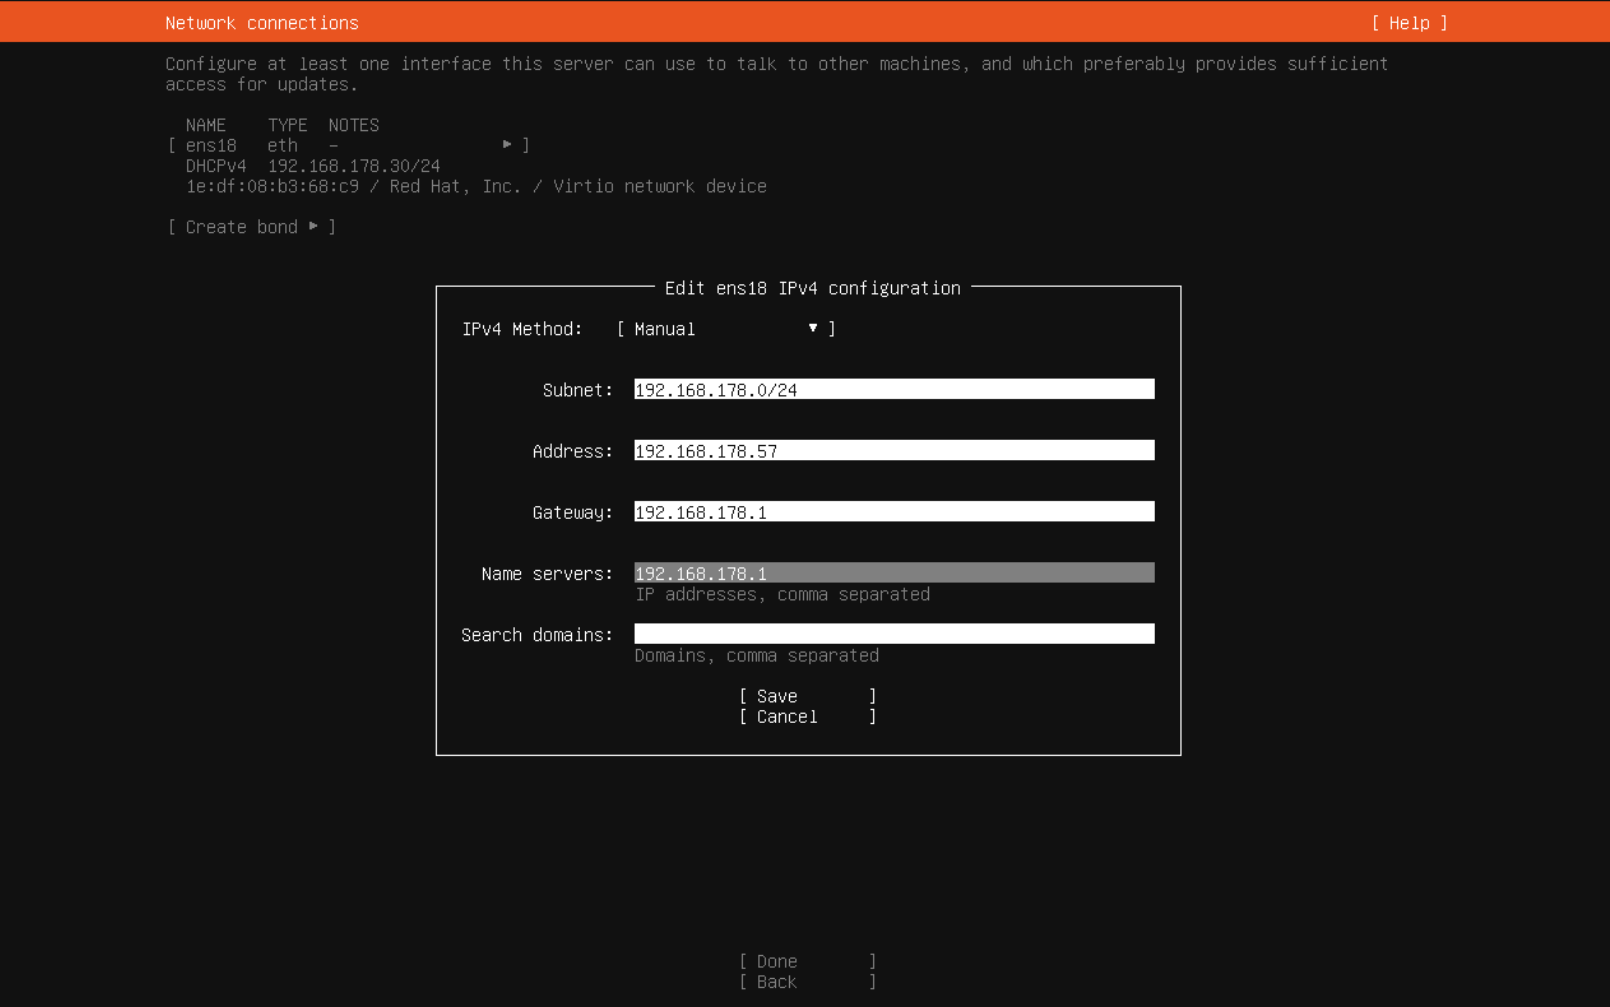
Ubuntu Server Installation: Static IP
Statische IP bei der Ubuntu Server Installation am Beispiel Ubuntu Server LTS 22.04.2
Ubuntu Netplan Static IP
Statische IP-Adresse und AdGuard als DNS-Server:
(Dateiname egal, auch mal unter /lib/netplan oder /run/netplan gucken ob da was liegt)
/etc/netplan/00-installer-config.yaml (oder /etc/netplan/50-cloud-init.yaml oder was auch immer)
network:
ethernets:
enp3s0:
addresses:
- 192.168.1.10/24
dhcp6: false
routes:
- to: default
via: 192.168.1.1
nameservers:
addresses:
- 192.168.1.1
- 8.8.8.8
search: []
optional: true
version: 2sudo netplan generate um die noetigen config-Dateien zu generieren
sudo netplan try zum testen der config
sudo netplan apply zum anwenden
alt noch mit gateway4 (deprecated):
# This is the network config written by 'subiquity'
network:
renderer: networkd
version: 2
ethernets:
ens18:
addresses:
- 192.168.1.71/24
gateway4: 192.168.1.1
nameservers:
addresses: [192.168.1.78]
die config funktionierte nach dem Einrichten des Adguard Werbeblockers nicht mehr. Nachdem ichrenderer: networkd hinzugefuegt habe, ging es. Alternativ wird der GUI Network-Renderer 'NetworkManager' verwendet
quellen
https://linuxconfig.org/how-to-configure-static-ip-address-on-ubuntu-18-04-bionic-beaver-linux
https://wiki.ubuntuusers.de/Netplan/
.deb package forcieren
Fehlermeldung bei
sudo apt install ./nvim-linux64.deb
trying to overwrite '/usr/share/applications/nvim.desktop', which is also in package neovim-runtime 0.6.1-3
dpkg-deb: error: paste subprocess was killed by signal (Broken pipe)
Loesung:
sudo dpkg -i --force-overwrite ./nvim-linux64.debquelle: https://askubuntu.com/a/1062184
Eigene Applikation erstellen
zb Postman:

*.desktop File unter /usr/share/applications erstellen:

[Desktop Entry]
Encoding=UTF-8
Name=Postman
Exec=/path/to/Downloads/Postman/app/Postman %U
Icon=/path/to/Downloads/Postman/app/resources/app/assets/icon.png
Terminal=false
Type=Application
Categories=Development;
Erfolg

.AppImage Dateien dauerhaft installieren
https://github.com/TheAssassin/AppImageLauncher
https://github.com/TheAssassin/AppImageLauncher/wiki/Install-on-Ubuntu-or-Debian
AppImageLauncher installieren:
sudo apt install software-properties-common
sudo add-apt-repository ppa:appimagelauncher-team/stable
sudo apt update
sudo apt install appimagelauncherSD-Karte formatieren
Mit
df -hdie device ID herausfinden:
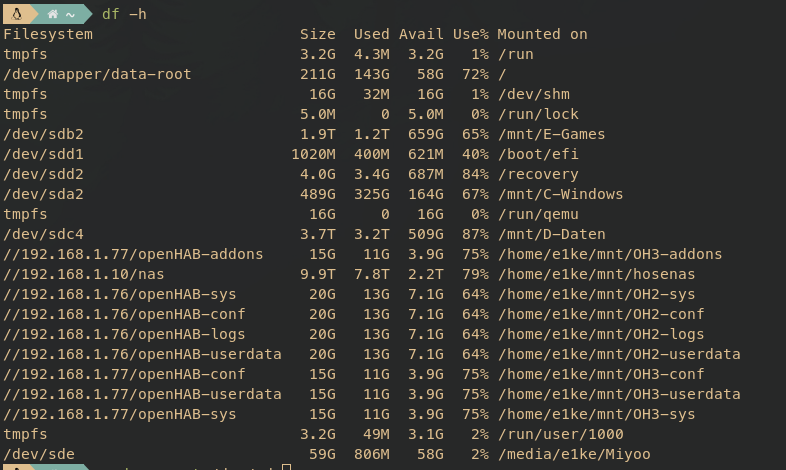
fdisk verwenden, falls unklar:
fdisk -ldann mit
sudo umount /dev/sdedie SD-Karte auswerfern, danach mit
sudo mkfs.vfat -n 'Miyoo' -I /dev/sdedie Karte als FAT32 formatieren

HINWEIS:
mkfs.vfat = FAT32
mkfs.ntfs = NTFS
mkfs.ext4 = EXT4
CPU Stresstest Linux
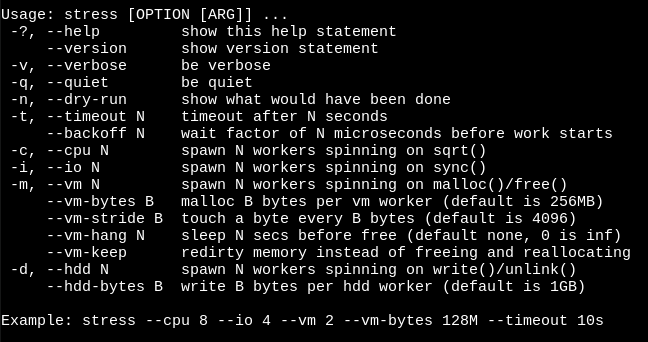
apt install stress
stress --cpu 6 --timeout 10
Java unter Linux mit sdkman installieren

curl -s "https://get.sdkman.io" | bash
source "/home/e1ke/.sdkman/bin/sdkman-init.sh"
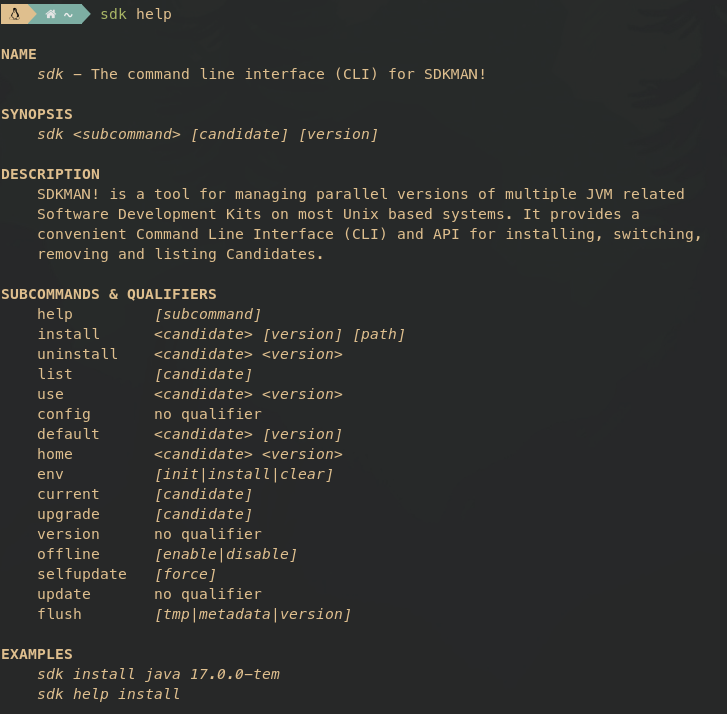
sdk list java
dann zb
sdk install java 11.0.20-tem
Screen shortcuts
https://wiki.ubuntuusers.de/Screen/
Screen erstellen:
screen -S MeinScreen
Aus Screen detachen:
STRG+A, danach D
Screens auflisten:
screen -ls
in Screen eintauchen:
screen -rx MeinScreen
Ubuntu Server root pw
sudo passwd root
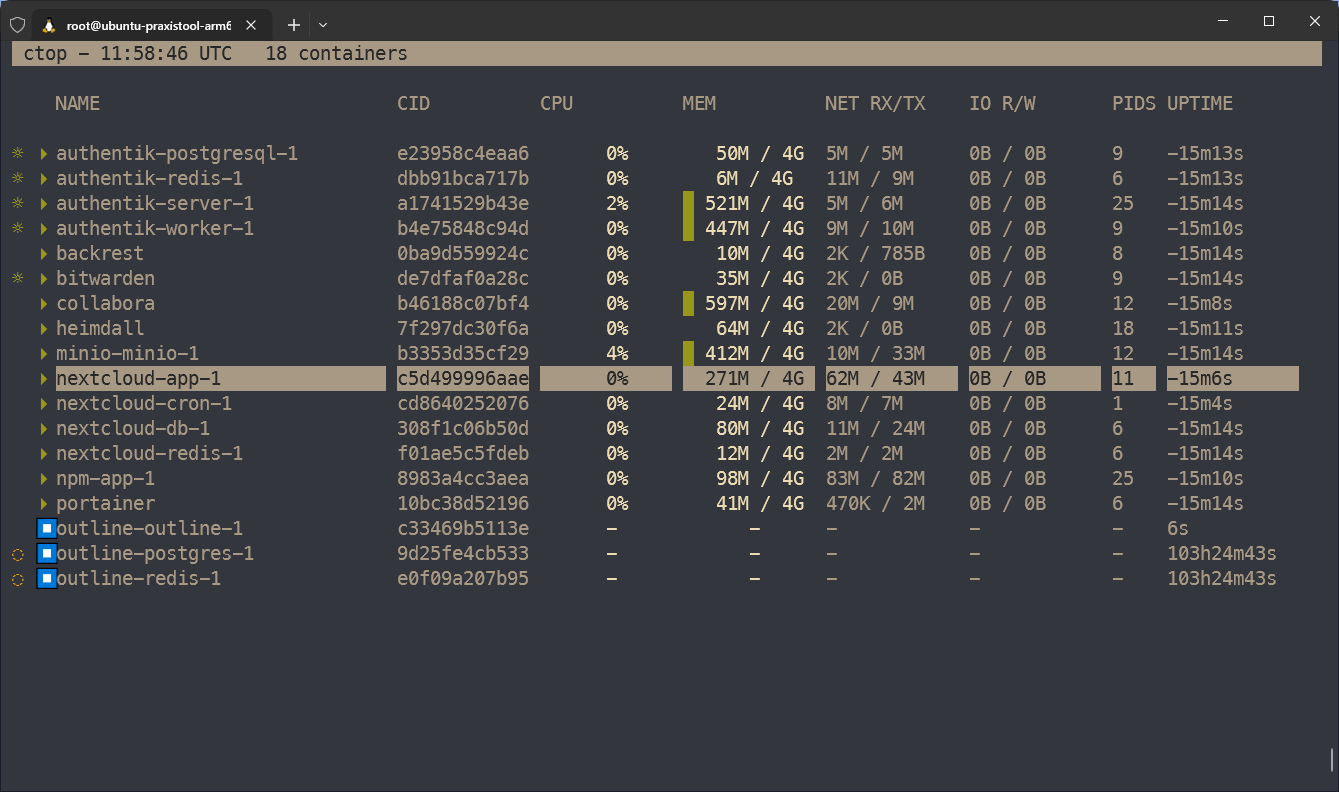
ctop unter Ubuntu 24.04 (Noble Numbat) installieren
Obacht: ctop ist veraltet, verwende daher lazydocker oder gomanagedocker stattdessen.
Obacht: die offizielle Installationsmethode klappt nicht (siehe unten). Verwende stattdessen folgende Befehle:
ctop
#arm:
sudo wget https://github.com/bcicen/ctop/releases/download/v0.7.7/ctop-0.7.7-linux-arm64 -O /usr/local/bin/ctop
#amd64:
sudo wget https://github.com/bcicen/ctop/releases/download/v0.7.7/ctop-0.7.7-linux-amd64 -O /usr/local/bin/ctop
#kann auch sein, dass es in /usr/bin/ctop (ohne local) muss also
#arm:
sudo wget https://github.com/bcicen/ctop/releases/download/v0.7.7/ctop-0.7.7-linux-arm64 -O /usr/bin/ctop
#amd64:
sudo wget https://github.com/bcicen/ctop/releases/download/v0.7.7/ctop-0.7.7-linux-amd64 -O /usr/bin/ctopsudo chmod +x /usr/local/bin/ctop
#bzw.
sudo chmod +x /usr/bin/ctopctop=
Problem mit offizieller Installationsanleitung
Befehl zum installieren von https://github.com/bcicen/ctop
sudo apt-get install ca-certificates curl gnupg lsb-release
curl -fsSL https://azlux.fr/repo.gpg.key | sudo gpg --dearmor -o /usr/share/keyrings/azlux-archive-keyring.gpg
echo \
"deb [arch=$(dpkg --print-architecture) signed-by=/usr/share/keyrings/azlux-archive-keyring.gpg] http://packages.azlux.fr/debian \
$(lsb_release -cs) main" | sudo tee /etc/apt/sources.list.d/azlux.list >/dev/null
sudo apt-get update
sudo apt-get install docker-ctopFehlermeldung
root@ubuntu-praxistool-arm64:~# sudo apt-get update
Hit:1 https://mirror.hetzner.com/ubuntu/packages noble InRelease
Hit:2 https://mirror.hetzner.com/ubuntu/packages noble-updates InRelease
Hit:3 https://mirror.hetzner.com/ubuntu/packages noble-backports InRelease
Hit:4 https://mirror.hetzner.com/ubuntu/security noble-security InRelease
Hit:5 https://download.docker.com/linux/ubuntu noble InRelease
Ign:6 http://packages.azlux.fr/debian noble InRelease
Err:7 http://packages.azlux.fr/debian noble Release
404 Not Found [IP: 2a01:728:401:1c::100 80]
Reading package lists... Done
E: The repository 'http://packages.azlux.fr/debian noble Release' does not have a Release file.
N: Updating from such a repository can't be done securely, and is therefore disabled by default.
N: See apt-secure(8) manpage for repository creation and user configuration details.Hetzner apt update: failed to fetch
Fehler bei apt update auf einem Hetzner arm Server:
E: Failed to fetch https://mirror.hetzner.com/ubuntu/packages/dists/jammy-updates/main/binary-arm64/Packages 404 Not Found [IP: 2a01:4ff:ff00::3:3 443]
E: Failed to fetch https://mirror.hetzner.com/ubuntu/packages/dists/jammy-backports/main/binary-arm64/Packages 404 Not Found [IP: 2a01:4ff:ff00::3:3 443]
E: Failed to fetch https://mirror.hetzner.com/ubuntu/security/dists/jammy-security/main/binary-arm64/Packages 404 Not Found [IP: 2a01:4ff:ff00::3:3 443]
E: Some index files failed to download. They have been ignored, or old ones used instead.Lösung:
https://www.reddit.com/r/hetzner/comments/1f3iz9f/e_failed_to_fetch_httpsmirrorhetzner_when_doing/
Fixed with this:
Run command:
sudo nano /etc/apt/sources.list.d/ubuntu.sources
Scroll down until you find URI:s like this:
URIs: https://mirror.hetzner.com/ubuntu/packages
URIs: https://mirror.hetzner.com/ubuntu/security
Change them to:
URIs: https://mirror.hetzner.com/ubuntu-ports/packages
URIs: https://mirror.hetzner.com/ubuntu-ports/security
ctrl x to save the file and press y if asked
Now doing updates should work.
>>
I had to edit the `/etc/apt/sources.list` file instead of `/etc/apt/sources.list.d/ubuntu.sources` in the Arm based Ubuntu Machine that I was running.
Posting this as it might help someone.also nano /etc/apt/sources.list > alle links mit hetzner.com/ubuntu/... in .../ubuntu-ports/... ändern
Basiskonfiguration Ubuntu vServer
aktualisiert am 09.12.25
Passwort und SSH
apt update
apt upgrade
passwd
vim /etc/ssh/sshd_config #rauten weg bei permitrootlogin prohibit-password, strictmode yes und pubkeyaut yes
Docker
curl -fsSL https://get.docker.com -o get-docker.sh
sudo sh get-docker.shalternativ über apt:
# Add Docker's official GPG key:
sudo apt-get update
sudo apt-get install ca-certificates curl
sudo install -m 0755 -d /etc/apt/keyrings
sudo curl -fsSL https://download.docker.com/linux/ubuntu/gpg -o /etc/apt/keyrings/docker.asc
sudo chmod a+r /etc/apt/keyrings/docker.asc
# Add the repository to Apt sources:
echo \
"deb [arch=$(dpkg --print-architecture) signed-by=/etc/apt/keyrings/docker.asc] https://download.docker.com/linux/ubuntu \
$(. /etc/os-release && echo "${UBUNTU_CODENAME:-$VERSION_CODENAME}") stable" | \
sudo tee /etc/apt/sources.list.d/docker.list > /dev/null
sudo apt-get update
sudo apt-get install docker-ce docker-ce-cli containerd.io docker-buildx-plugin docker-compose-pluginFail2Ban
apt install fail2ban
cp /etc/fail2ban/jail.conf /etc/fail2ban/jail.local
vim /etc/fail2ban/jail.local
systemctl start fail2ban.service
systemctl enable fail2ban.service
Portainer
#FIREWALL VORHER KONFIGURIEREN, SODASS KEIN ANDERER AUF DIE PORTAINER WEB-UI KOMMT
#--> Port 9443 nur von meiner pub-ip erreichbar machen
docker volume create portainer_data
docker run -d -p 8000:8000 -p 9443:9443 --name portainer --restart=always -v /var/run/docker.sock:/var/run/docker.sock -v portainer_data:/data portainer/portainer-ce:lts
Große Ordner löschen (rm -rf)
Mit rm (inklusive Fortschrittsanzeige und Log)
Eikes Variante, um nur den Inhalt zu löschen und nicht den Ordner selbst (/* am Ende des Pfades hinter den Anführungszeichen):
rm -rfv "/ordner/mit/leerzeichen dazwischen/testordner"/* | pv -l -s $( du -a "/ordner/mit/leerzeichen dazwischen/testordner"/* | wc -l ) > /dev/null
I get the progress bar using pv command line Pipe Viewer
This is the command
rm -rv DIR_OR_FILE_NAME | pv -l -s $( du -a DIR_OR_FILE_NAME | wc -l ) > /dev/null
If you need root permissions for the dir or file to delete,
sudo rm -rv DIR_OR_FILE_NAME | pv -l -s $( sudo du -a DIR_OR_FILE_NAME | wc -l ) > /dev/null
-
rm -rv:-rto recursively remove DIRs and files.-vverbose it lists all the files and directories that is removing. -
pv -l -s:-lto count lines instead of bytes.-sset the total lines to be removed. -
$( du -a <dir_or_file> | wc -l ):du -areturns a list all files and directories from the dir specified.wc -lreturns the count of lines outputted bydu -a. -
> /dev/null: send the output ofrm -rvto nowhere.
rclone: OneDrive, SFTP & Co. unter Linux einrichten
rclone: rsync für Cloud Storage
Obacht! Nicht apt install rclone verwenden, weil alte Version, sondern zum installieren:
sudo -v ; curl https://rclone.org/install.sh | sudo bashEikes cmd mit Datum+Uhrzeit im Logfile + leere Verzeichnisse mitsynchronisieren:
rclone sync onedrive-pl: /mnt/praxis-volume-01/onedrive-pl --log-file /home/onedrive-rclone-sync/log_$(date +'%Y-%m-%d_%H-%M-%S').txt --log-level INFO --create-empty-src-dirs --progress1) onedrive mit rclone konfigurieren
rclone configfür OneDrive folgende Anleitung verwenden:
2) auflisten der dateien mit
# alle ordner in top-level onedrive auflisten
rclone lsd onedrive-pl:
# alle dateien gesamt auflisten (abbrechen mit STRG+C)
rclone ls onedrive-pl:
# alle mit mir geteilten ordner anzeigen
rclone lsf onedrive-pl: --drive-shared-with-me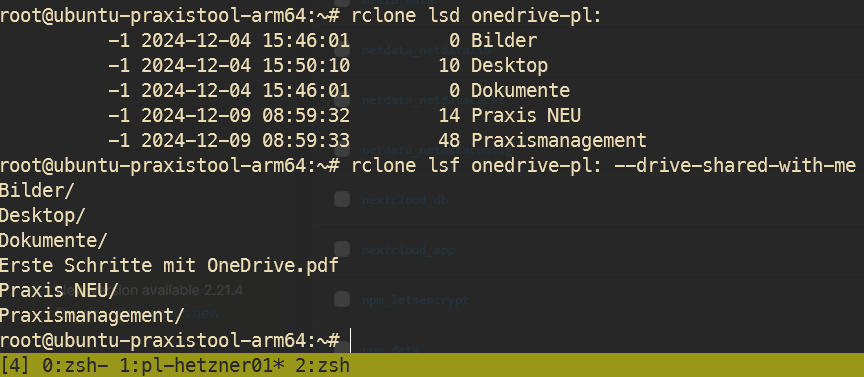
3) synchronisieren zu pfad
rclone sync onedrive-pl: /lokaler/pfad --drive-shared-with-meoder mit Bandbreitenbegrenzung:
rclone sync onedrive-pl: /lokaler/pfad --drive-shared-with-me --bwlimit 10M --progressoder erstmal als dry run (testdurchlauf)
rclone sync onedrive-pl: /lokaler/pfad --drive-shared-with-me --bwlimit 10M --progress --dry-runoder mit logfile
rclone sync onedrive-pl: /lokaler/pfad --drive-shared-with-me --bwlimit 10M --log-file /path/to/log.txt --log-level INFO --progressmounten
rclone mount sftp-remote-01:/ /mnt/rclone-sftp/remote-01 --vfs-cache-mode writes --daemonhttps://rclone.org/commands/rclone_mount/
Troubleshoot
fusermount: user has no write access to mountpoint /data
fusermount3: user has no write access to mountpoint /mnt...
https://github.com/tynor88/docker-rclone-mount/issues/2#issuecomment-470129261
Lösung: chmod 777 /mnt/disks/rclone_volume
VolumeDriver.Mount: failed to mount FUSE fs: fusermount: exec: "fusermount3": executable file not found in $PATH
https://github.com/rclone/rclone/issues/6844#issuecomment-1474183838
Lösung: sudo apt install fuse3
failed to parse private key file: ssh: key is not password protected
Lösung: aktuellste Version von rclone installieren
rsync
rsync ist ein Tool, um Dateien zu kopieren.
zum Testen kann ein --dry-run am Ende des cmd angefügt werden
rsync -aPh --info=progress2 --info=name0 --ignore-existing --log-file=/home/root/rsync.log "/mnt/START" "/mnt/ZIEL"oder auch
rsync -aPhzv --delete --info=progress2 --bwlimit=2048 --log-file="/home/rsync_$(date +'%Y-%m-%d_%H-%M').log" --exclude data/pl-admin --exclude data/appdata_ockpw9aiwppb /mnt/praxis-volume-01/docker-data/volumes/nextcloud_db/_data/ /mnt/pl-hz-03/mnt/praxis-volume-03/docker-data/volumes/nextcloud_db/_data/Eikes Empfehlung für Spiegelung:
rsync -aPhv --info=progress2 --log-file="/home/rsync_$(date +'%Y-%m-%d_%H-%M').log" /mnt/volume-01/docker-data/volumes/ /mnt/volume-02/docker-data/volumes/Eikes Empfehlung für Kopiervorgang (vorhanden Dateien im Zielverzeichnis bleiben erhalten):
rsync -aPhv --info=progress2 --ignore-existing --log-file="/home/rsync_$(date +'%Y-%m-%d_%H-%M').log" /mnt/volume-01/docker-data/volumes/ /mnt/volume-02/docker-data/volumes/zwischen zwei SSH-Clients ⚠ FALSCH, GEHT NICHT MIT ZWEI REMOTES, NIMM SCP STATTDESSEN (siehe scp Eintrag hier im Wiki)
rsync -aPhv --info=progress2 --ignore-existing --log-file="~/rsync_$(date +'%Y-%m-%d_%H-%M').log" -e ssh root@1.2.3.3:/pfad/zum/quellordner/ root@1.2.3.4:/pfad/zum/zielordnerNextcloud Übertragung:
rsync -aPhv --info=progress2 --log-file="/home/rsync_$(date +'%Y-%m-%d_%H-%M').log" --exclude Joplin-Sync /mnt/fn-volume-01/docker-data/volumes/nextcloud_app/_data/data/Eike/files/ /mnt/fn-volume-02/docker-data/volumes/nextcloud_aio_nextcloud_data/_data/Eike/files/
Erklärung:
-
-a→ Archiv-Modus (rekursiv, Rechte, Zeit, Symlinks etc.) -
-P→ Fortschritt je Datei & abgebrochene Übertragungen fortsetzen -
-h→ „Human readable“ Größenangaben (z.B. 4.3M) -
-z→ Komprimiert Daten bei Übertragung -
-v→ „Verbose“ Ausgabe (mehr Infos) -
--bwlimit=2048→ Limitert die Übertragungsgeschwindigkeit auf zb 2048 Kilobyte/s (2 MB/s), gut für SSH oder tagsüber -
--info=progress2→ Zeigt Gesamtfortschritt aller Dateien -
--perms→ Überträgt die Datei-Berechtigungen (explizit, steckt aber schon in-a) -
--times→ Überträgt die Änderungszeit (auch schon in-a) -
--log-file="/home/rsync_$(date +'%Y-%m-%d_%H-%M').log"→ Schreibt ein Logfile - ENTWEDER:
-
--delete→ Löscht im Ziel alles, was es in der Quelle nicht mehr gibt (gut für Spiegelung) - ODER:
--ignore-existing→ Erhält Dateien im Zielordner, auch wenn die Dateien sich unterscheiden (schlecht für Spiegelung)- ODER:
- --update → Überschreibt nur wenn Quelldatei neuer ist
https://www.rsyncinator.app/web
https://askubuntu.com/questions/609303/how-can-i-view-a-progress-bar-when-running-rsync
Log-Output lesen
Quelle: https://stackoverflow.com/questions/4493525/what-does-f-mean-in-rsync-logs
Explanation of each bit position and value in rsync's output:
YXcstpoguax path/to/file
|||||||||||
||||||||||╰- x: The extended attribute information changed
|||||||||╰-- a: The ACL information changed
||||||||╰--- u: The u slot is reserved for future use
|||||||╰---- g: Group is different
||||||╰----- o: Owner is different
|||||╰------ p: Permission are different
||||╰------- t: Modification time is different
|||╰-------- s: Size is different
||╰--------- c: Different checksum (for regular files), or
|| changed value (for symlinks, devices, and special files)
|╰---------- the file type:
| f: for a file,
| d: for a directory,
| L: for a symlink,
| D: for a device,
| S: for a special file (e.g. named sockets and fifos)
╰----------- the type of update being done::
<: file is being transferred to the remote host (sent)
>: file is being transferred to the local host (received)
c: local change/creation for the item, such as:
- the creation of a directory
- the changing of a symlink,
- etc.
h: the item is a hard link to another item (requires
--hard-links).
.: the item is not being updated (though it might have
attributes that are being modified)
*: means that the rest of the itemized-output area contains
a message (e.g. "deleting")Some example output from rsync for various scenarios:
>f+++++++++ some/dir/new-file.txt
.f....og..x some/dir/existing-file-with-changed-owner-and-group.txt
.f........x some/dir/existing-file-with-changed-unnamed-attribute.txt
>f...p....x some/dir/existing-file-with-changed-permissions.txt
>f..t..g..x some/dir/existing-file-with-changed-time-and-group.txt
>f.s......x some/dir/existing-file-with-changed-size.txt
>f.st.....x some/dir/existing-file-with-changed-size-and-time-stamp.txt
cd+++++++++ some/dir/new-directory/
.d....og... some/dir/existing-directory-with-changed-owner-and-group/
.d..t...... some/dir/existing-directory-with-different-time-stamp/LVM resize
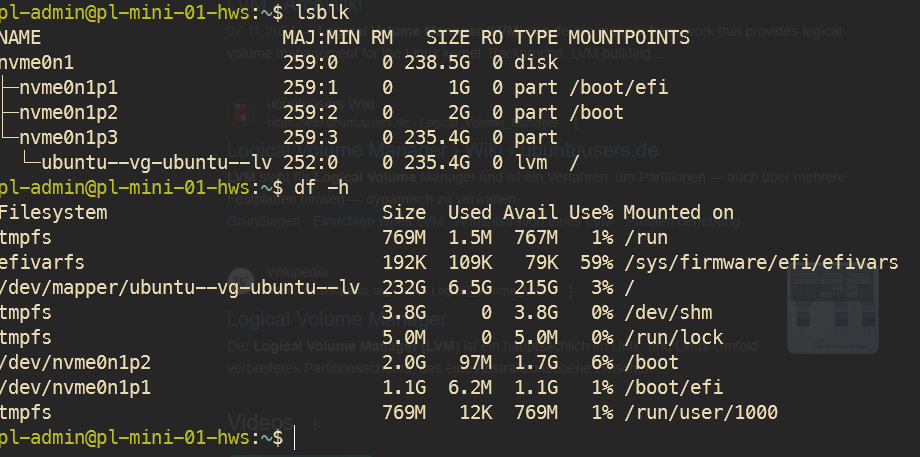
Um die Größe eines Logical Volume (LV) zu erweitern, müssen folgende Befehle eingegeben werden:
# Listed die Disks und ihre Partitionen
lsblk
# Extended das lv auf 100%
sudo lvextend -l 100%VG ubuntu-vg/ubuntu-lv
# nutzt resize2fs um das lv zu erweitern
sudo resize2fs /dev/mapper/ubuntu--vg-ubuntu--lvdanach:
Intel N150 GPU aktivieren: Kernel-Update
Quelle https://www.number13.de/nipogi-e1-mit-intel-n150-als-mini-server-im-test/
Eikes Ulti-Kommando:
sudo add-apt-repository ppa:cappelikan/ppa
sudo apt update && sudo apt upgrade -y
sudo apt install -y mainline policykit-1
mainline install 6.11.XXX # ANPASSEN, je nach mainline list
Damit die Grafikeinheit des Intel N150 (zb im GMKtec G3 Plus) erkannt wird, ist ein aktuellerer Kernel notwendig, als der, der mit zb Ubuntu derzeit mitgeliefert wird.
Hardwareinfo aufrufen:
sudo lspci -v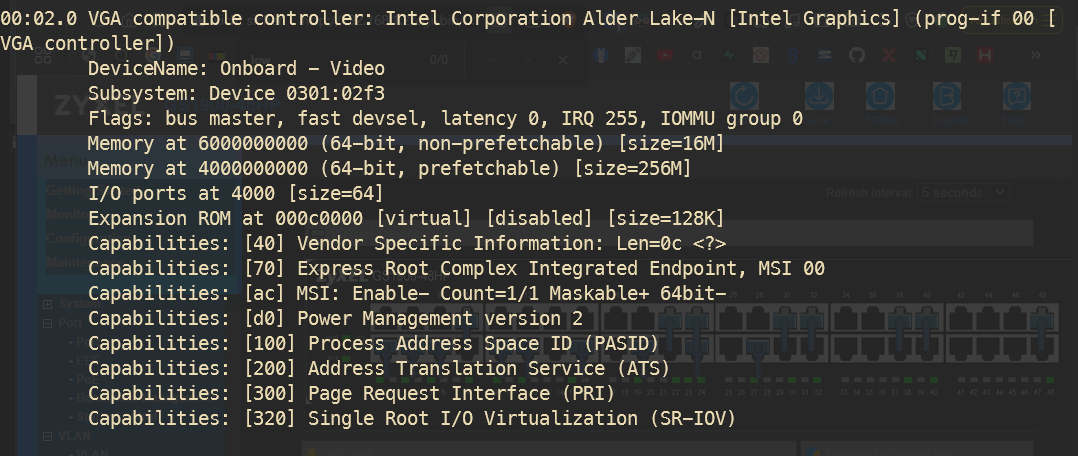
wenn hier keine Kernelinformationen angezeigt werden, fehlt der neueste Kernel
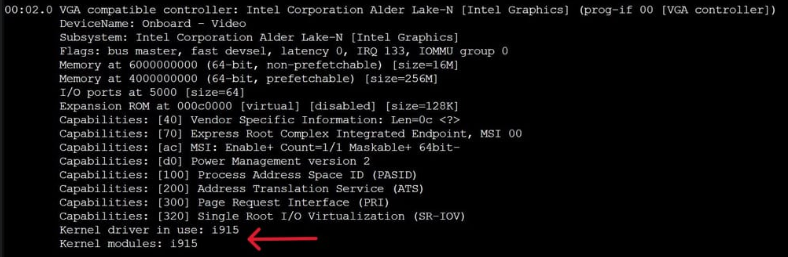
Kernel-Version abfragen:
uname -r
Wir brauchen mindestens 6.11.x um auf die Grafikeinheit des N150 zugreifen zu können.
Mainline installieren, um neueste Kernels zu installieren:
sudo add-apt-repository ppa:cappelikan/ppa
sudo apt update && sudo apt upgrade -y
sudo apt install -y mainlineEntweder Mainline GUI starten oder in Shell:
mainline list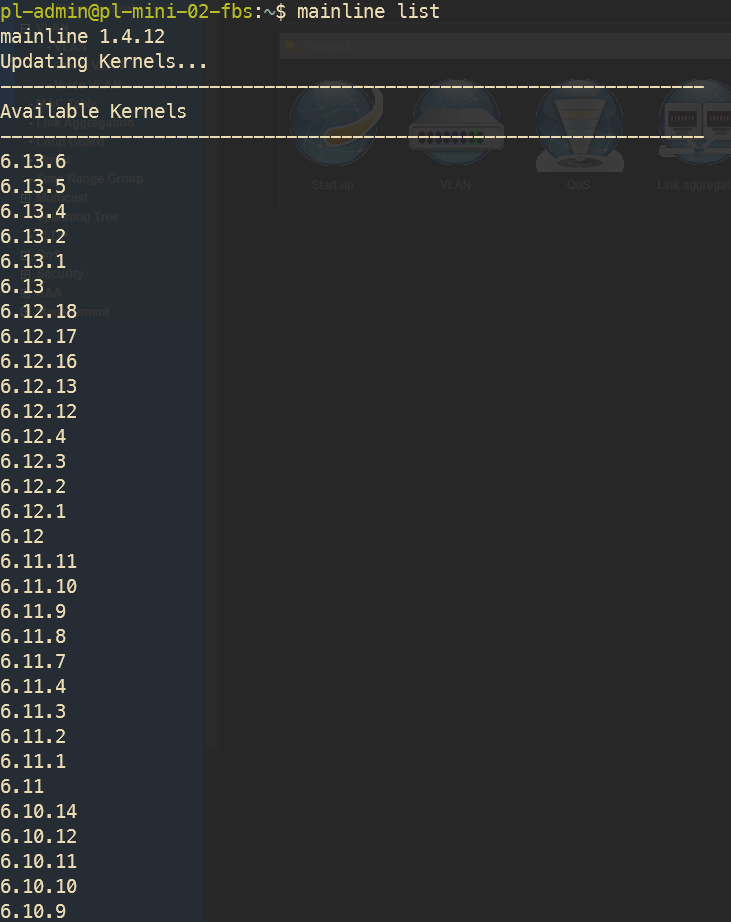
sudo -i
# Falls der Fehler
# sh: 1: pkexec: not found
# erscheint, policykit installieren:
apt update
apt install policykit-1
mainline install 6.11.11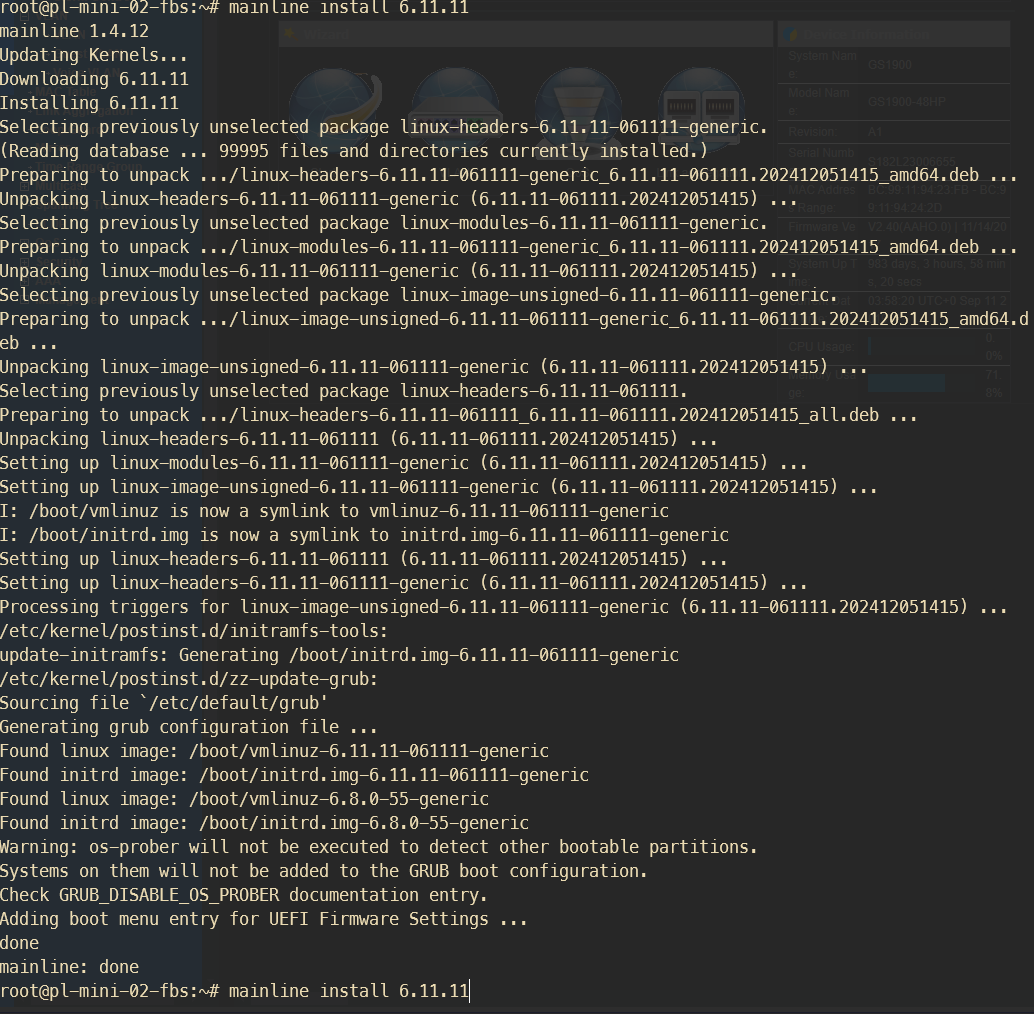
rebootuname -r
sudo lspci -v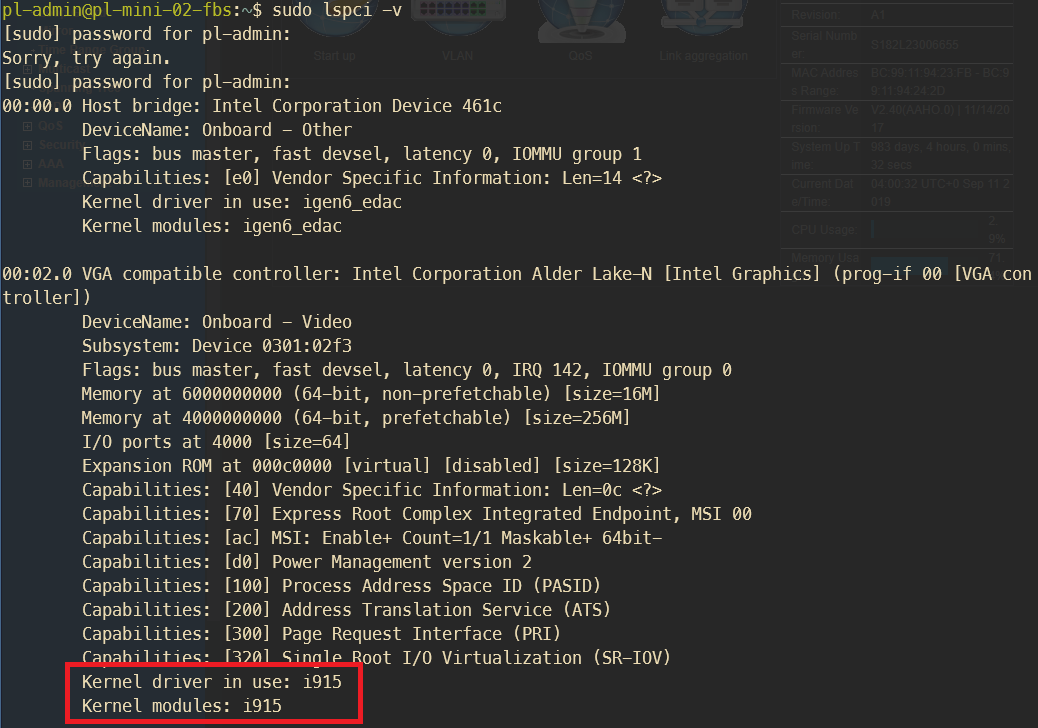
yay
Cloud-init
Cloud-Init für Ubuntu-Server:
neu mit ranger, atuin, lazydocker und btop++
Public SSH-Key selbst eintragen!
#cloud-config
# Hostname und Zeitzone
hostname: hz-01
timezone: Europe/Berlin
# System-Updates und Paketquellen
package_update: true
package_upgrade: true
package_reboot_if_required: true
# Zu installierende Pakete
packages:
- apt-transport-https
- ca-certificates
- curl
- gnupg
- lsb-release
- fail2ban
- unattended-upgrades
- vim
- htop
- ranger
- net-tools
- git
- wget
- build-essential
# Root-User SSH-Konfiguration
ssh_authorized_keys:
- DEIN_SSH_PUBLIC_KEY_HIER
# SSH-Konfiguration - Root-Login per Key erlauben, Password auth deaktivieren
ssh_pwauth: false
disable_root: false
# SSH-Config anpassen für Root-Login nur mit Key
write_files:
- path: /etc/ssh/sshd_config.d/99-custom.conf
content: |
PermitRootLogin prohibit-password
PasswordAuthentication no
PubkeyAuthentication yes
ChallengeResponseAuthentication no
- path: /etc/fail2ban/jail.local
content: |
[DEFAULT]
bantime = 3600
findtime = 600
maxretry = 5
[sshd]
enabled = true
port = 22
logpath = /var/log/auth.log
- path: /etc/motd
content: |
╔═══════════════════════════════════════════════╗
║ Docker Server hz-01 Firma XYZ ║
║ Portainer: https://<IP>:9443 ║
║ ║
║ ║
║ btop++, lazydocker (lzd), atuin, ranger ║
╚═══════════════════════════════════════════════╝
# Docker und Portainer installieren
runcmd:
# Docker GPG-Key und Repository hinzufügen
- mkdir -p /etc/apt/keyrings
- curl -fsSL https://download.docker.com/linux/ubuntu/gpg | gpg --dearmor -o /etc/apt/keyrings/docker.gpg
- echo "deb [arch=$(dpkg --print-architecture) signed-by=/etc/apt/keyrings/docker.gpg] https://download.docker.com/linux/ubuntu $(lsb_release -cs) stable" | tee /etc/apt/sources.list.d/docker.list > /dev/null
# Docker installieren
- apt-get update
- apt-get install -y docker-ce docker-ce-cli containerd.io docker-buildx-plugin docker-compose-plugin
# Docker-Daemon starten und aktivieren
- systemctl enable docker
- systemctl start docker
# Portainer Volume und Container erstellen
- docker volume create portainer_data
- docker run -d -p 9000:9000 -p 9443:9443 --name portainer --restart=always -v /var/run/docker.sock:/var/run/docker.sock -v portainer_data:/data portainer/portainer-ce:latest
# Fail2ban konfigurieren
- systemctl enable fail2ban
- systemctl start fail2ban
# Unattended-Upgrades konfigurieren
- echo 'Unattended-Upgrade::Automatic-Reboot "false";' >> /etc/apt/apt.conf.d/50unattended-upgrades
- echo 'Unattended-Upgrade::Remove-Unused-Kernel-Packages "true";' >> /etc/apt/apt.conf.d/50unattended-upgrades
- echo 'Unattended-Upgrade::Remove-Unused-Dependencies "true";' >> /etc/apt/apt.conf.d/50unattended-upgrades
- systemctl enable unattended-upgrades
- systemctl start unattended-upgrades
# Docker-Logs rotieren (verhindert Speicherprobleme)
- |
cat > /etc/docker/daemon.json <<EOF
{
"log-driver": "json-file",
"log-opts": {
"max-size": "10m",
"max-file": "3"
}
}
EOF
- systemctl restart docker
# Kernel-Hardening (Sysctl)
- |
cat >> /etc/sysctl.conf <<EOF
# IP-Forwarding für Docker
net.ipv4.ip_forward = 1
# Schutz gegen SYN-Flood-Attacken
net.ipv4.tcp_syncookies = 1
# Ignoriere ICMP-Redirects
net.ipv4.conf.all.accept_redirects = 0
net.ipv6.conf.all.accept_redirects = 0
# Source-Route-Pakete ablehnen
net.ipv4.conf.all.accept_source_route = 0
net.ipv6.conf.all.accept_source_route = 0
EOF
- sysctl -p
# btop++ installieren
- |
BTOP_VERSION=$(curl -s https://api.github.com/repos/aristocratos/btop/releases/latest | grep -oP '"tag_name": "v\K[^"]+')
wget -q https://github.com/aristocratos/btop/releases/download/v${BTOP_VERSION}/btop-x86_64-linux-musl.tbz -O /tmp/btop.tbz
tar -xjf /tmp/btop.tbz -C /tmp
cd /tmp/btop && make install
rm -rf /tmp/btop /tmp/btop.tbz
# lazydocker installieren
- |
LAZYDOCKER_VERSION=$(curl -s https://api.github.com/repos/jesseduffield/lazydocker/releases/latest | grep -oP '"tag_name": "v\K[^"]+')
wget -q https://github.com/jesseduffield/lazydocker/releases/download/v${LAZYDOCKER_VERSION}/lazydocker_${LAZYDOCKER_VERSION}_Linux_x86_64.tar.gz -O /tmp/lazydocker.tar.gz
tar -xzf /tmp/lazydocker.tar.gz -C /tmp
install /tmp/lazydocker /usr/local/bin/
rm /tmp/lazydocker*
# atuin für alle Benutzer installieren
- curl --proto '=https' --tlsv1.2 -LsSf https://setup.atuin.sh | sh
# atuin für admin-User konfigurieren
- sudo -u admin bash -c 'curl --proto "=https" --tlsv1.2 -LsSf https://setup.atuin.sh | sh'
- sudo -u admin bash -c 'echo "eval \"\$(atuin init bash)\"" >> ~/.bashrc'
# Aliases für admin-User hinzufügen
- |
sudo -u admin bash -c 'cat >> ~/.bashrc <<EOF
# Custom Aliases
alias lzd="lazydocker"
alias dc="docker compose"
alias dps="docker ps"
alias dlog="docker logs"
EOF'
# Finaler Reboot nach Abschluss (optional)
power_state:
mode: reboot
timeout: 300
condition: truealt:
#cloud-config
users:
- name: pl-admin
groups: users, admin
sudo: ALL=(ALL) NOPASSWD:ALL
shell: /bin/bash
ssh_authorized_keys:
- <public_ssh_key>
package_update: true
package_upgrade: true
packages:
- fail2ban
#- ufw
#Docker:
- apt-transport-https
- ca-certificates
- curl
- gnupg-agent
- software-properties-common
runcmd:
- printf "[sshd]\nenabled = true\nbanaction = iptables-multiport" > /etc/fail2ban/jail.local
- systemctl enable fail2ban
#- ufw allow ssh
#- ufw enable
- sed -i -e '/^\(#\|\)PermitRootLogin/s/^.*$/PermitRootLogin no/' /etc/ssh/sshd_config
- sed -i -e '/^\(#\|\)PasswordAuthentication/s/^.*$/PasswordAuthentication no/' /etc/ssh/sshd_config
- sed -i -e '/^\(#\|\)KbdInteractiveAuthentication/s/^.*$/KbdInteractiveAuthentication no/' /etc/ssh/sshd_config
- sed -i -e '/^\(#\|\)ChallengeResponseAuthentication/s/^.*$/ChallengeResponseAuthentication no/' /etc/ssh/sshd_config
- sed -i -e '/^\(#\|\)MaxAuthTries/s/^.*$/MaxAuthTries 2/' /etc/ssh/sshd_config
- sed -i -e '/^\(#\|\)AllowTcpForwarding/s/^.*$/AllowTcpForwarding no/' /etc/ssh/sshd_config
- sed -i -e '/^\(#\|\)X11Forwarding/s/^.*$/X11Forwarding no/' /etc/ssh/sshd_config
- sed -i -e '/^\(#\|\)AllowAgentForwarding/s/^.*$/AllowAgentForwarding no/' /etc/ssh/sshd_config
- sed -i -e '/^\(#\|\)AuthorizedKeysFile/s/^.*$/AuthorizedKeysFile .ssh\/authorized_keys/' /etc/ssh/sshd_config
- sed -i '$a AllowUsers pl-admin' /etc/ssh/sshd_config
# Docker:
- install -m 0755 -d /etc/apt/keyrings
- curl -fsSL https://download.docker.com/linux/ubuntu/gpg -o /etc/apt/keyrings/docker.asc
- chmod a+r /etc/apt/keyrings/docker.asc
- echo \
"deb [arch=$(dpkg --print-architecture) signed-by=/etc/apt/keyrings/docker.asc] https://download.docker.com/linux/ubuntu \
$(. /etc/os-release && echo "${UBUNTU_CODENAME:-$VERSION_CODENAME}") stable" | \
sudo tee /etc/apt/sources.list.d/docker.list > /dev/null
- apt-get update
- apt-get install docker-ce docker-ce-cli containerd.io docker-buildx-plugin docker-compose-plugin
- docker volume create portainer_data
- docker run -d -p 8000:8000 -p 9443:9443 --name portainer --restart=always -v /var/run/docker.sock:/var/run/docker.sock -v portainer_data:/data portainer/portainer-ce:lts
- rebootsshfs
sshfs mountet SFTP Verbindungen.
Quelle: https://www.lexo.ch/blog/2025/01/linux-how-to-mount-sftp-file-system/
apt update
apt install sshfs
# hz-02 via SFTP mounten
mkdir /mnt/pl-hz-02
sshfs root@pl-hz-02:/ -p 22 -o IdentityFile=/root/.ssh/id_ed25519_hz-01 /mnt/pl-hz-02/Für dauerhaftes mounte auch nach reboot, folgendes in nano /etc/fstab eintragen:
das root verzeichnis ("/") mounten:
sshfs#root@pl-hz-02:/ /mnt/pl-hz-02 fuse uid=1003,gid=100,umask=0,allow_other,_netdev,IdentityFile=/root/.ssh/id_ed25519_hz-01 0 0oder direkt ein mnt/volume mounten:
sshfs#root@server-01.MEINEDOMAIN.de:/mnt/hetzner-volume-02/ /mnt/hetzner-volume-02 fuse uid=1003,gid=100,umask=0,allow_other,_netdev,IdentityFile=/root/.ssh/privatekey.ppk 0 0Desktop Environment + VNC für Ubuntu Server installieren
Um für Fernwartung einen Webbrowser über VNC auf einem Ubuntu Server zu bedienen, müssen ein Desktop-Environment (DE) und VPN-Server installiert werden. Der Vorgang wird auf Ubuntu Server 24.04.2 LTS durchgeführt.
Ich benötige neben einer SSH Verbindung zu einem Linuxserver via VPN einen Webbrowser im Zielnetzwerk, da das lokales Subnetz identisch mit dem Ziel-Subnetz ist (192.168.1.0/24) und ich nur mit einer VPN-Verbindung zb. nicht die 192.168.1.1 aufrufen kann, weil ich dann auf meinem Router lande.
# zu root wechseln
sudo -i
# XFCE als DE installieren (hab vorher apt install ubuntu-desktop getestet aber hatte Display-Probleme beim Headless-Betrieb des Servers)
apt update
apt install xfce4 xfce4-goodies
# VNC-Server installieren
apt install tightvncserver -y
# VNC-Server starten, um Passwort festzulegen, danach schließen
vncserver
# optional vncserver :1 um direkt einen Port mit anzugeben. :1 bedeutet dass der VNC Server auf Port 5901 läuft, :2 5902 usw
# standard ist aber :1
vncserver -kill :1
# config betrachten und evtl editieren (siehe nächsten Code-Block)
nano ~/.vnc/xstartup
#oder
#nano /root/.vnc/xstartup
# ausführbar machen falls noch nicht automatisch von tightvnc passiert
chmod +x ~/.vnc/xstartup
#dbus installieren, weil sonst Display-Probleme (headless-Betrieb in meinem Fall)
apt install dbus-x11
# Display festlegen
xhost +local:
# Firefox installieren
#apt install firefox
apt install flatpak
flatpak remote-add --if-not-exists flathub https://flathub.org/repo/flathub.flatpakrepo
flatpak install flathub org.mozilla.firefox
# VNC-Server starten
vncserver :1~/.vnc/xstartup für XFCE
#!/bin/sh
xrdb "$HOME/.Xresources"
xsetroot -solid grey
#x-terminal-emulator -geometry 80x24+10+10 -ls -title "$VNCDESKTOP Desktop" &
#x-window-manager &
# Fix to make GNOME work
#export XKL_XMODMAP_DISABLE=1
#/etc/X11/Xsession
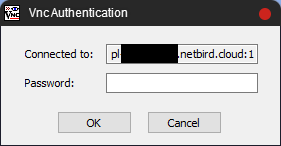
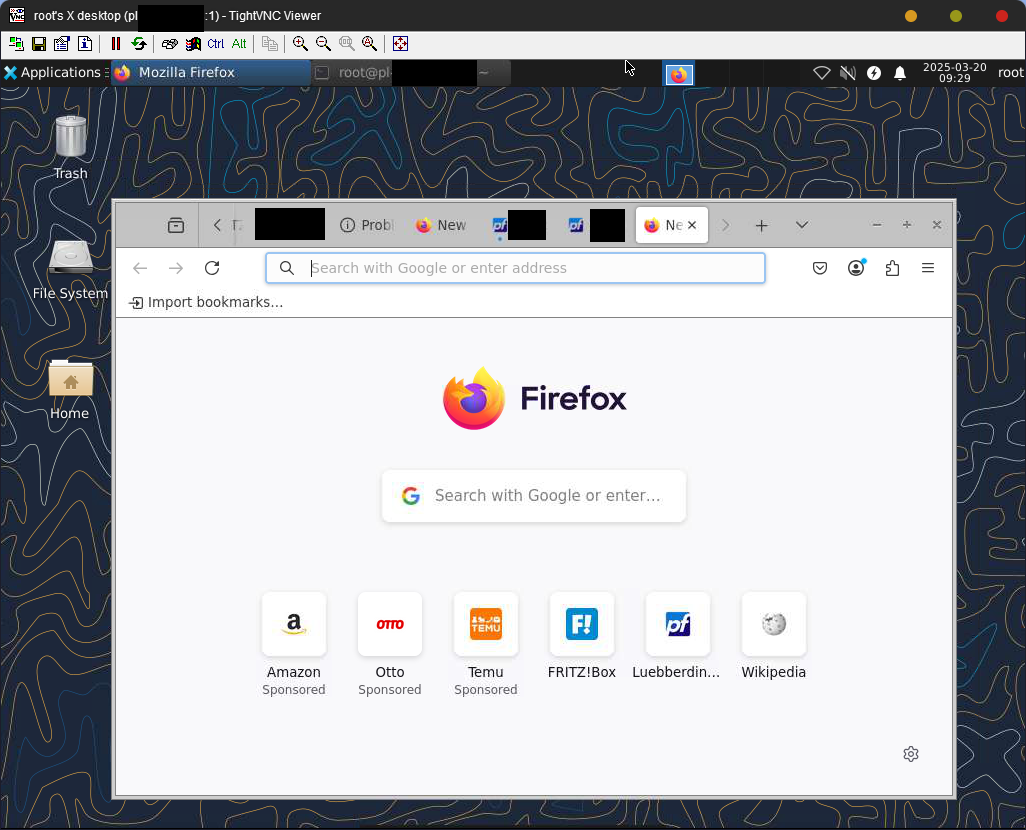
startxfce4 &Mit VNC-Server verbinden:
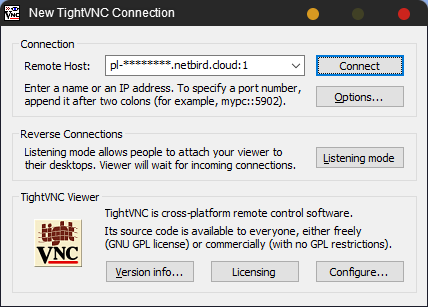
pw eingeben:
verbunden:
Extra: Suspend verhindern
Die Display-Manager wie zb lightdm oder gdm3, zuständig fürs einloggen, setzen standardmäßig den Rechner in Suspend nach 20 oder 30min. Um das zu verhindern kann folgendes gemacht werden:
Targets in systemd maskieren
sudo systemctl mask sleep.target suspend.target hibernate.target hybrid-sleep.targetlogind.conf anpassen
nano /etc/systemd/logind.confHandleSuspendKey=ignore
HandleSuspendKeyLongPress=ignore
HandleHibernateKey=ignore
HandleHibernateKeyLongPress=ignore
HandleLidSwitch=ignore
HandleLidSwitchExternalPower=ignore
HandleLidSwitchDocked=ignore
IdleAction=ignoresudo systemctl restart systemd-logind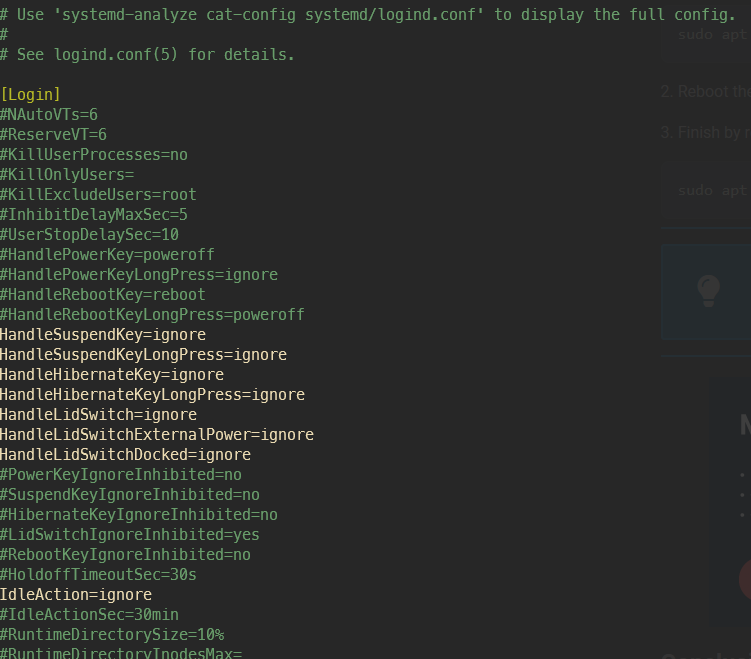
SSH: Permissions too open
Fehlermeldung:
Dateirechte sind zu offen, weil der Key zb einfach als Datei erzeugt wurde:
@@@@@@@@@@@@@@@@@@@@@@@@@@@@@@@@@@@@@@@@@@@@@@@@@@@@@@@@@@@
@ WARNING: UNPROTECTED PRIVATE KEY FILE! @
@@@@@@@@@@@@@@@@@@@@@@@@@@@@@@@@@@@@@@@@@@@@@@@@@@@@@@@@@@@
Permissions 0644 for '/root/.ssh/sshkey.ppk' are too open.
It is required that your private key files are NOT accessible by others.
This private key will be ignored.
Load key "/root/.ssh/sshkey.ppk": bad permissionsLösung:
chown 600 ~/.ssh/sshkey.ppk
Zorin OS
Wireguard GUI via Network-Manager
sudo apt install wireguard git dh-autoreconf libglib2.0-dev intltool build-essential libgtk-3-dev libnma-dev libsecret-1-dev network-manager-dev resolvconfgit clone https://github.com/max-moser/network-manager-wireguard
cd network-manager-wireguard
./autogen.sh --without-libnm-glib
./configure --without-libnm-glib --prefix=/usr --sysconfdir=/etc --libdir=/usr/lib/x86_64-linux-gnu --libexecdir=/usr/lib/NetworkManager --localstatedir=/var
make
sudo make installDanach kommt ein Fehler, dass die Verbindung fehlgeschlagen ist, wenn man einen Wireguard VPN über die Zorin Settings einrichten möchte. Man muss dann nmcli verwenden, um eine .conf zu importieren:
nmcli connection import type wireguard file "/path/to/pl-e.folkerts.conf"
nmcli connection modify pl-e.folkerts.conf connection.id "pl-test"
nmcli connection show pl-test
nmcli connection show
nmcli -overview
#optional autoconnect deaktivieren
nmcli connection modify pl-test connection.autoconnect falseDadurch taucht sie leider nicht mehr in Settings > Network auf, dafür aber in den Schnelleinstellungen unten rechts:
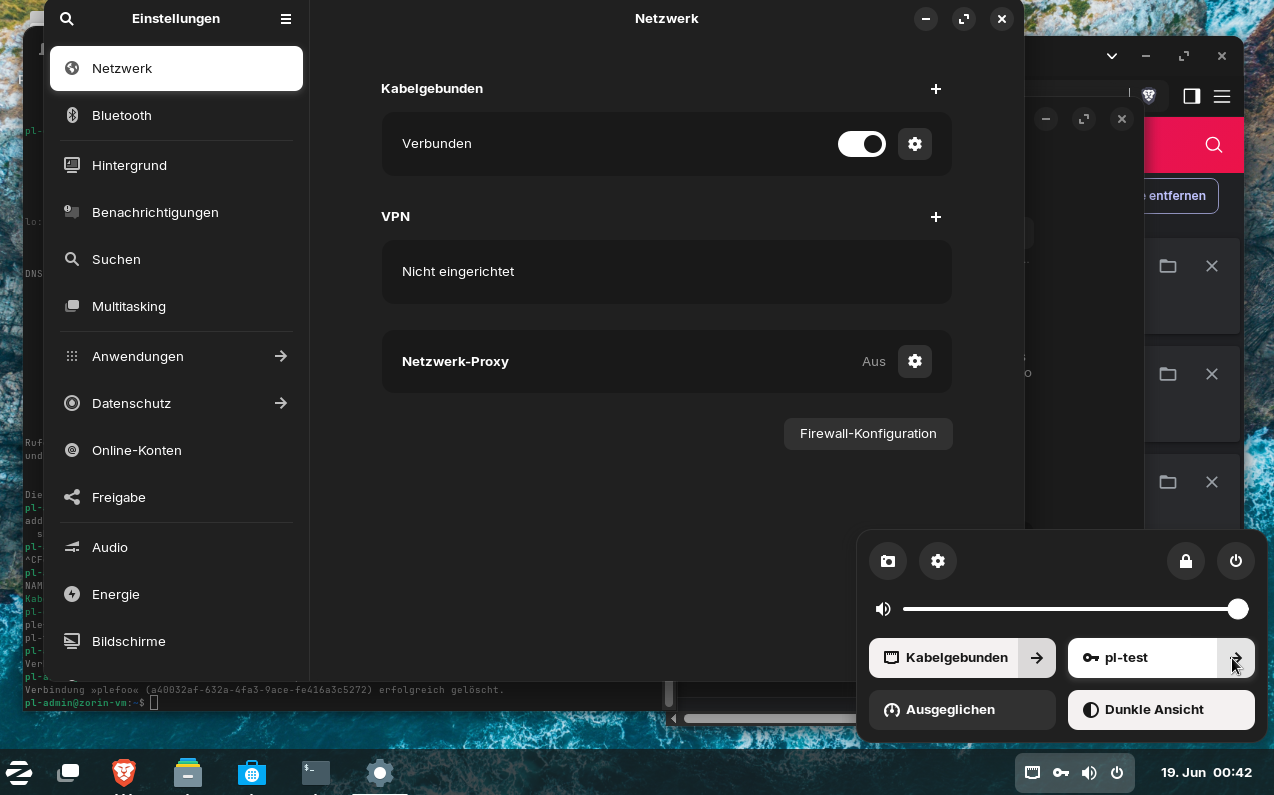
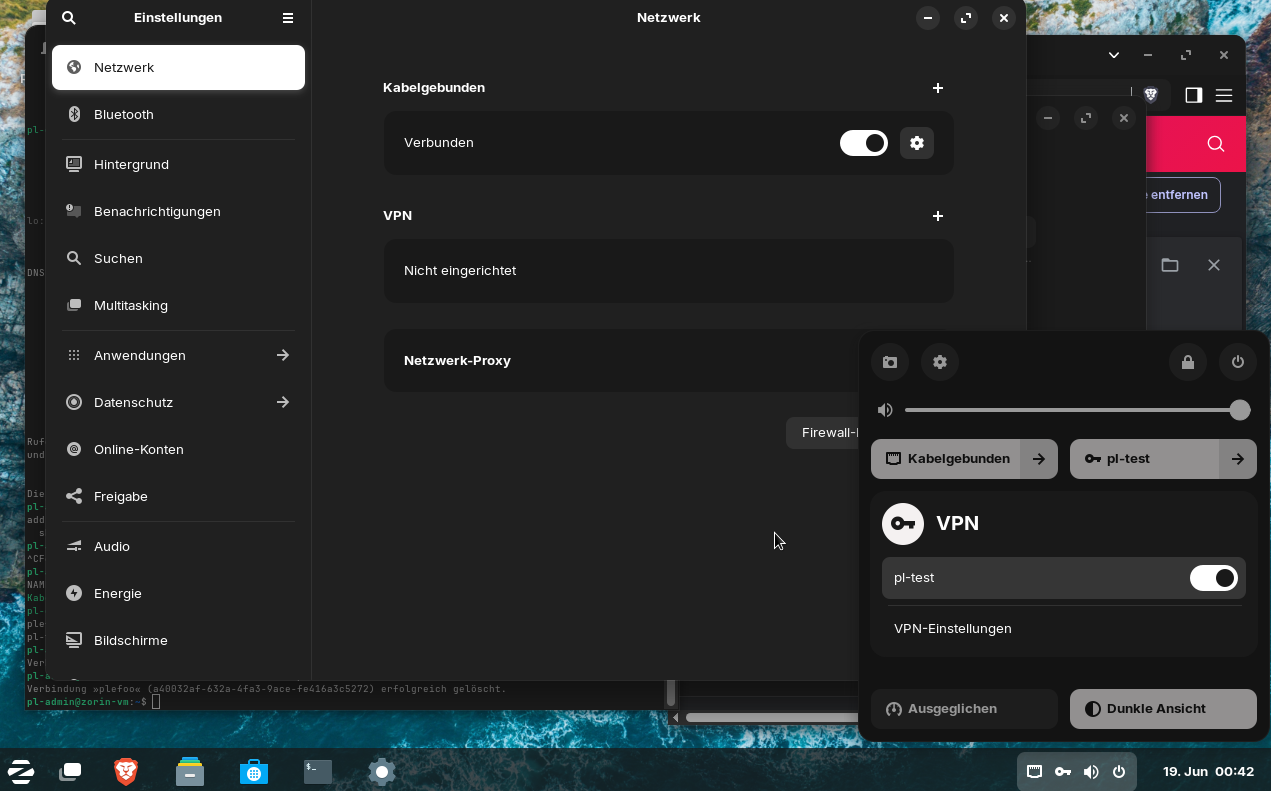
Quellen
von https://www.reddit.com/r/zorinos/comments/pjdqfn/wireguard_via_network_manger_gui/
verlinkt zu https://askubuntu.com/questions/1233034/wireguard-vpn-client-gui
von https://askubuntu.com/questions/1404807/wireguard-management-in-network-manager-on-jammy
verlinkt zu https://www.reddit.com/r/WireGuard/comments/us1blx/comment/i9klpio/?context=3
Suchbegriffe: Gnome, KDE Plasma
CLI-Tools
Atuin (History-Manager)
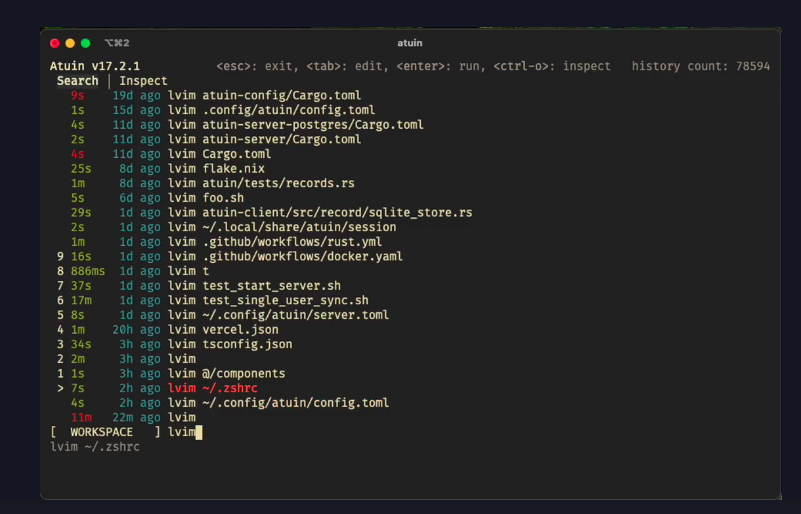
https://github.com/atuinsh/atuin
curl --proto '=https' --tlsv1.2 -LsSf https://setup.atuin.sh | shrestart cli, dann STRG+R oder 'atuin'
BTOP++
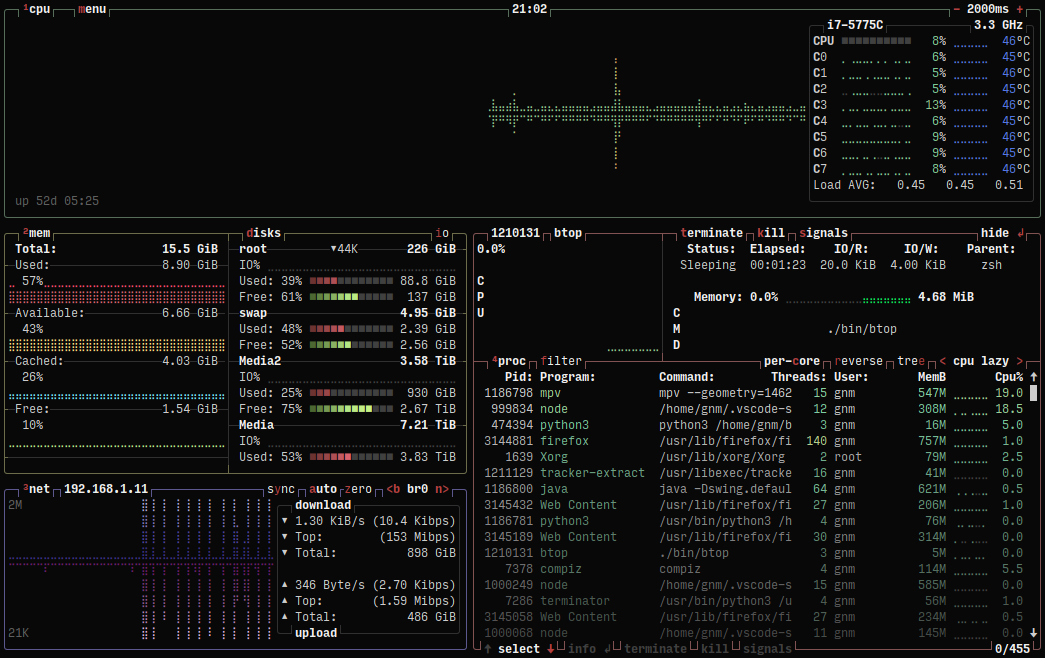
https://github.com/aristocratos/btop
snap install btop
Lazydocker installieren
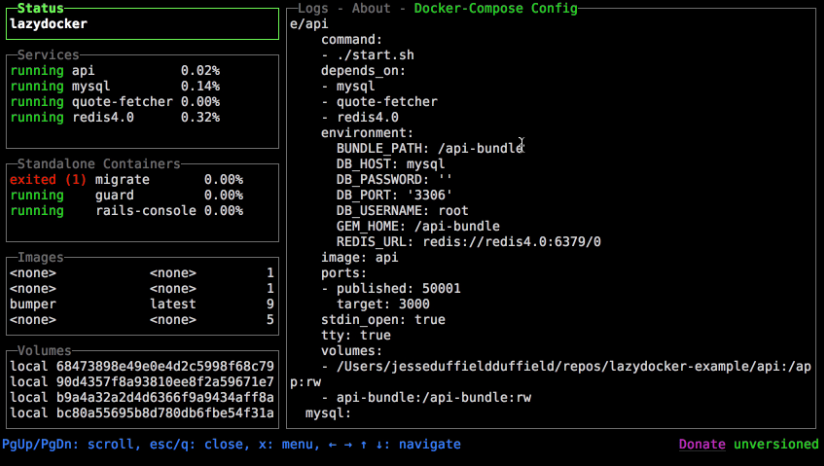
https://github.com/jesseduffield/lazydocker#installation
Variante 1: Leicht (Offizielles Skript)
# Installationsskript mit bash ausführen
curl https://raw.githubusercontent.com/jesseduffield/lazydocker/master/scripts/install_update_linux.sh | bash
# Checken wo lazydocker liegt (dauert, kann man auch skippen):
find / -name lazydocker 2>/dev/null
# Pfad zur .bashrc pflegen:
echo 'export PATH="$HOME/.local/bin:$PATH"' >> ~/.bashrcdanach CLI neustarten!
Variante 2: Schwer (Brew)
Falls root, vorher neuen Sudo-User anlegen, ansonsten gibt das Brew-Installationsskript 'Don't run this as root!' zurück:
sudo adduser [username]
usermod -aG sudo [username]
id [username] | grep sudo
su [username]brew installieren:
/bin/bash -c "$(curl -fsSL https://raw.githubusercontent.com/Homebrew/install/HEAD/install.sh)"zu bashrc hinzufügen (USERNAME ersetzen):
echo >> /home/USERNAME/.bashrc
echo 'eval "$(/home/linuxbrew/.linuxbrew/bin/brew shellenv)"' >> /home/USERNAME/.bashrc
eval "$(/home/linuxbrew/.linuxbrew/bin/brew shellenv)"Nähere Infos:
==> Next steps:
- Run these commands in your terminal to add Homebrew to your PATH:
echo >> /home/pl-admin/.bashrc
echo 'eval "$(/home/linuxbrew/.linuxbrew/bin/brew shellenv)"' >> /home/pl-admin/.bashrc
eval "$(/home/linuxbrew/.linuxbrew/bin/brew shellenv)"
- Install Homebrew's dependencies if you have sudo access:
sudo apt-get install build-essential
For more information, see:
https://docs.brew.sh/Homebrew-on-Linux
- We recommend that you install GCC:
brew install gcc
- Run brew help to get started
- Further documentation:
https://docs.brew.shLazydocker installieren:
Normally
lazydockerformula can be found in the Homebrew core but we suggest you to tap our formula to get frequently updated one. It works with Linux, too.
Tap:
brew install jesseduffield/lazydocker/lazydocker
Core:
brew install lazydocker
oder
brew install gcc
brew install --build-from-source lazydockerZeitzone ändern
unter Ubuntu 22.04:
timedatectl set-timezone Europe/Berlintimedatectl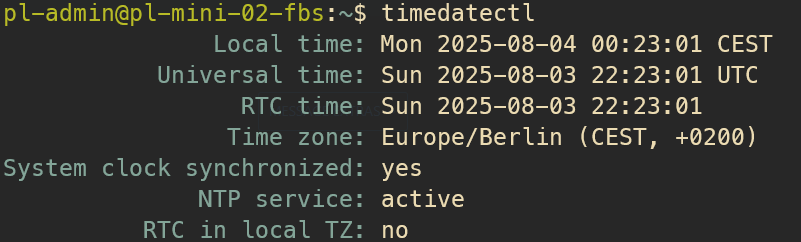
Obacht! tzselectverändert nur temporär die Timezone, siehe
https://www.hostinger.com/tutorials/how-to-change-timezone-in-ubuntu
scp
von lokal zu Remote:
scp -r /mnt/d/Entwicklung/Praxis\ L/network_str_53_HH_v8.1.127.unf root@pl-mini-02-fbs.nb.pl:/root/zwischen zwei Remotes:
scp -3 -p -r root@10.1.1.71:/var/lib/docker/volumes/kimai2_mysql-data root@fn-02.MEINEDOMAIN.it:/mnt/fn-volume-02/docker-data/volumes/kimai_mysql-data/> Das -3 Flag leitet den Datentransfer über dein lokales System, was hilfreich ist, wenn die beiden Hosts sich nicht direkt erreichen können.
Die -p Option bewahrt:
- Modification times (mtime)
- Access times (atime)
- File modes (Berechtigungen)
https://docs.rackspace.com/docs/copy-files-with-scp-and-rsync
Copy a file from a remote server:
~$ scp user@IP.address:/path/file_name /local/destination/path/Copy a directory from a remote server:
~$ scp -r user@IP.address:/path/directory[/] /local/destination/path/Copy a file to a remote server:
~$ scp /local/path/file_name user@IP.address:/destination/path/~$ scp -r /local/path/directory[/] user@IP.address:/destination/path/SSH Keys & SSH-Config
SSH-Keys importieren
nano ~/.ssh/id_NAME_rsa
nano ~/.ssh/id_NAME_rsa.pub
# Berechtigungen
chmod 700 ~/.ssh
chmod 600 ~/.ssh/id_NAME_rsa
chmod 644 ~/.ssh/id_NAME_rsa.pubzum SSH-Agenten hinzufügen:
ssh-add ~/.ssh/id_NAME_rsacat ~/.ssh/id_NAME_rsa.pub >> ~/.ssh/authorized_keys
chmod 600 ~/.ssh/authorized_keyszum fernen Server in seine authorized_keys hinzufügen:
# kopiert Standard-Key (~/.ssh/id_rsa.pub)
ssh-copy-id user@remote-server
# mit spezifischem Key
ssh-copy-id -i ~/.ssh/id_NAME_rsa.pub user@remote-server
# Mit Port
ssh-copy-id -i ~/.ssh/id_NAME_rsa.pub -p 2222 user@remote-server
# Nur Public-Key mit force (-f) kopieren, ohne private-key
ssh-copy-id -f -i ~/.ssh/id_NAME_ed25519.pub root@123.456.789.100SSH-Config
nano /root/.ssh/config.ssh/config:
Host storagebox
Hostname u12345.your-storagebox.de
Port 23
User u12345
IdentityFile /root/.ssh/id_admin_ed25519
ODER
IdentityFile /config/ssh_keys/id_admin_ed25519
JE NACHDEM WO DER SSH-KEY LIEGT!wenn dannn noch WARNING UNPROTECTED PRIVATE KEY FILE Meldung kommt, einfach
chown 600 /config/ssh_keys/id_admin_ed25519Verbindung aufrechterhalten (wenn zu häufig Meldung Broke Pipeline kommt) :
# Verbindung aufrechterhalten
Host *
ServerAliveInterval 30
ServerAliveCountMax 3
Weiteres Beispiel für eine .ssh/config:
Host gitlab.blentwurg.com
PreferredAuthentications publickey
IdentityFile ~/.ssh/gitlab.pub
Host git.MEINEDOMAIN.com
HostName git.MEINEDOMAIN.com
Port 222
User git
IdentityFile ~/.ssh/id_rsaoder
# Verbindung aufrechterhalten
Host *
ServerAliveInterval 30
ServerAliveCountMax 3
# Haupt-SSH-Key
# auskommentieren und auch spezifische SSH-Keys beim Host auskommentieren, wenn SSH-Keys über Bitwarden Vault geholt werden
# IdentityFile /home/eix/.ssh/id_rsa_eiketower
Host hz-01
HostName hetzner-01.DOMAIN.de
IdentityFile ~/.ssh/id_pl-admin_ed25519
User root
Host hz-02
HostName hetzner-02.DOMAIN.de
IdentityFile ~/.ssh/id_pl-admin_ed25519
User root
Host hz-03
HostName hetzner-03.DOMAIN.de
IdentityFile ~/.ssh/id_pl-admin_ed25519
User root
Host mini-01-hws
HostName 192.168.200.11
IdentityFile ~/.ssh/id_rsa_eiketower
User pl-admin
Host mini-02-fbs
HostName 10.53.1.5
IdentityFile ~/.ssh/id_rsa_eiketower
User pl-admin
Host mini-03-sps
HostName 10.26.1.5
IdentityFile ~/.ssh/id_rsa_eiketower
User pl-admin
Host pve
HostName 10.1.1.69
IdentityFile ~/.ssh/id_rsa_eiketower
User root
Host fn-01
HostName fn-01.DOMAIN.it
IdentityFile ~/.ssh/id_rsa_eiketower
User root
Host fn-02
HostName fn-02.DOMAIN.it
IdentityFile ~/.ssh/id_rsa_eiketower
User rootvorher
chmod 600 ~/.ssh/id_rsa_eiketower.ppk
chmod 600 ~/.ssh/id_pl-admin_ed25519GMKTec EVO-X2
128GB RAM + 2TB SSD + Ryzen AI MAX+ 395
Neue Firmware
https://strixhalo.wiki/Hardware/Boards/Sixunited_AXB35/Firmware
BIOS: 1.11 20251017 AXB35-02_GMK_SW1.11_20251017.zip
EC Firmware: 1.08 EC-AXB35-02-1.08.zip
Linksammlung
https://www.reddit.com/r/MiniPCs/comments/1mptl53/gmktec_evox2_amd_ryzen_ai_max_395_minipc_with/
https://www.reddit.com/r/LocalLLaMA/comments/1le951x/gmk_x2amd_max_395_w128gb_first_impressions/
https://www.reddit.com/r/GMKtec/comments/1ldtnbl/new_firmware_for_evox2_bios_105_ec_106/
https://github.com/ollama/ollama/issues/12342 <
https://github.com/ollama/ollama/issues/12062
https://www.reddit.com/r/ollama/comments/1nt5fcr/how_do_i_get_ollama_to_use_the_igpu_on_the_amd_ai/
AMD-Treiber installieren
Mit folgendem Tipp auf
https://www.reddit.com/r/ollama/comments/1nt5fcr/how_do_i_get_ollama_to_use_the_igpu_on_the_amd_ai/
auf folgenden Kommentar gestoßen
https://www.reddit.com/r/ollama/comments/1nt5fcr/comment/ngshfbr/
joseph_sellers
•
2mo ago
I am on a different stack (but same device). I am on Ubuntu 25.04, and using Docker, but I have Ollama working great.I found an AMD APU specific fork of Ollama: https://github.com/rjmalagon/ollama-linux-amd-apu
On that fork, there is an open issue where someone says they have figured out how to get Ollama working on the exact device I am using: https://github.com/rjmalagon/ollama-linux-amd-apu/issues/24
They have created a fork, of the fork, with the fix they found: https://github.com/phueper/ollama-linux-amd-apu
Hopefully there are some clues there to help you get up and running on your setup.
dann auf https://github.com/rjmalagon/ollama-linux-amd-apu?tab=readme-ov-file#check-amount-of-gtt-memory gekommen und folgendes cmd überprüft:
sudo dmesg | grep "amdgpu*"danach ist mir aufgefallen, dass der init der amdgpu nicht geklappt hat:
amdgpu: Fatal error during GPU init
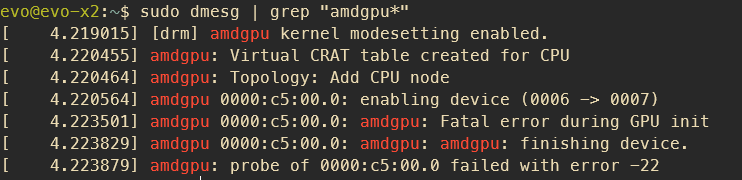
also unter https://www.amd.com/en/support/download/linux-drivers.html aktuellste Treiber für mein Ubuntu 24.04.03 heruntergeladen
sudo -i
wget https://repo.radeon.com/amdgpu-install/30.20.1/ubuntu/noble/amdgpu-install_7.1.1.70101-1_all.deb
chmod +x ./amdgpu-install_7.1.1.70101-1_all.deb
apt install ./amdgpu-install_7.1.1.70101-1_all.deb
amdgpu-install
rebootdanach
sudo dmesg | grep "amdgpu.*memory"
Richtiges Ollama Dockerimage wählen
Für AMD GPUs muss das RCOm Image verwendet werden:
https://hub.docker.com/r/ollama/ollama/tags?name=rocm
Proxmox PVE statische IP
Proxmox > Node > System > DNS > Edit
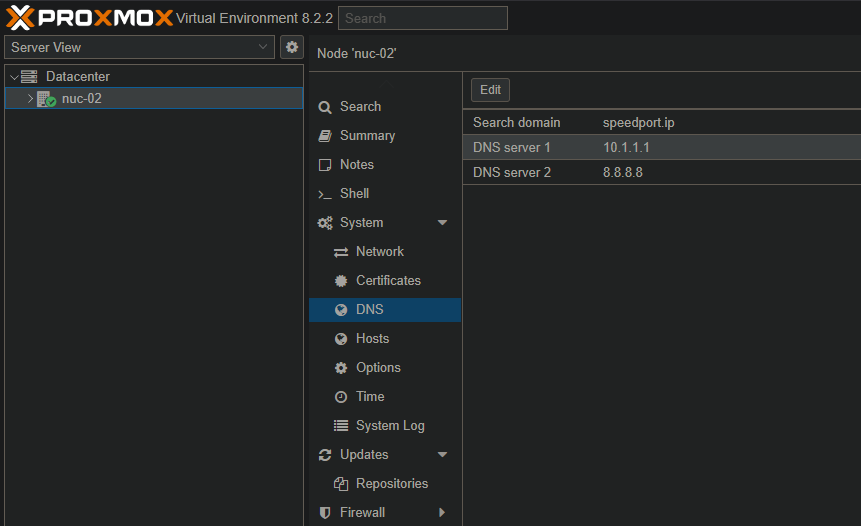
damit wird immer die /etc/resolv.conf überschrieben:
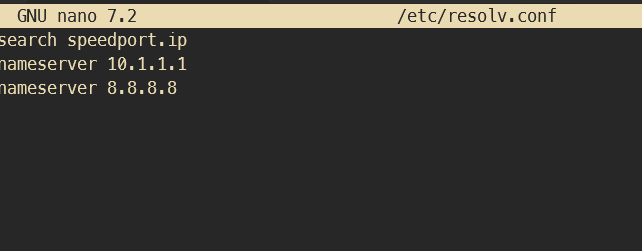
danach
nano /etc/network/interfaces
auto lo
iface lo inet loopback
iface eno1 inet manual
auto vmbr0
iface vmbr0 inet static
address 10.1.1.69/24
gateway 10.1.1.1
dns-nameservers 10.1.1.1 8.8.8.8
bridge-ports eno1
bridge-stp off
bridge-fd 0
iface wlp0s20f3 inet manual
source /etc/network/interfaces.d/*
systemctl restart networking
SSH-Agent mit Bitwarden
Guide: https://bitwarden.com/help/ssh-agent/#tab-linux-6VN1DmoAVFvm7ZWD95curS
Kurzfassung
Bitwarden Desktop installieren
> In den Bitwarden Programm Settings den SSH-Agent aktivieren
# Bitwarden SSH-Agent aktivieren
export SSH_AUTH_SOCK=/home/<user>/.bitwarden-ssh-agent.sock
# in .bashrc oder .zshrc speichern
nano ~/.bashrc
nano ~/.zshrc
export SSH_AUTH_SOCK=/home/<user>/.bitwarden-ssh-agent.sock
falls Bitwarden mit Snap oder flatpak installiert wurde:
# Snap
export SSH_AUTH_SOCK=/home/<user>/snap/bitwarden/current/.bitwarden-ssh-agent.sock
# Flatpak
export SSH_AUTH_SOCK=/home/<user>/.var/app/com.bitwarden.desktop/data/.bitwarden-ssh-agent.sockdanach Shell neustarten und testen
# SSH-Keys aus Bitwarden auflisten
ssh-add -L
# ansonsten einfach SSH-Verbindung wie gewohnt zb
ssh root@<hostname>
# dann holt sich der Agent schon den richtigen Key aus Bitwarden
# SSH-Agent durchschleifen
ssh -A <HostnameA>
Beispiel fuer config
falls eine bestehende config mit vorhandenen Keys genutzt wurde, kann der Pfad zum Key einfach auskommentiert werden:
nano ~/.ssh/config
Host remoteA
HostName remoteA.MEINEDOMAIN.de
IdentityFile ~/.ssh/id_rsa_remoteA
User root
#### wird zu ####
Host remoteA
HostName remoteA.MEINEDOMAIN.de
# IdentityFile ~/.ssh/id_rsa_remoteA
User rootOmarchy
input.conf (Keyboardlayout us altgr-intl)
https://wiki.hypr.land/Configuring/Variables/#input
https://learn.omacom.io/2/the-omarchy-manual/67/faq#how-do-i-switch-between-keyboard-layouts
https://learn.omacom.io/2/the-omarchy-manual/78/keyboard-mouse-trackpad
Tastaturlayout: US-International für QWERTY aber trotzdem Umlaute zb mit
AltGr+Z = Ü
AltGr+Q = Ä
AltGr+P = Ö
https://de.wikipedia.org/wiki/Tastaturbelegung_US-International
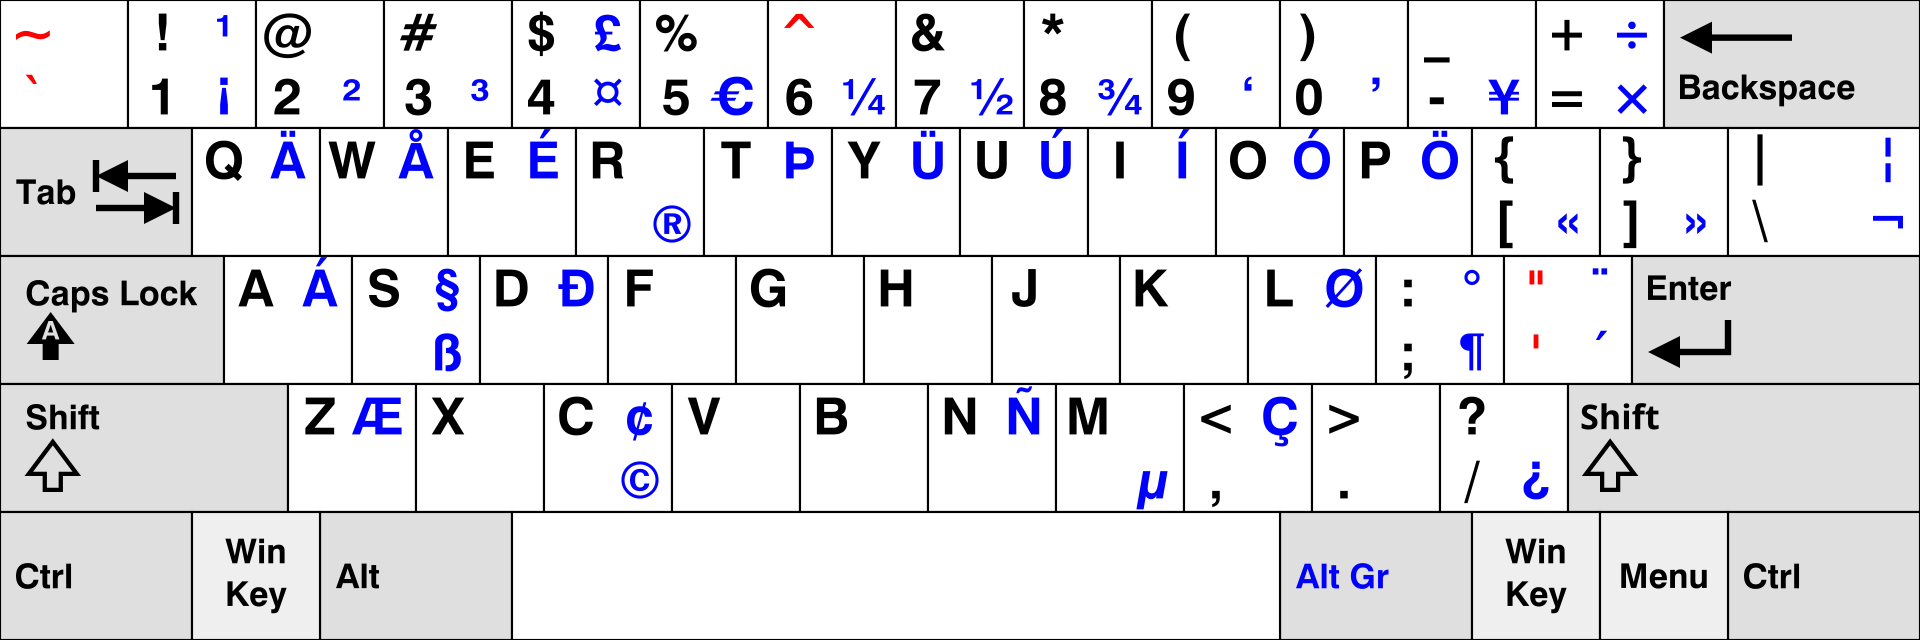
In omarchy Win+Alt+Leertaste > Setup > Input
oder
nvim .config/hypr/input.conf
# Control your input devices
# See https://wiki.hypr.land/Configuring/Variables/#input
input {
# Use multiple keyboard layouts and switch between them with Left Alt + Right Alt
# kb_layout = us,dk,eu
# alt-intl = International without dead-keys
kb_layout = us
kb_variant = altgr-intl
kb_options = compose:caps # ,grp:alts_toggle
# Change speed of keyboard repeat
repeat_rate = 40
repeat_delay = 250
# Start with numlock on by default
numlock_by_default = true
# Increase sensitivity for mouse/trackpad (default: 0)
# sensitivity = 0.35
touchpad {
# Use natural (inverse) scrolling
# natural_scroll = true
# Use two-finger clicks for right-click instead of lower-right corner
# clickfinger_behavior = true
# Control the speed of your scrolling
scroll_factor = 0.4
# Enable the touchpad while typing
# disable_while_typing = false
# Left-click-and-drag with three fingers
# drag_3fg = 1
}
}
# Scroll nicely in the terminal
windowrule = match:class (Alacritty|kitty), scroll_touchpad 1.5
windowrule = match:class com.mitchellh.ghostty, scroll_touchpad 0.2
# Enable touchpad gestures for changing workspaces
# See https://wiki.hyprland.org/Configuring/Gestures/
# Enable touchpad gestures for changing workspaces
# See https://wiki.hyprland.org/Configuring/Gestures/
gesture = 3, horizontal, workspace
gesture = 3, vertical, dispatcher, togglespecialworkspace, scratchpad
gesture = 4, vertical, dispatcher, fullscreen, 1
Möglichkeiten:
cat /usr/share/X11/xkb/rules/evdev.lst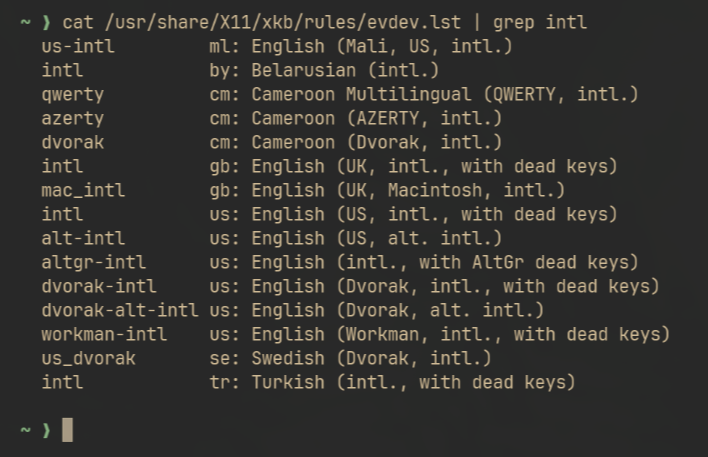
Waybar DateTime Format

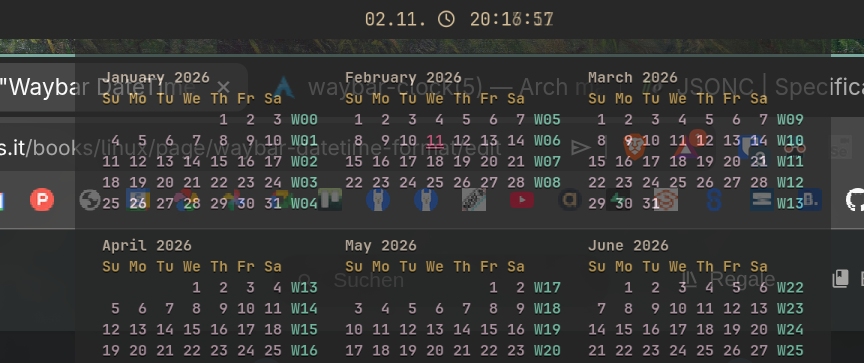
Waybar ist die Topbar in Omarchy.
vim .config/waybar/config.jsonc
"clock": {
"format": "{:%a, %m.%d. %H:%M:%S}",
"interval": 1,
"format-alt": "{:%A, %B %d, %Y (%R)} ",
"tooltip-format": "<tt><small>{calendar}</small></tt>",
"calendar": {
"mode" : "year",
"mode-mon-col" : 3,
"weeks-pos" : "right",
"on-scroll" : 1,
"on-click-right": "mode",
"format": {
"months": "<span color='#fe8019'><b>{}</b></span>",
"days": "<span color='#b8bb26'><b>{}</b></span>",
"weeks": "<span color='#83a598'><b>W{}</b></span>",
"weekdays": "<span color='#fabd2f'><b>{}</b></span>",
"today": "<span color='#fb4934'><b><u>{}</u></b></span>"
}
},
"actions": {
"on-click-right": "mode",
"on-click-forward": "tz_up",
"on-click-backward": "tz_down",
"on-scroll-up": "shift_up",
"on-scroll-down": "shift_down"
}
},
// alt ab hier:
// "clock": {
// "format": "{:L%A %H:%M:%S}",
// "format-alt": "{:L%d %B W%V %Y}",
// "tooltip": false,
// "on-click-right": "omarchy-launch-floating-terminal-with-presentation omarchy-tz-select"
// },
https://man.archlinux.org/man/extra/waybar/waybar-clock.5.en
https://en.cppreference.com/w/cpp/chrono/duration/formatter
| Conversion specifier |
Explanation | |
|---|---|---|
%% |
Writes a literal % character. |
|
%n |
Writes a newline character. | |
%t |
Writes a horizontal tab character. | |
| Time of day | ||
%H%OH |
Writes the hour (24-hour clock) as a decimal number. If the result is a single digit, it is prefixed with 0.
The modified command |
|
%I%OI |
Writes the hour (12-hour clock) as a decimal number. If the result is a single digit, it is prefixed with 0.
The modified command |
|
%M%OM |
Writes the minute as a decimal number. If the result is a single digit, it is prefixed with 0.
The modified command |
|
%S%OS |
Writes the second as a decimal number. If the number of seconds is less than 10, the result is prefixed with 0.
If the precision of the input cannot be exactly represented with seconds, then the format is a decimal floating-point number with a fixed format and a precision matching that of the precision of the input (or to a microseconds precision if the conversion to floating-point decimal seconds cannot be made within 18 fractional digits). The character for the decimal point is localized according to the locale. The modified command |
|
%p |
Writes the locale's equivalent of the AM/PM designations associated with a 12-hour clock. | |
%R |
Equivalent to "%H:%M". |
|
%T |
Equivalent to "%H:%M:%S". |
|
%r |
Writes the locale's 12-hour clock time. | |
%X%EX |
Writes the locale's time representation.
The modified command |
|
| Duration count | ||
%Q |
Writes the count of ticks of the duration, i.e. the value obtained via count(). |
|
%q |
Writes the unit suffix of the duration, as specified in operator<<(). |
|
The following specifiers are recognized, but will cause std::format_error to be thrown:
| Conversion specifier |
Explanation | |
|---|---|---|
| Year | ||
%C%EC |
Writes the year divided by 100 using floored division. If the result is a single decimal digit, it is prefixed with 0.
The modified command |
|
%y%Oy%Ey |
Writes the last two decimal digits of the year. If the result is a single digit it is prefixed by 0.
The modified command The modified command |
|
%Y%EY |
Writes the year as a decimal number. If the result is less than four digits it is left-padded with 0 to four digits.
The modified command |
|
| Month | ||
%b%h |
Writes the locale's abbreviated month name. | |
%B |
Writes the locale's full month name. | |
%m%Om |
Writes the month as a decimal number (January is 01). If the result is a single digit, it is prefixed with 0.
The modified command |
|
| Day | ||
%d%Od |
Writes the day of month as a decimal number. If the result is a single decimal digit, it is prefixed with 0.
The modified command |
|
%e%Oe |
Writes the day of month as a decimal number. If the result is a single decimal digit, it is prefixed with a space.
The modified command |
|
| Day of the week | ||
%a |
Writes the locale's abbreviated weekday name. | |
%A |
Writes the locale's full weekday name. | |
%u%Ou |
Writes the ISO weekday as a decimal number (1-7), where Monday is 1.
The modified command |
|
%w%Ow |
Writes the weekday as a decimal number (0-6), where Sunday is 0.
The modified command |
|
| ISO 8601 week-based year | ||
|
In ISO 8601 weeks begin with Monday and the first week of the year must satisfy the following requirements:
|
||
%g |
Writes the last two decimal digits of the ISO 8601 week-based year. If the result is a single digit it is prefixed by 0. | |
%G |
Writes the ISO 8601 week-based year as a decimal number. If the result is less than four digits it is left-padded with 0 to four digits. | |
%V%OV |
Writes the ISO 8601 week of the year as a decimal number. If the result is a single digit, it is prefixed with 0.
The modified command |
|
| Week/day of the year | ||
%j |
Writes the day of the year as a decimal number (January 1 is 001). If the result is less than three digits, it is left-padded with 0 to three digits. |
|
%U%OU |
Writes the week number of the year as a decimal number. The first Sunday of the year is the first day of week 01. Days of the same year prior to that are in week 00. If the result is a single digit, it is prefixed with 0.
The modified command |
|
%W%OW |
Writes the week number of the year as a decimal number. The first Monday of the year is the first day of week 01. Days of the same year prior to that are in week 00. If the result is a single digit, it is prefixed with 0.
The modified command |
|
| Date | ||
%D |
Equivalent to "%m/%d/%y". |
|
%F |
Equivalent to "%Y-%m-%d". |
|
%x%Ex |
Writes the locale's date representation.
The modified command |
|
| Time zone | ||
%z%Ez%Oz |
Writes the offset from UTC in the ISO 8601 format. For example -0430 refers to 4 hours 30 minutes behind UTC. If the offset is zero, +0000 is used.
The modified commands |
|
%Z |
Writes the time zone abbreviation. | |
| Miscellaneous | ||
%c%Ec |
Writes the locale's date and time representation.
The modified command |
|