# Vikunja

### docker-compose.yml

```yaml
version: '3'

services:
  vikunja:
    image: vikunja/vikunja:0.24.6
    environment:
      VIKUNJA_SERVICE_PUBLICURL: https://vikunja.MEINEDOMAIN.DE
      VIKUNJA_DATABASE_HOST: db
      VIKUNJA_DATABASE_PASSWORD: MEINDB-PW-123 (gleiches wie unten)
      VIKUNJA_DATABASE_TYPE: postgres
      VIKUNJA_DATABASE_USER: vikunja
      VIKUNJA_DATABASE_DATABASE: vikunja
      VIKUNJA_SERVICE_JWTSECRET: GCP.........bjd ("openssl rand 32 -base64" in shell eingeben)
      #EMAIL-Settings
      #VIKUNJA_MAILER_AUTHTYPE: plain
      #VIKUNJA_MAILER_SKIPTLSVERIFY: 1
      #VIKUNJA_MAILER_FORCESSL: 1
      VIKUNJA_SERVICE_ENABLEEMAILREMINDERS: 1
      VIKUNJA_MAILER_ENABLED: 1
      VIKUNJA_MAILER_HOST: smtp.MAILSERVER.DE
      VIKUNJA_MAILER_PORT: 587
      VIKUNJA_MAILER_USERNAME: USER@DOMAIN.DE
      VIKUNJA_MAILER_PASSWORD: MEINMAILPW123
      VIKUNJA_MAILER_FROMEMAIL: USER@DOMAIN.DE
      #Allow New User Registration (Für ersten User auf true setzen, User anlegen und danach wieder auf false)
      VIKUNJA_SERVICE_ENABLEREGISTRATION: true
      #JWT Token Expiration in Seconds (2592000 = 30 days, default is 3 days = 259200)
      VIKUNJA_SERVICE_JWTTTL: 2592000 
      #Defaultsettings  https://vikunja.io/docs/config-options/
      VIKUNJA_DEFAULTSETTINGS_EMAIL_REMINDERS_ENABLED: true
      VIKUNJA_DEFAULTSETTINGS_DISCOVERABLE_BY_NAME: true
      VIKUNJA_DEFAULTSETTINGS_DISCOVERABLE_BY_EMAIL: true
      VIKUNJA_DEFAULTSETTINGS_OVERDUE_TASKS_REMINDERS_ENABLED: true
      VIKUNJA_DEFAULTSETTINGS_WEEK_START: 1 #0=Sunday, 1=Monday, etc...
      VIKUNJA_DEFAULTSETTINGS_LANGUAGE: de-DE
      #Trello import
      VIKUNJA_MIGRATION_TRELLO_ENABLE: true
      VIKUNJA_MIGRATION_TRELLO_KEY: xxx
      #Prometheus Metrics (.../api/v1/metrics)
      VIKUNJA_METRICS_ENABLED: true
      #OIDC Usersearch
      VIKUNJA_SERVICE_ENABLEOPENIDTEAMUSERSEARCH: true
      #Weiteres
      VIKUNJA_SERVICE_CUSTOMLOGOURL: https://auth.MEINEAUTHENTIKDOMAIN.de/media/public/pr...ng/PL-Logo.png
    ports:
      - 3456:3456
    volumes:
      - app:/app/vikunja/files
      - config:/etc/vikunja/
    depends_on:
      db:
        condition: service_healthy
    restart: unless-stopped
  db:
    image: postgres:16
    environment:
      POSTGRES_PASSWORD: MEINDB-PW-123 (gleiches wie oben)
      POSTGRES_USER: vikunja
    volumes:
      - db:/var/lib/postgresql/data
    restart: unless-stopped
    healthcheck:
      test: ["CMD-SHELL", "pg_isready -h localhost -U $$POSTGRES_USER"]
      interval: 2s

volumes:
  app:
  db:
  config:
```

### Schreibrechte für files erteilen

(default ist root user mit uid 1000 für den container)

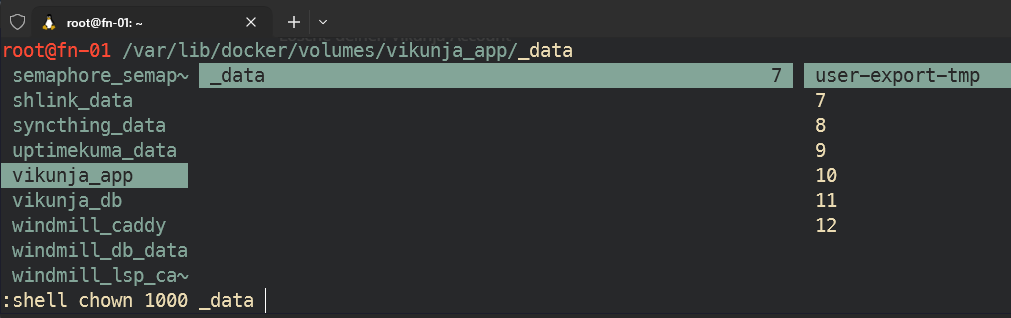
<p class="callout warning">Für Schreibrechte muss man noch den root user 1000 für das App-Volume berechtigen:  
</p>

```
chown 1000 $PWD/files
```

zb in ranger mit Shortcut s um ein Shell-cmd einzugeben:

[![image.png](https://wiki.folkerts.it/uploads/images/gallery/2024-08/scaled-1680-/bfHimage.png)](https://wiki.folkerts.it/uploads/images/gallery/2024-08/bfHimage.png)
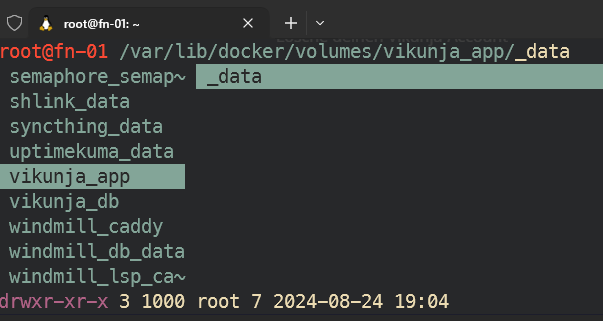
sieht danach so aus:

[![image.png](https://wiki.folkerts.it/uploads/images/gallery/2024-08/scaled-1680-/rViimage.png)](https://wiki.folkerts.it/uploads/images/gallery/2024-08/rViimage.png)
### Account anlegen

dann die subdomain anlegen, Reverserproxy konfigurieren und domain aufrufen:

[![image.png](https://wiki.folkerts.it/uploads/images/gallery/2024-08/scaled-1680-/image.png)](https://wiki.folkerts.it/uploads/images/gallery/2024-08/image.png)
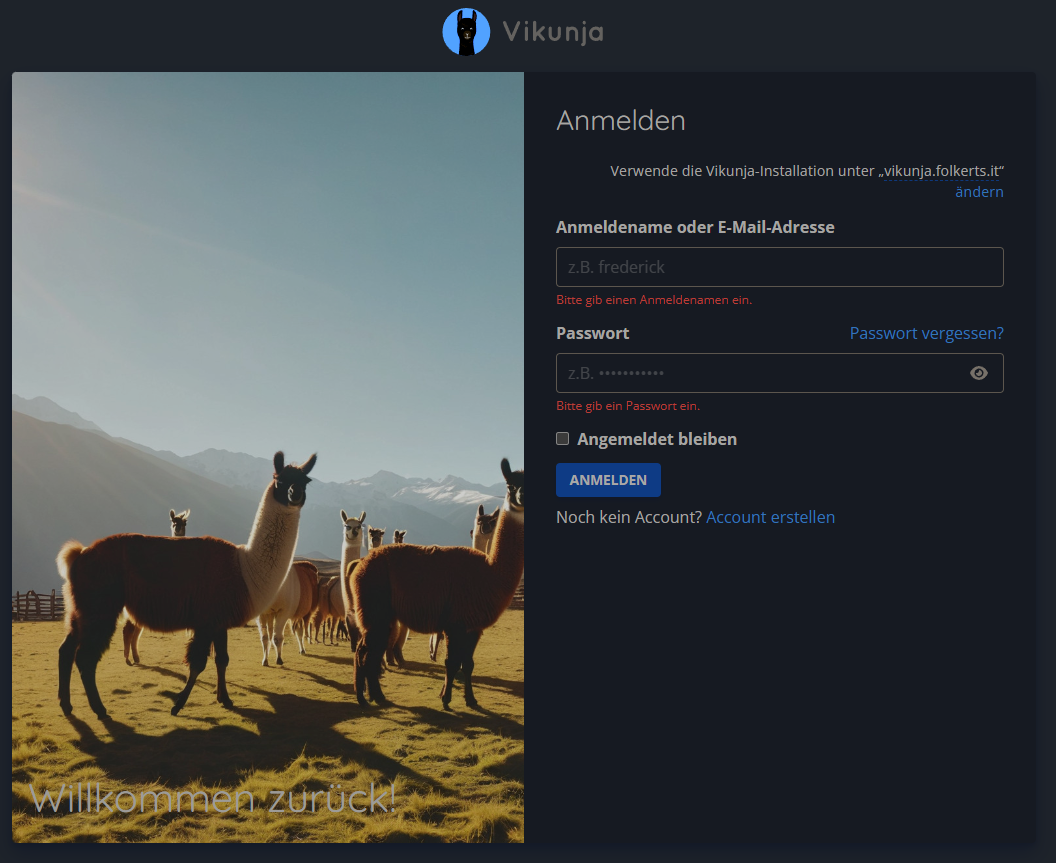
auf 'Account erstellen' und ersten bzw weitere Accounts erstellen.

Danach im Stack die env

```bash
VIKUNJA_SERVICE_ENABLEREGISTRATION=false
```

setzen, um weitere Anmeldungen zu verhindern.

### Authentik verknüpfen

<p class="callout danger">OBACHT: Mit dem aktuellsten unstable Release ändert sich die OIDC Syntax in der config.yml von Vikunja. Die alte Version für Vikunja 0.24.6 findest du weiter unten!</p>

für die config.yml, das volume config: verwenden und dort eine config.yml anlegen:

[![image.png](https://wiki.folkerts.it/uploads/images/gallery/2024-08/scaled-1680-/SzWimage.png)](https://wiki.folkerts.it/uploads/images/gallery/2024-08/SzWimage.png)
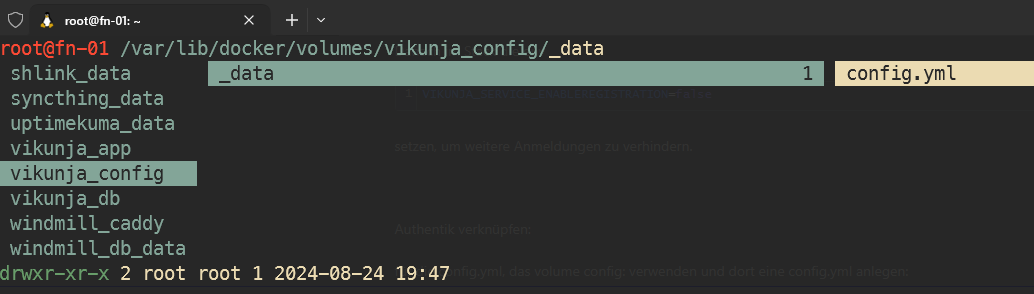
mit dem inhalt:

ACHTUNG! SYNTAX IST FÜR NEUE UNSTABLE VERSION NACH 0.24.6! ALTE CONFIG WEITER UNTEN

```yaml
# neue Syntax für unstable release nach 0.24.6
# https://vikunja.io/docs/openid/#step-2-configure-vikunja
auth:
  local:
    enabled: false
  openid:
    enabled: true
    redirecturl: https://vikunja.MEINEDOMAIN.DE/auth/openid/ #SLASH AM ENDE IST WICHTIG
    providers:
      AUTHENTIK:
        name: "Authentik"
        authurl: https://auth.MEINEDOMAIN.DE/application/o/vikunja/ #SLASH AM ENDE IST WICHTIG
        clientid: Bes........Hzg
        clientsecret: giQY...................A1b6XW
        scope: openid profile email vikunja_scope
        forceuserinfo: false # Optional: Set to true to always use UserInfo endpoint instead of ID token claims, defaults to false
```

ALTE SYNTAX zB FÜR VERSION 0.24.6:

```yaml
auth:
  # Local authentication will let users log in and register (if enabled) through the db.
  # This is the default auth mechanism and does not require any additional configuration.
  local:
    # Enable or disable local authentication
    enabled: true
  # OpenID configuration will allow users to authenticate through a third-party OpenID Connect compatible provider.<br/>
  # The provider needs to support the `openid`, `profile` and `email` scopes.<br/>
  # **Note:** Some openid providers (like gitlab) only make the email of the user available through openid claims if they have set it to be publicly vis>  # If the email >  # **Note 2:** The frontend expects to be redirected after authentication by the third party
  # to <frontend-url>/auth/openid/<auth key>. Please make sure to configure the redirect url with your third party
  # auth service accordingly if you're using the default Vikunja frontend.
  # Take a look at the [default config file](https://github.com/go-vikunja/api/blob/main/config.yml.sample) for more information about how to configure >  openid:
  openid:
    # Enable or disable OpenID Connect authentication
    enabled: true
    # A list of enabled providers
    providers:
      # The name of the provider as it will appear in the frontend.
      - name: "authentik Login"
        # The auth url to send users to if they want to authenticate using OpenID Connect.
        authurl: https://auth.MEINEDOMAIN.DE/application/o/vikunja/
        # The client ID used to authenticate Vikunja at the OpenID Connect provider.
        clientid: x8GYDQBG8..........WPiN0n
        # The client secret used to authenticate Vikunja at the OpenID Connect provider.
        clientsecret: vdciH0h1L..........................................................dPHA9WBP6tGLD

        # https://vikunja.io/docs/openid#setup-in-authentik
        logouturl: https://auth.MEINEDOMAIN.DE/application/o/vikunja/end-session/"
        scope: openid email profile vikunja_scope
```

<p class="callout info">weiteres unter   
[https://docs.goauthentik.io/integrations/services/vikunja/](https://docs.goauthentik.io/integrations/services/vikunja/)   
und um teams / groups zu syncen:  
[https://vikunja.io/docs/openid#setup-in-authentik](https://vikunja.io/docs/openid#setup-in-authentik) </p>

### easyVerein als IdP

Konfiguration bei easyVerein:

[![image.png](https://wiki.folkerts.it/uploads/images/gallery/2025-08/scaled-1680-/j3Aimage.png)](https://wiki.folkerts.it/uploads/images/gallery/2025-08/j3Aimage.png)
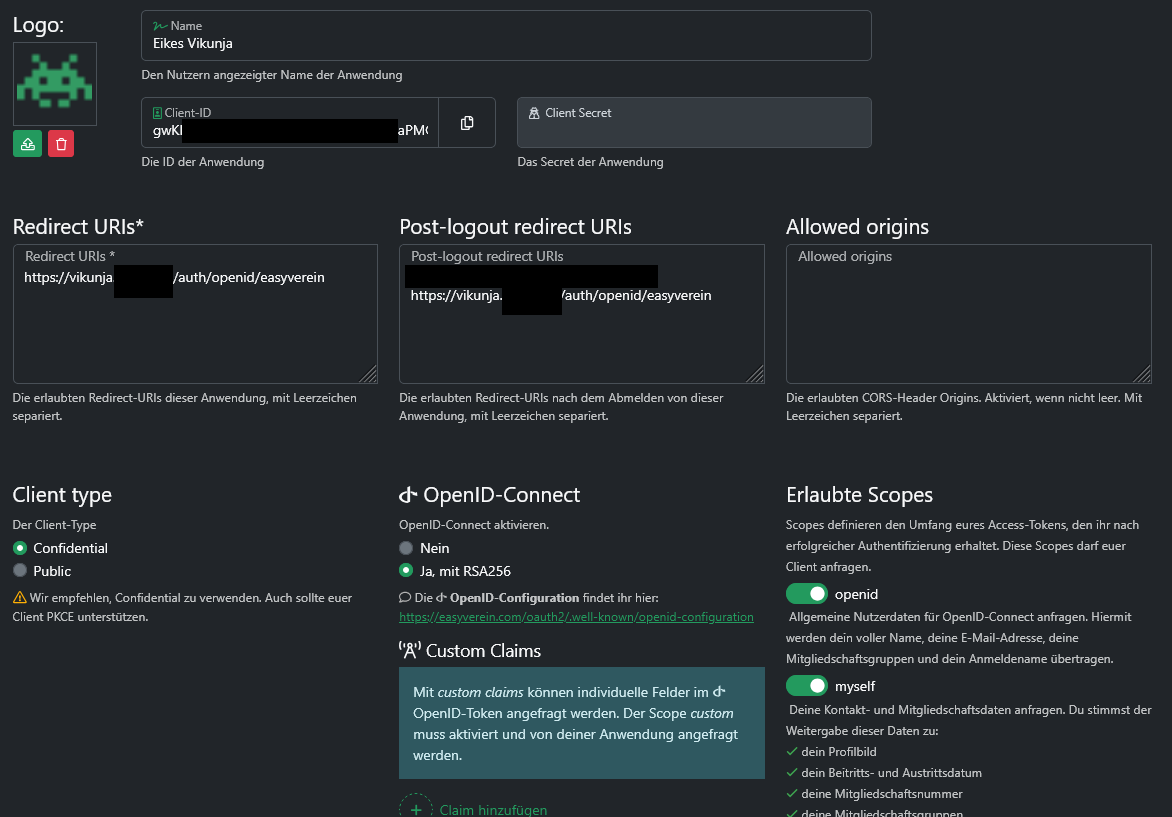
config.yml vom Vikunja Docker Volume `config`:   
(NEUE SYNTAX!, siehe oben)

```yaml
auth:
  local:
    enabled: false
  openid:
    enabled: true
    redirecturl: https://vikunja.folkerts.it/auth/openid/
    providers:
      AUTHENTIK:
        name: "Authentik"
        authurl: https://auth.folkerts.it/application/o/vikunja/
        clientid: Bes4h...fMRnMHzg
        clientsecret: giQYk.....................QUvSVtXIWCw3polnJw
        scope: openid profile email vikunja_scope
        forceuserinfo: false # Optional: Set to true to always use UserInfo endpoint instead of ID token claims, defaul>
      easyVerein:
        name: "easyVerein"
#        authurl: "https://easyverein.com/oauth2/authorize"
        authurl: https://easyverein.com/oauth2
        clientid: gwKKKZn7T......U7W4lt
        clientsecret: Z6jug02E2t9WDzmXXoZ....................rfi5iiOo1T88KDYs
        scope: openid myself custom
        forceuserinfo: false
        teamsclaim: groups  # Der Claim-Name für Gruppen
        teamcreateproperty: name  # Property für Teamnamen
        teamsyncenabled: true  # Teams automatisch synchronisieren
```

### Vikunja Teams aus Authentik übernehmen

[https://vikunja.io/docs/openid#setup-in-authentik](https://vikunja.io/docs/openid#setup-in-authentik)

in der config.yml (siehe oben) ist dafür bereits der scope vikunja\_scope eingestellt. Der Custom Scope muss nun noch in Authentik angelegt werden:

[![image.png](https://wiki.folkerts.it/uploads/images/gallery/2024-08/scaled-1680-/ZkSimage.png)](https://wiki.folkerts.it/uploads/images/gallery/2024-08/ZkSimage.png)
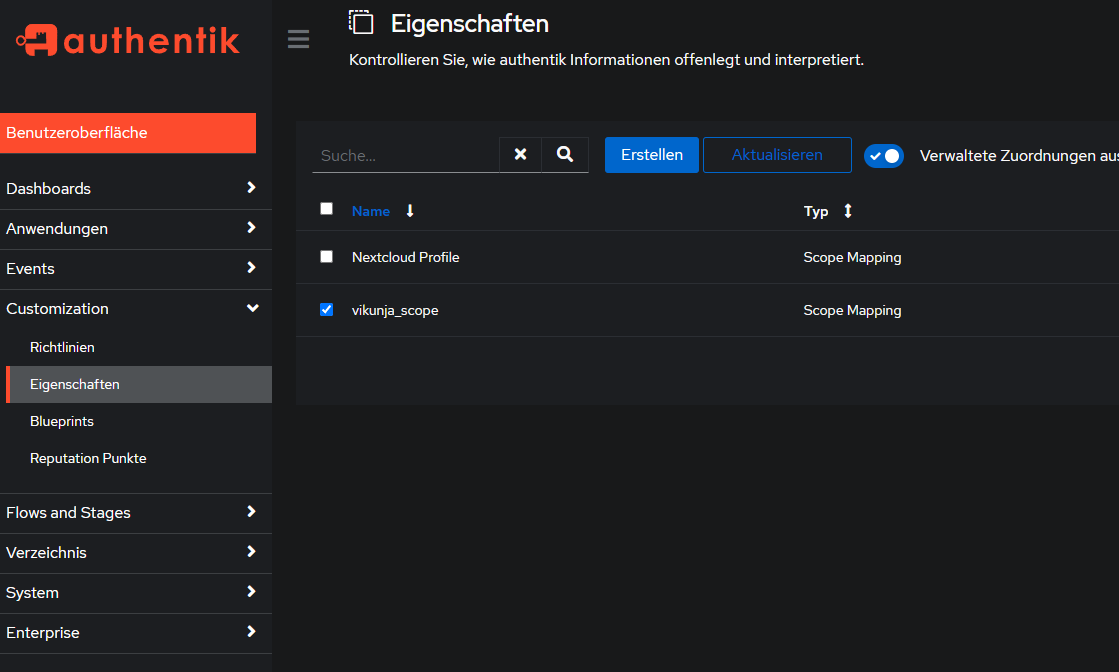
neuer scope unter Customization &gt; Eigenschaften (Properties auf eng?) &gt; Erstellen &gt; Scope Mapping &gt;  
Name: vikunja\_scope  
Bereichsname: vikunja\_scope (?)  
Ausdruck:

```python
groupsDict = {"vikunja_groups": []}
for group in request.user.ak_groups.all():
  groupsDict["vikunja_groups"].append({"name": group.name, "oidcID": group.num_pk})
return groupsDict
```

&gt; Fertig

Danach unter Anwendungen &gt; Anbieter (Provider auf eng.) &gt; Vikunja &gt; Erweiterte Protokolleinstellungen &gt; email, openid, profile, vikunja\_scope mit gedrückter STRG-Taste und Mausklick auswählen:

[![image.png](https://wiki.folkerts.it/uploads/images/gallery/2024-08/scaled-1680-/UUCimage.png)](https://wiki.folkerts.it/uploads/images/gallery/2024-08/UUCimage.png)
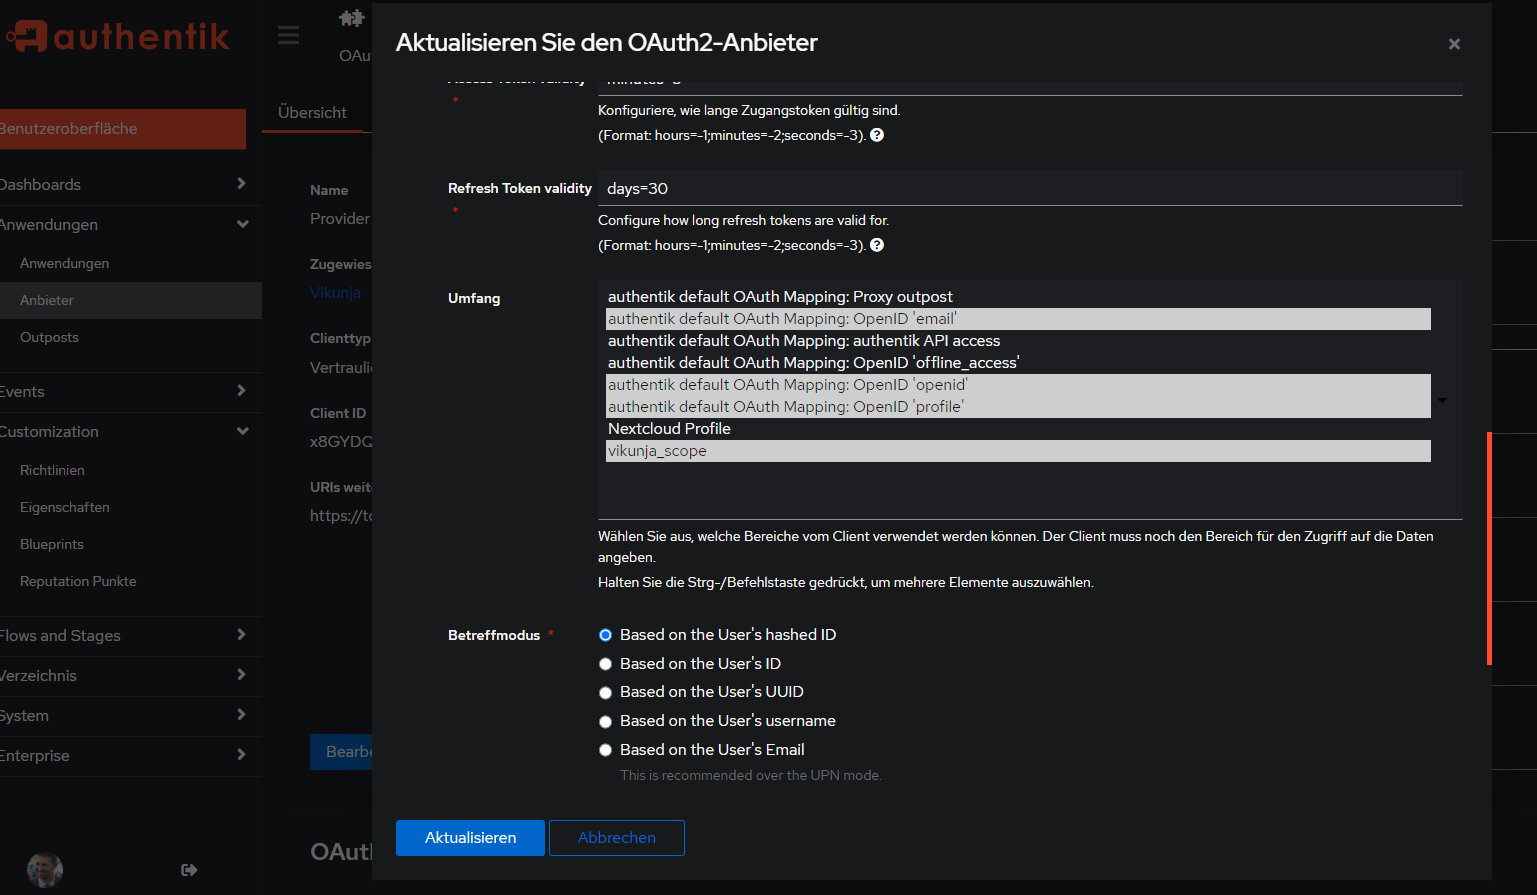
&gt; Aktualisieren

Vikunja Container neustarten, nochmal aus- und einloggen mit Authentik bei Vikunja, dann sollten die Teams (Gruppen) aus Authentik übernommen worden sein:

[![image.png](https://wiki.folkerts.it/uploads/images/gallery/2024-08/scaled-1680-/G3rimage.png)](https://wiki.folkerts.it/uploads/images/gallery/2024-08/G3rimage.png)