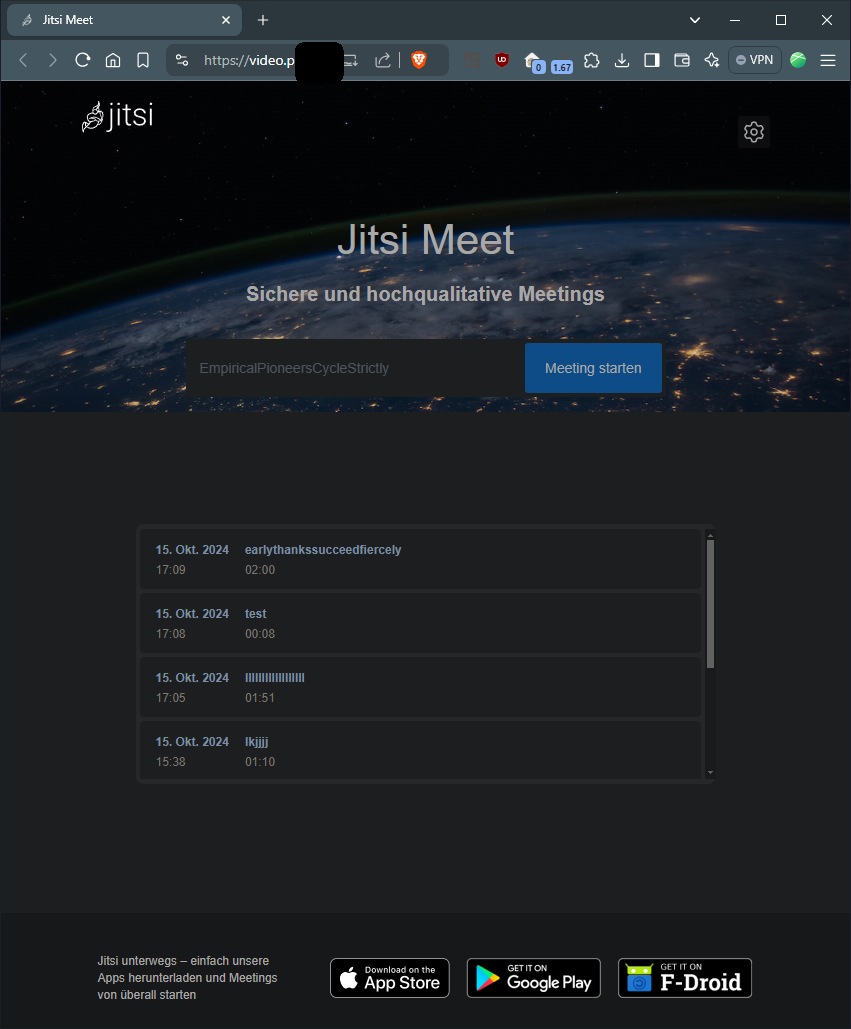
# Jitsi Meet
[](https://wiki.folkerts.it/uploads/images/gallery/2024-10/AUqimage.png)
[https://jitsi.support/wiki/install-jitsi-meet-docker/#step-2-download-jitsi-meet-docker-files](https://jitsi.support/wiki/install-jitsi-meet-docker/#step-2-download-jitsi-meet-docker-files)
oder
[https://jitsi.github.io/handbook/docs/devops-guide/devops-guide-docker](https://jitsi.github.io/handbook/docs/devops-guide/devops-guide-docker)
## Installation
Jitsi Meet sollte nicht in Portainer installiert werden, weil ein Skript zur Passworderstellung benutzt und damit eine eigene .env erzeugt wird.
### Git Repo Klonen
```
git clone https://github.com/jitsi/docker-jitsi-meet
cd docker-jitsi-meet
```
### .env kopieren
```
cp env.example .env
```
### Passwörter autogenerieren
```
./gen-passwords.sh
```
### docker-compose.yml anpassen
ein paar kleine Änderungen habe ich für die yml gemacht:
```yaml
#......
web:
image: jitsi/web:${JITSI_IMAGE_VERSION:-unstable}
restart: ${RESTART_POLICY:-unless-stopped}
ports:
- '${HTTP_PORT}:80'
- '${HTTPS_PORT}:443'
volumes:
- ${CONFIG}/web:/config:Z
- ${CONFIG}/web/crontabs:/var/spool/cron/crontabs:Z
- ${CONFIG}/transcripts:/usr/share/jitsi-meet/transcripts:Z
- ${CONFIG}/web/load-test:/usr/share/jitsi-meet/load-test:Z
- ${CONFIG}/web/images:/usr/share/jitsi-meet/images:Z # um zb das watermark.svg zu ersetzen
labels:
#......
# XMPP server
prosody:
image: jitsi/prosody:${JITSI_IMAGE_VERSION:-stable-10008}
restart: ${RESTART_POLICY:-unless-stopped}
expose:
- '${XMPP_PORT:-5222}'
- '${PROSODY_S2S_PORT:-5269}'
- '5347'
- '${PROSODY_HTTP_PORT:-5280}'
ports:
- '5222:5222' # Ports weitergeleitet, damit eine zweite JVB auf Port 5222 zugreifen kann
- '5347:5347'
container_name: jitsi-prosody
labels:
#...........
```
### .env anpassen
```bash
# shellcheck disable=SC2034
################################################################################
################################################################################
# Welcome to the Jitsi Meet Docker setup!
#
# This sample .env file contains some basic options to get you started.
# The full options reference can be found here:
# https://jitsi.github.io/handbook/docs/devops-guide/devops-guide-docker
################################################################################
################################################################################
#
# Basic configuration options
#
# Directory where all configuration will be stored
#CONFIG=~/.jitsi-meet-cfg
CONFIG=/var/lib/docker/volumes/jitsimeet
# ^ wähle hier das Standardverzeichnis für deine Docker Volumes, ansonsten werden alle Volumes im Root-Nutzerverzeichnis des Servers (~/.jitsi-meet-cfg) erstellt (welches meistens bei Backups ignoriert wird).
#Falls ein Hetzner-Volume auf dem Server eingehängt ist, kann zb das als Config-Directory verwendet werden:
#CONFIG=/mnt/praxis-volume-01/docker-data/volumes/jitsimeet
# Exposed HTTP port (will redirect to HTTPS port)
HTTP_PORT=8043
# Exposed HTTPS port
HTTPS_PORT=8443
# System time zone
TZ=Europe/Berlin
# Public URL for the web service (required)
# Keep in mind that if you use a non-standard HTTPS port, it has to appear in the public URL
PUBLIC_URL=https://jitsi.MEINE-DOMAIN.de
# Media IP addresses to advertise by the JVB
# This setting deprecates DOCKER_HOST_ADDRESS, and supports a comma separated list of IPs
# See the "Running behind NAT or on a LAN environment" section in the Handbook:
# https://jitsi.github.io/handbook/docs/devops-guide/devops-guide-docker#running-behind-nat-or-on-a-lan-environment
#JVB_ADVERTISE_IPS=192.168.1.1,1.2.3.4
JVB_ADVERTISE_IPS=116.xxx.xxx.143 #Public IP zb vom Hetzner Server, auf dem die JVB läuft
# oder
JVB_ADVERTISE_IPS=116.xxx.xxx.143, 10.20.0.5 #Public IP zb vom Hetzner Server, auf dem die JVB läuft PLUS zweiter Server mit JVB
#https://jitsi.github.io/handbook/docs/devops-guide/devops-guide-docker/#turn-server-configuration
#JVB_STUN_SERVERS=meet-jit-si-turnrelay.jitsi.net:443, stun.l.google.com:19302, stun1.l.google.com:19302, stun2.l.google.com:19302
JVB_STUN_SERVERS=turn.MEINEDOMAIN.de:443
TURN_CREDENTIALS=rqjmfcGhY
TURN_HOST=turn.MEINEDOMAIN.de
TURN_PORT=443
#TURNS_HOST=turn.praxisluebberding.de
#TURNS_PORT=443
TURN_TRANSPORT=tcp
ENABLE_TURN=1
ENABLE_P2P=1
# Beim starten mit docker compose -f docker-compose.yml -f log-analyser.yml -f prometheus.yml -f grafana.yml up -d
PROSODY_ENABLE_METRICS = true
#https://github.com/jitsi/docker-jitsi-meet/issues/992#issuecomment-811373266
#https://jitsi.github.io/handbook/docs/devops-guide/devops-guide-docker/#running-behind-a-reverse-proxy
#ENABLE_SCTP=1
#ENABLE_COLIBRI_WEBSOCKET=0
#ENABLE_XMPP_WEBSOCKET=0
#
# Memory limits for Java components
#
#JICOFO_MAX_MEMORY=3072m
#VIDEOBRIDGE_MAX_MEMORY=3072m
#
# JaaS Components (beta)
# https://jaas.8x8.vc
#
# Enable JaaS Components (hosted Jigasi)
# NOTE: if Let's Encrypt is enabled a JaaS account will be automatically created, using the provided email in LETSENCRYPT_EMAIL
#ENABLE_JAAS_COMPONENTS=0
#
# Let's Encrypt configuration
#
# Enable Let's Encrypt certificate generation
#ENABLE_LETSENCRYPT=1
# Domain for which to generate the certificate
#LETSENCRYPT_DOMAIN=meet.example.com
# E-Mail for receiving important account notifications (mandatory)
#LETSENCRYPT_EMAIL=alice@atlanta.net
# Use the staging server (for avoiding rate limits while testing)
#LETSENCRYPT_USE_STAGING=1
#
# Etherpad integration (for document sharing)
#
# Set the etherpad-lite URL in the docker local network (uncomment to enable)
#ETHERPAD_URL_BASE=http://etherpad.meet.jitsi:9001
# Set etherpad-lite public URL, including /p/ pad path fragment (uncomment to enable)
#ETHERPAD_PUBLIC_URL=https://etherpad.my.domain/p/
#
# Whiteboard integration
#
# Set the excalidraw-backend URL in the docker local network (uncomment to enable)
WHITEBOARD_COLLAB_SERVER_URL_BASE=http://excalidraw.jitsi_meet.jitsi
# Set the excalidraw-backend public URL (uncomment to enable)
WHITEBOARD_COLLAB_SERVER_PUBLIC_URL=https://excalidraw.MEINEDOMAIN.de
#
# Basic Jigasi configuration options (needed for SIP gateway support)
#
# SIP URI for incoming / outgoing calls
#JIGASI_SIP_URI=test@sip2sip.info
# Password for the specified SIP account as a clear text
#JIGASI_SIP_PASSWORD=passw0rd
# SIP server (use the SIP account domain if in doubt)
#JIGASI_SIP_SERVER=sip2sip.info
# SIP server port
#JIGASI_SIP_PORT=5060
# SIP server transport
#JIGASI_SIP_TRANSPORT=UDP
#
# Authentication configuration (see handbook for details)
#
# Enable authentication (will ask for login and password to join the meeting)
ENABLE_AUTH=1
# Enable guest access (if authentication is enabled, this allows for users to be held in lobby until registered user lets them in)
ENABLE_GUESTS=1
# Select authentication type: internal, jwt, ldap or matrix
AUTH_TYPE=internal
#https://jitsi.github.io/handbook/docs/devops-guide/devops-guide-docker/#features-configuration-configjs
ENABLE_WELCOME_PAGE=0
# Prejoin Page deaktiviert, weil Teilnehmer manchmal beim Moderator-Login auf Abbrechen drücken und dann auf der Prejoin-Page vereinsamen, wo man seinen Namen eingibt
ENABLE_PREJOIN_PAGE=0
# Die Lobby aktiviert ein Moderator im Raum nach der Erföffnung über Sicherheitseinstellungen > Lobby aktivieren
ENABLE_LOBBY=1
ENABLE_CLOSE_PAGE=0
# JWT authentication
#
# Application identifier
#JWT_APP_ID=my_jitsi_app_id
# Application secret known only to your token generator
#JWT_APP_SECRET=my_jitsi_app_secret
# (Optional) Set asap_accepted_issuers as a comma separated list
#JWT_ACCEPTED_ISSUERS=my_web_client,my_app_client
# (Optional) Set asap_accepted_audiences as a comma separated list
#JWT_ACCEPTED_AUDIENCES=my_server1,my_server2
# LDAP authentication (for more information see the Cyrus SASL saslauthd.conf man page)
#
# LDAP url for connection
#LDAP_URL=ldaps://ldap.domain.com/
# LDAP base DN. Can be empty
#LDAP_BASE=DC=example,DC=domain,DC=com
# LDAP user DN. Do not specify this parameter for the anonymous bind
#LDAP_BINDDN=CN=binduser,OU=users,DC=example,DC=domain,DC=com
# LDAP user password. Do not specify this parameter for the anonymous bind
#LDAP_BINDPW=LdapUserPassw0rd
# LDAP filter. Tokens example:
# %1-9 - if the input key is user@mail.domain.com, then %1 is com, %2 is domain and %3 is mail
# %s - %s is replaced by the complete service string
# %r - %r is replaced by the complete realm string
#LDAP_FILTER=(sAMAccountName=%u)
# LDAP authentication method
#LDAP_AUTH_METHOD=bind
# LDAP version
#LDAP_VERSION=3
# LDAP TLS using
#LDAP_USE_TLS=1
# List of SSL/TLS ciphers to allow
#LDAP_TLS_CIPHERS=SECURE256:SECURE128:!AES-128-CBC:!ARCFOUR-128:!CAMELLIA-128-CBC:!3DES-CBC:!CAMELLIA-128-CBC
# Require and verify server certificate
#LDAP_TLS_CHECK_PEER=1
# Path to CA cert file. Used when server certificate verify is enabled
#LDAP_TLS_CACERT_FILE=/etc/ssl/certs/ca-certificates.crt
# Path to CA certs directory. Used when server certificate verify is enabled
#LDAP_TLS_CACERT_DIR=/etc/ssl/certs
# Wether to use starttls, implies LDAPv3 and requires ldap:// instead of ldaps://
# LDAP_START_TLS=1
#
# Security
#
# Set these to strong passwords to avoid intruders from impersonating a service account
# The service(s) won't start unless these are specified
# Running ./gen-passwords.sh will update .env with strong passwords
# You may skip the Jigasi and Jibri passwords if you are not using those
# DO NOT reuse passwords
#
# XMPP password for Jicofo client connections
JICOFO_AUTH_PASSWORD=
# XMPP password for JVB client connections
JVB_AUTH_PASSWORD=
# XMPP password for Jigasi MUC client connections
JIGASI_XMPP_PASSWORD=
# XMPP password for Jigasi transcriber client connections
JIGASI_TRANSCRIBER_PASSWORD=
# XMPP recorder password for Jibri client connections
JIBRI_RECORDER_PASSWORD=
# XMPP password for Jibri client connections
JIBRI_XMPP_PASSWORD=
#
# Docker Compose options
#
# Container restart policy
#RESTART_POLICY=unless-stopped
# Jitsi image version (useful for local development)
#JITSI_IMAGE_VERSION=latest
ENABLE_TRANSCRIPTIONS=0
```
### Konfigurationsdateien anpassen
Für config.js und interface\_config.js müssen eigene custom-Dateien angelegt werden. Mehr dazu unter
[https://jitsi.github.io/handbook/docs/devops-guide/devops-guide-docker/#jitsi-meet-configuration](https://jitsi.github.io/handbook/docs/devops-guide/devops-guide-docker/#jitsi-meet-configuration)
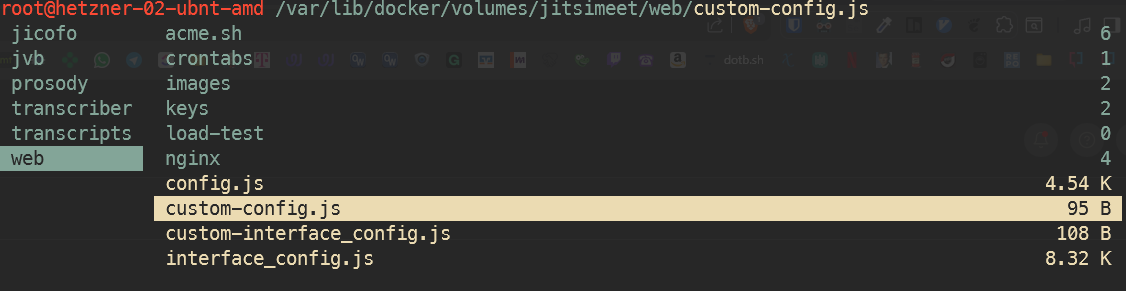
dazu werden im Docker Volume (CONFIG-Verzeichnis aus der .env siehe oben) zwei Dateien angelegt:
#### custom-config.js
```javascript
config.defaultRemoteDisplayName= 'Teilnehmer';
config.defaultLocalDisplayName= 'Ich';
```
#### custom-interface\_config.js
```javascript
interfaceConfig.JITSI_WATERMARK_LINK= 'https://MEINEDOMAIN.de';
interfaceConfig.APP_NAME= 'Mein-Jitsi';
```
sieht dann so aus:
[](https://wiki.folkerts.it/uploads/images/gallery/2025-08/4fXimage.png)
### Container starten
```
docker-compose up -d
```
Mit Grafana, Prometheus, Loki und OpenTelemetry-Connector starten:
```
docker compose -f docker-compose.yml -f log-analyser.yml -f grafana.yml -f prometheus.yml -f transcriber.yml up -d
```
Mit OIDC-Connector (siehe unten)
```
docker compose -f jitsi-go-openid.yml -f docker-compose.yml -f log-analyser.yml -f grafana.yml -f prometheus.yml -f transcriber.yml up -d
```
Anpassungen für grafana.yml, prometheus.yml usw: überall container\_name: jitsi-prometheus hinzugefügt, damit alles einheitlich benannt ist. Außerderm bei log-analyser.yml den hostname: jitsi-otel hinzugefügt, damit prometheus den hostname erkennt:
also docker-compose.yml, grafana.yml, prometheus.yml usw:
```yaml
web:
image: jitsi/web:${JITSI_IMAGE_VERSION:-stable-10008}
...
container_name: jitsi-web # <-- container_name in allen ymls hinzugefügt
labels:
service: "jitsi-web"
environment:
- AMPLITUDE_ID
- ANALYTICS_SCRIPT_URLS
...
```
log-analyser.yml:
```yaml
otel-collector:
image: otel/opentelemetry-collector-contrib
container_name: jitsi-otel
hostname: otel
volumes:
...
```
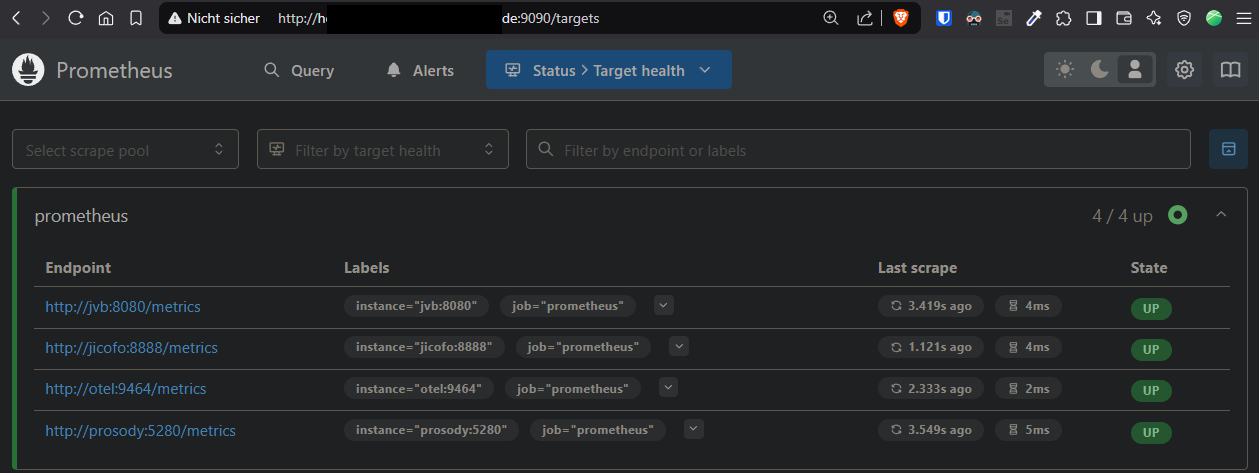
Prometheus kontrollieren: [http://DOCKER-HOST:9090/targets](http://DOCKER-HOST:9090/targets) oder Prometheus > Status > Target health:
[](https://wiki.folkerts.it/uploads/images/gallery/2025-02/meXimage.png)
#### OIDC-Connector mit Authentik
[https://github.com/mod242/jitsi-go-openid](https://github.com/mod242/jitsi-go-openid)
unbedingt die .env anpassen, wenn OIDC verwendet werden soll:
```bash
ENABLE_AUTH=1
ENABLE_GUESTS=1
AUTH_TYPE=jwt
ENABLE_WELCOME_PAGE=0
ENABLE_PREJOIN_PAGE=0
ENABLE_LOBBY=1
ENABLE_CLOSE_PAGE=0
JWT_APP_ID=jitsi.MEINEDOMAIN.de
JWT_APP_SECRET=wAEJSlo........1qKMvdvxQKp
# benötigt und hardkodiert: jitsi
JWT_ACCEPTED_ISSUERS=jitsi
JWT_ACCEPTED_AUDIENCES=jitsi
TOKEN_AUTH_URL=https://jitsi-auth.MEINEDOMAIN.de/authenticate?state={state}&room={room}
JWT_AUTH_TYPE=token
JWT_TOKEN_AUTH_MODULE=token_verification
# wichtig für lobby automatisch aktivieren
XMPP_MUC_MODULES=lobby_autostart_on_owner
```
jitsi-go-openid.yml
```yaml
services:
jitsi-go-openid:
image: mod242/jitsi-go-openid:latest
restart: unless-stopped
environment:
- 'JITSI_SECRET=wAEJSlo....vdvxQKp' # Must match the jwt_secret from your Jitsi configuration
- 'JITSI_URL=https://jitsi.MEINEDOMAIN.de/prefix-zb-kleines-passwort' # Base URL of your Jitsi instance
- 'JITSI_SUB=jitsi.MEINEDOMAIN.de' # Must match the JWT_APP_ID from your Jitsi configuration
- 'ISSUER_BASE_URL=https://authentik.MEINEDOMAIN.de/application/o/jitsi-auth/' # Base URL of your OpenID Connect provider
- 'BASE_URL=https://jitsi-auth.MEINEDOMAIN.de' # Public base URL of this application (should run behind a reverse proxy)
- 'CLIENT_ID=s5iM.......h2dy5d' # Client ID from your OAuth provider
- 'SECRET=hFiiaCEizhRZ......qffiDxxqhQve' # Client secret from your OAuth provider
- 'PREJOIN=false' # Whether the prejoin page should be displayed again after authentication
- 'DEEPLINK=false' # Whether the callback should use a deep link for redirect to ensure the originating client (Desktop, iOS, Android) is used
- 'NAME_KEY=name' # Key for the user's name from the OAuth token (defaults to 'name', but can be 'given_name' or any other key present in the token)
ports:
- "3001:3001"
expose:
- 3001
networks:
meet.jitsi: # -> Your Jitsi Network (if run co-located and exposed via Jitsi-Web)
```
reverse proxy mit neuer subdomain (in diesem fall jitsi-auth.MEINEDOMAIN.de) noch auf port 3001 leiten
### .env bearbeiten und Container neustarten
Wenn die .env bearbeitet wird, müssen die Container mit
```
docker compose down
docker compose up -d
```
neugestartet werden.
❗ Wenn nur `docker compose restart` ausgeführt wird, wird die aktualisierte .env nicht erneut eingelesen!
### Firewall: Ports freischalten
Port 80 & 443 werden über den Reverse Proxy Manager geregelt, zusätzlich muss aber **Port 10000 UDP** freigeschaltet werden!
[https://jitsi.github.io/handbook/docs/devops-guide/devops-guide-docker/#external-ports](https://jitsi.github.io/handbook/docs/devops-guide/devops-guide-docker/#external-ports) ansonsten passiert es, dass nur zwei Teilnehmer miteinander videokonferenzen können und alle stummgeschaltet und deren Videos deaktiviert werden, sobald drei oder mehre Teilnehmer im Jitsi Raum sind.
Fehler im JVB (Jitsi Videobridge) Container:
BridgeSelectionStrategy.select#127: Existing bridge does not have a relay, will not consider other bridges.
[https://github.com/jitsi/docker-jitsi-meet/issues/1735](https://github.com/jitsi/docker-jitsi-meet/issues/1735)
### Zweite JVB für Load-Balancer
auf einem anderen Server:
```yaml
services:
jvb:
image: jitsi/jvb:stable
restart: unless-stopped
ports:
- '${JVB_PORT}:${JVB_PORT}/udp'
- '${JVB_COLIBRI_PORT}:${JVB_COLIBRI_PORT}'
volumes:
- ${CONFIG}/jvb:/config:Z
environment:
- DOCKER_HOST_ADDRESS
- XMPP_AUTH_DOMAIN
- XMPP_INTERNAL_MUC_DOMAIN
- XMPP_SERVER
- JVB_AUTH_USER
- JVB_AUTH_PASSWORD
- JVB_BREWERY_MUC
- JVB_PORT
- JVB_COLIBRI_PORT
- JVB_STUN_SERVERS
- TZ
networks:
meet.jitsi:
networks:
meet.jitsi:
```
.env
```bash
DOCKER_HOST_ADDRESS=server-04.MEINEDOMAIN.de
CONFIG=/var/lib/docker/volumes/jitsimeet
XMPP_SERVER=10.0.0.3
XMPP_AUTH_DOMAIN=auth.meet.jitsi
XMPP_INTERNAL_MUC_DOMAIN=internal-muc.meet.jitsi
JVB_AUTH_USER=jvb
JVB_AUTH_PASSWORD=a054c......da0d # GLEICHES PW WIE AUF HAUPTSERVER IN .env
JVB_BREWERY_MUC=jvbbrewery
JVB_PORT=10000
JVB_COLIBRI_PORT=8080
JVB_STUN_SERVERS=turn.MEINEDOMAIN.de:443
TZ=Europe/Berlin
```
### Moderator Account erstellen
[https://jitsi.github.io/handbook/docs/devops-guide/devops-guide-docker#authentication](https://jitsi.github.io/handbook/docs/devops-guide/devops-guide-docker#authentication)
Wenn die Einstellungen aus meiner .env übernommen wurden, muss noch ein Moderator Account erstellt werden, um einen Jitsi Meet Raum eröffnen zu können. Dafür in die Shell des Containers "prosodyctl" gehen, entweder mit ctop, portainer (/bin/bash) oder über die docker cli:
```bash
docker compose exec prosody /bin/bash
```
danach in der shell des prosody containers:
#### Benutzer anlegen
```bash
prosodyctl --config /config/prosody.cfg.lua register meet.jitsi
```
`meet.jitsi` ist dabei der Name des Netzwerks aus der docker-compose.yml
#### Benutzer entfernen
```bash
prosodyctl --config /config/prosody.cfg.lua unregister meet.jitsi
```
#### Benutzer auflisten
```bash
find /config/data/meet%2ejitsi/accounts -type f -exec basename {} .dat \;
```
### Nginx Proxy Manager Konfiguration
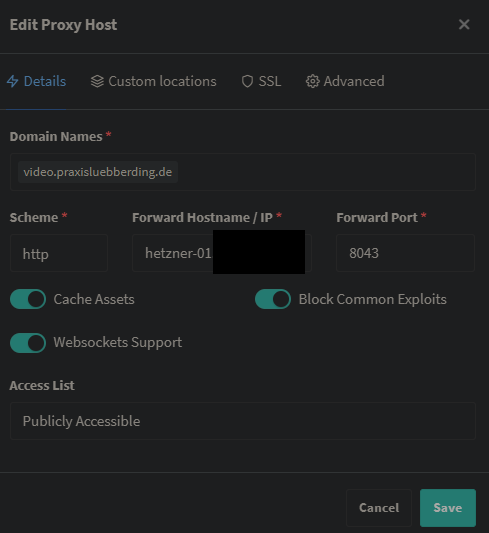
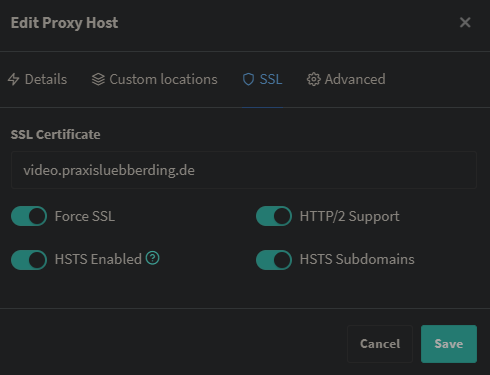
- an Jitsi HTTP Port aus .env weiterleiten, 8043 in meinem Fall
- Alles Checkboxes aktivieren (Websockets!)
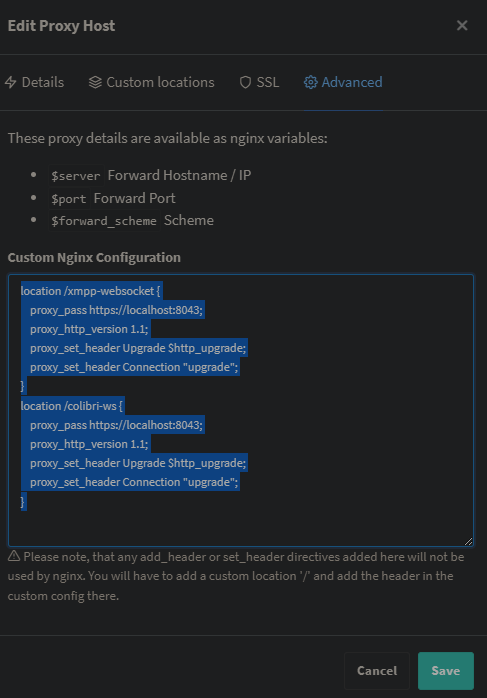
- Custom Locations (nicht unter custom locations sondern im "Advanced" Tab! siehe unten)
[](https://wiki.folkerts.it/uploads/images/gallery/2024-10/lpQimage.png)
[](https://wiki.folkerts.it/uploads/images/gallery/2024-10/PTQimage.png)
[](https://wiki.folkerts.it/uploads/images/gallery/2024-10/UEQimage.png)
```
location /xmpp-websocket {
proxy_pass https://localhost:8043;
proxy_http_version 1.1;
proxy_set_header Upgrade $http_upgrade;
proxy_set_header Connection "upgrade";
}
location /colibri-ws {
proxy_pass https://localhost:8043;
proxy_http_version 1.1;
proxy_set_header Upgrade $http_upgrade;
proxy_set_header Connection "upgrade";
}
```
### Whiteboard (ExcaliDraw) integrieren
[https://discussion.scottibyte.com/t/add-a-whiteboard-to-jitsi-meet/320](https://discussion.scottibyte.com/t/add-a-whiteboard-to-jitsi-meet/320)
[https://github.com/jitsi/excalidraw-backend](https://github.com/jitsi/excalidraw-backend)
```
git clone https://github.com/jitsi/excalidraw-backend.git
cd excalidraw-backend
touch docker-compose.yml
```
docker-compose.yml
```yaml
version: "3.8"
services:
excalidraw:
build:
context: .
args:
- NODE_ENV=development
container_name: excalidraw
ports:
- "6421:80"
restart: unless-stopped
stdin_open: true
networks:
- jitsi_meet.jitsi
healthcheck:
disable: true
environment:
- NODE_ENV=development
volumes:
- ./:/opt/node_app/app:delegated
- ./package.json:/opt/node_app/package.json
- ./yarn.lock:/opt/node_app/yarn.lock
networks:
jitsi_meet.jitsi:
name: jitsi_meet.jitsi
external: true
driver: bridge
```
```
docker compose up --build -d
```
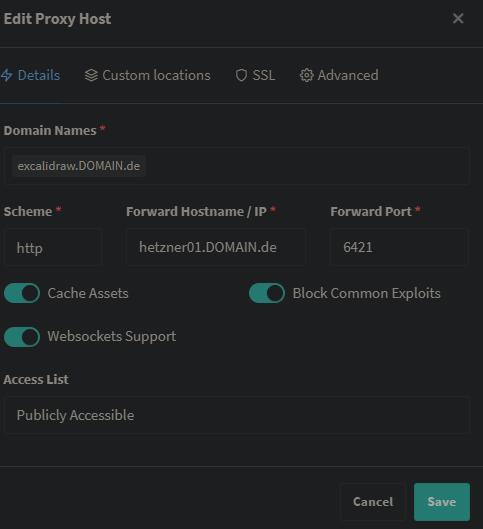
NPM Reverse Proxy Eintrag für excalidraw anlegen:
[](https://wiki.folkerts.it/uploads/images/gallery/2024-11/S1aimage.png)
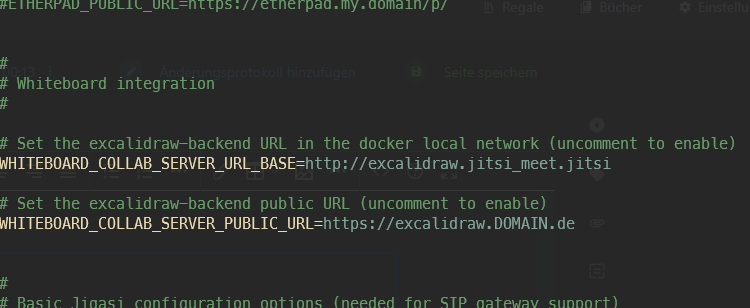
.env von Jitsi anpassen:
```bash
#
# Whiteboard integration
#
# Set the excalidraw-backend URL in the docker local network (uncomment to enable)
WHITEBOARD_COLLAB_SERVER_URL_BASE=http://excalidraw.jitsi_meet.jitsi
# Set the excalidraw-backend public URL (uncomment to enable)
WHITEBOARD_COLLAB_SERVER_PUBLIC_URL=https://excalidraw.DOMAIN.de
```
[](https://wiki.folkerts.it/uploads/images/gallery/2024-11/KhDimage.png)
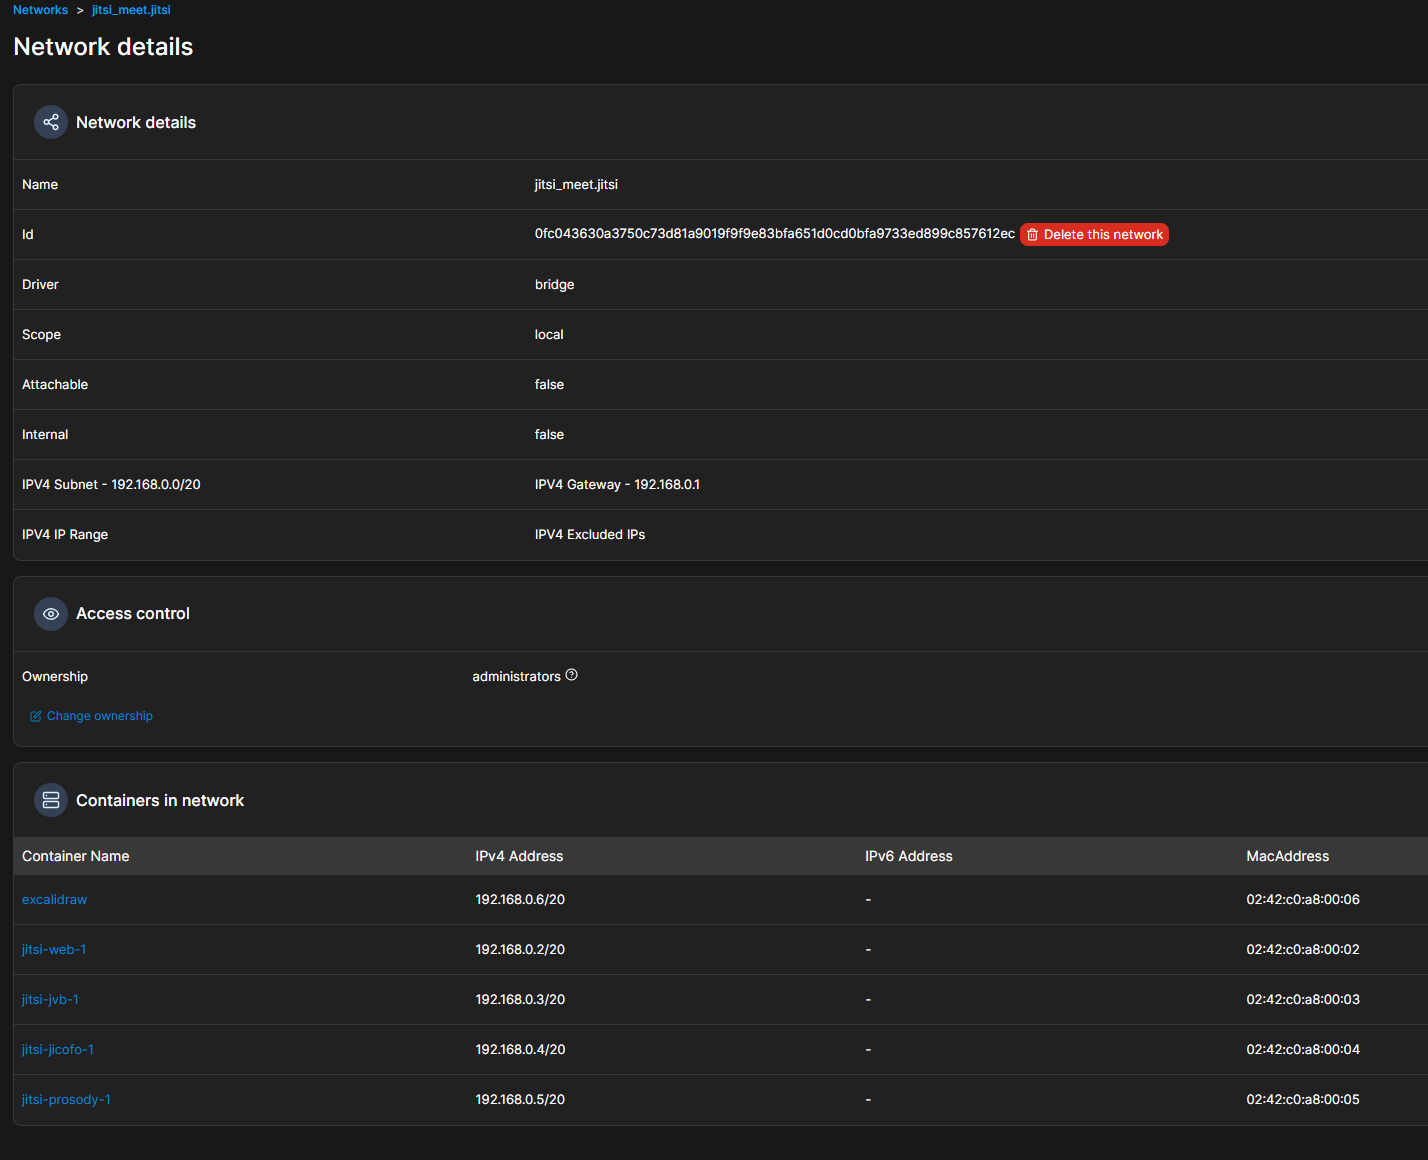
Obacht: damit die lokale URL funktioniert, müssen die jitsi container im gleichen Netzwerk wie excalidraw sein, daher auch in der docker-compose.yml von excalidraw das netzwerk von jitsi als external einpflegen. Am besten mit exec in den jitsi-web container gehen und prüfen, ob exclidraw erreichbar ist:
```
ping excalidraw -c 1
ping excalidraw.jitsi_meet.jitsi -c 1
```
[](https://wiki.folkerts.it/uploads/images/gallery/2024-11/AUIimage.png)
[](https://wiki.folkerts.it/uploads/images/gallery/2024-11/tPXimage.png)
[](https://wiki.folkerts.it/uploads/images/gallery/2024-11/4Y7image.png)
nachdem die .env mit URLs versorgt wurde, nochmal in den jitsi docker Ordner wechseln und
```
docker compose down
docker compose up -d
```
### TURN / STUN Server einrichten (Coturn)
Weil einige Firewalls auf der Clientseite verhindern, sich mit UDP Port 10000 zu verbinden, um WebRTC durchzuschleusen, sollte ein TURN Server aufgesetzt werden, über den dann der Verkehr geleitet wird. Wenn UDP Ports möglich sind, stellt der STUN Server eine Peer2Peer Verbinung her. Wenn nicht, wird der Traffic über Port 443 geleitet, was bei jedem restriktiven Netzwerk funktionieren sollte.
Mehr dazu hier im Eintrag Coturn: [https://wiki.folkerts.it/books/docker/page/coturn-stun-turn-server-fur-jitsi-meet](https://wiki.folkerts.it/books/docker/page/coturn-stun-turn-server-fur-jitsi-meet)
**⚠ Wichtig ⚠** Der TURN Server kann nicht ohne weiteres über einen Reverse Proxy geleitet werden, weil er nicht auf dem HTTP Protokoll beruht, sondern auf TCP und/oder TLS. Es sollte also am besten ein eigener Server sein, auf dem der Port 443 freigegeben werden kann, ohne auf einen Reverse Proxy zu zeigen.
### Design anpassen
[https://goneuland.de/jitsi-anpassungen-docker/](https://goneuland.de/jitsi-anpassungen-docker/)
[https://scheible.it/das-design-von-jitsi-meet-anpassen](https://scheible.it/das-design-von-jitsi-meet-anpassen)
#### Logo anpassen
```yaml
web:
image: jitsi/web:${JITSI_IMAGE_VERSION:-stable-10008}
...
volumes:
...
- ${CONFIG}/web/load-test:/usr/share/jitsi-meet/load-test:Z
- ${CONFIG}/web/images/watermark.svg:/usr/share/jitsi-meet/images/watermark.svg:Z # <-- Logo als .svg hinzufügen
container_name: jitsi-web
...
```
## UDP Buffer auf Host anpassen
[https://jitsi.github.io/handbook/docs/devops-guide/devops-guide-docker/#adjust-udp-buffers](https://jitsi.github.io/handbook/docs/devops-guide/devops-guide-docker/#adjust-udp-buffers)
If you are experiencing issues with UDP traffic, like synchronization issues, skipping frames and similar, or if you expect a high traffic and big conferences, you might want to adjust the UDP buffer sizes. You need to do that on the host system, that hosts the jvb container. To do so you can get this [sysctl config file](https://github.com/jitsi/jitsi-videobridge/blob/master/config/20-jvb-udp-buffers.conf) and save it in `/etc/sysctl.d` and load it via: `sysctl --system`.
also
```
nano /etc/sysctl.d/20-jvb-udp-buffers.conf
```
Inhalt:
```
# this sets the max, so that we can bump the JVB UDP single port buffer size.
net.core.rmem_max=10485760
net.core.netdev_max_backlog=100000
```
Danach laden und prüfen mit:
```
sysctl --system
```
## Troubleshooting
Jitsi in Kubernetes, Port 10000 kann nicht freigeschaltet werden, stattdessen 30000 bis 32.000 irgendwas
[https://stackoverflow.com/questions/71495351/how-to-setup-jitsi-meet-on-a-custom-kubernetes](https://stackoverflow.com/questions/71495351/how-to-setup-jitsi-meet-on-a-custom-kubernetes)