# backrest (+ restic Befehle)

restic repo GUI mit Autobackups + Luckycloud S3-Storage oder Hetzner StorageBox

[![image.png](https://wiki.folkerts.it/uploads/images/gallery/2024-06/scaled-1680-/4nbimage.png)](https://wiki.folkerts.it/uploads/images/gallery/2024-06/4nbimage.png)

[https://github.com/garethgeorge/backrest](https://github.com/garethgeorge/backrest)

```yaml
version: "3.2"
services:
  backrest:
    image: garethgeorge/backrest
    container_name: backrest
    hostname: backrest
    volumes:
      - data:/data
      - config:/config
      - cache:/cache
      - /var/lib/docker/volumes:/docker-var-lib
      - /data/compose:/docker-data-compose
      #- /MY-BACKUP-DATA:/userdata # [optional] mount local paths to backup here.
      #- /MY-REPOS:/repos # [optional] mount repos if using local storage, not necessary for remotes e.g. B2, S3, etc.
    environment:
      - BACKREST_DATA=/data # path for backrest data. restic binary and the database are placed here.
      - BACKREST_CONFIG=/config/config.json # path for the backrest config file.
      - XDG_CACHE_HOME=/cache # path for the restic cache which greatly improves performance.
      - TZ=Europe/Berlin # set the timezone for the container, used as the timezone for cron jobs.
    restart: unless-stopped
    ports:
      - 9898:9898

volumes:
  data:
  config:
  cache:
```

## Konfiguration mit Luckycloud

In Luckyclouc einen S3 Speicher anlegen:

[![image.png](https://wiki.folkerts.it/uploads/images/gallery/2024-09/scaled-1680-/WjSimage.png)](https://wiki.folkerts.it/uploads/images/gallery/2024-09/WjSimage.png)

auf das grüne Schloss drücken, um die Zugangsdaten AWS\_ACCESS\_KEY\_ID und AWS\_SECRET\_ACCESS\_KEY zu erhalten:

[![image.png](https://wiki.folkerts.it/uploads/images/gallery/2024-09/scaled-1680-/K3Gimage.png)](https://wiki.folkerts.it/uploads/images/gallery/2024-09/K3Gimage.png)

die Zugangsdaten bei backrest als neues repo anlegen:

[![image.png](https://wiki.folkerts.it/uploads/images/gallery/2024-09/scaled-1680-/uliimage.png)](https://wiki.folkerts.it/uploads/images/gallery/2024-09/uliimage.png)

die repository url ist dann sowas wie

s3:https://&lt;luckycloudserver&gt;.luckycloud.de/&lt;bucketname&gt;

und ist zu finden im luckycloud portal:

[![image.png](https://wiki.folkerts.it/uploads/images/gallery/2024-09/scaled-1680-/qbtimage.png)](https://wiki.folkerts.it/uploads/images/gallery/2024-09/qbtimage.png)

als Plan dann zb folgendes:

[![image.png](https://wiki.folkerts.it/uploads/images/gallery/2024-09/scaled-1680-/mYximage.png)](https://wiki.folkerts.it/uploads/images/gallery/2024-09/mYximage.png)

oder /docker-var-lib als Path wenn man das Beispiel aus der docker-compose.yaml von oben nimmt

## Konfiguration mit Hetzner Storage Box (SFTP)

1. Unter Hetzner Robot SSH aktivieren:  
    [![image.png](https://wiki.folkerts.it/uploads/images/gallery/2024-09/scaled-1680-/ZIWimage.png)](https://wiki.folkerts.it/uploads/images/gallery/2024-09/ZIWimage.png)
2. Auf dem Server, auf dem Docker mit backrest als Container läuft, einen SSH-Key erzeugen, wenn noch nicht geschehen:  
    ```
    ssh-keygen
    ```
3. SSH <span style="text-decoration: underline;">**Public** </span>Key an Storage Box SSH Port 23 übertragen (kann auch id\_ed25519.pub heißen oä, wenn es kein rsa ist):  
    ```
    cat ~/.ssh/id_rsa.pub | ssh -p23 uXXXXX@uXXXXX.your-storagebox.de install-ssh-key
    ```
4. testweise nochmal mit der Storage Box über ssh verbinden, sollte nun ohne Bestätigung klappen:  
    ```
    ssh -p 23 uXXXXX@uXXXXX.your-storagebox.de
    ```
    
    oder mit Angabe zum Private-Key
    
    ```
    ssh -i /root/.ssh/id_mein-admin_ed25519 -p 23 uXXXXX@uXXXXX.your-storagebox.de
    ```
5. `/home/<user>/.ssh/known_hosts `und `/home/<user>/.ssh/id_ed25519` (SSH <span style="text-decoration: underline;"><span data-darkreader-inline-color="" style="color: rgb(0, 0, 0); --darkreader-inline-color: #a9a8a6; text-decoration: underline;">**Private** </span></span>Key) vom Docker Server in das Config Volume vom Backrest Container kopieren, sodass backrest Zugriff auf den PrivateKey und die known\_hosts Datei hat:  
    [![image.png](https://wiki.folkerts.it/uploads/images/gallery/2024-09/scaled-1680-/pP9image.png)](https://wiki.folkerts.it/uploads/images/gallery/2024-09/pP9image.png)
    
      
    oder als Bsp auf hz-02:  
      
    [![image.png](https://wiki.folkerts.it/uploads/images/gallery/2025-06/scaled-1680-/image.png)](https://wiki.folkerts.it/uploads/images/gallery/2025-06/image.png)
6. Neues Repository in backrest hinzufügen:  
    [![image.png](https://wiki.folkerts.it/uploads/images/gallery/2024-09/scaled-1680-/NrIimage.png)](https://wiki.folkerts.it/uploads/images/gallery/2024-09/NrIimage.png)
    
    [![image.png](https://wiki.folkerts.it/uploads/images/gallery/2024-09/scaled-1680-/ASqimage.png)](https://wiki.folkerts.it/uploads/images/gallery/2024-09/ASqimage.png)
    
    Repository URL bei SFTP hinzufügen:  
    ```
    sftp:user@host:/path/to/repo
    also zb 
    sftp:u12345@u12345.your-storagebox.de:ResticBackup/DockerServer
    ```
    
    Das Passwort für das Restic Backup kann man einfach mit klick auf Generate generieren lassen \*udontsay.gif\*  
      
    Flags (sftp.args) hinzufügen:
    
    ```
    -o sftp.args="-i /config/ssh_keys/id_ed25519 -P 23 -o UserKnownHostsFile=/config/ssh_keys/known_hosts"
    ```

Falls es zu Problemen kommt, kann die SSH config angepasst werden, sodass man die SSH Flags weglassen kann:

Quelle: [https://forum.restic.net/t/usability-issue-with-sftp-and-sftp-command/1170/2](https://forum.restic.net/t/usability-issue-with-sftp-and-sftp-command/1170/2)

<p class="callout warning">OBACHT   
Dieser "Trick" ist vollkommen sinnlos, weil man einen ssh-key und eine ssh-config in den flüchtigen ordner /root/.ssh im backrest-container legt. Nach jedem Neustart des Containers sind die Dateien also weg. Besser bei oben bleiben, wo man Flags hinzufügt und den SSH-Key sowie die known\_hosts in das backrest\_config Docker-Volume legt</p>

```
docker exec -it backrest /bin/bash
```

```
nano /root/.ssh/config
```

.ssh/config:

```
Host storagebox
    Hostname u12345.your-storagebox.de
    Port 23
    User u12345
    IdentityFile /root/.ssh/id_admin_ed25519
    ODER
    IdentityFile /config/ssh_keys/id_admin_ed25519
    JE NACHDEM WO DER SSH-KEY LIEGT!
```

wenn dannn noch WARNING UNPROTECTED PRIVATE KEY FILE Meldung kommt, einfach

```
chown 600 /config/ssh_keys/id_admin_ed25519
```

danach sollte

```
ssh storagebox
```

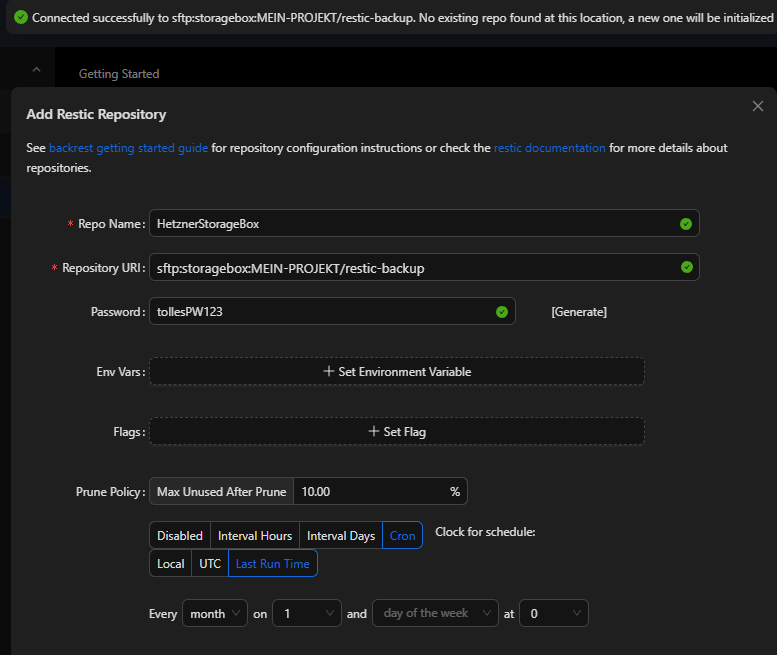
funktionieren und damit auch bei Repository URI:

sftp:storagebox:MEIN-PROJEKT/restic-backup

[![image.png](https://wiki.folkerts.it/uploads/images/gallery/2025-06/scaled-1680-/xrZimage.png)](https://wiki.folkerts.it/uploads/images/gallery/2025-06/xrZimage.png)
## restic unlock

[https://github.com/restic/restic/issues/1450](https://github.com/restic/restic/issues/1450)

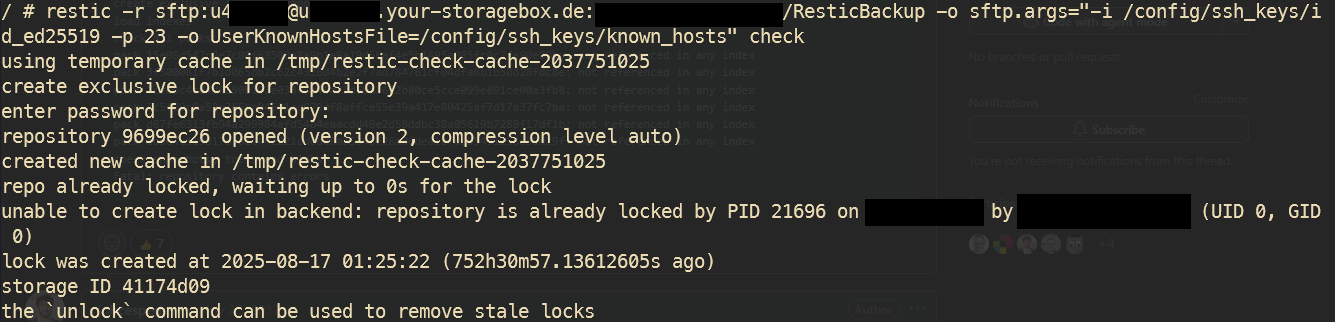
Falls es zu folgender Fehlermeldung bei einem Backup kommt, kann man das Repository mit `restic unlock` wieder entsperren:

```
unable to create lock in backend: repository is already locked by PID 3604 on HOSTNAME by HOSTNAME\User (UID 0, GID 0)
lock was created at 2025-08-17 22:58:46 (725h49m33.96593014s ago)
storage ID 42...bce
the `unlock` command can be used to remove stale locks
```

Lösung:

In die Shell des Backrest Docker-Container gehen und folgende Befehle eingeben:

```bash
restic -r /path/to/repository/external/drive unlock
# release previous lock
restic -r /path/to/repository/external/drive check
# Return some "not referenced in any index"
restic -r /path/to/repository/external/drive rebuild-index
# rebuild index 
restic -r /path/to/repository/external/drive check
# return a few  "not referenced in any index"
restic -r /path/to/repository/external/drive prune
# remove those few incomplete packs
restic -r /path/to/repository/external/drive check
# no errors were found
```

Wobei aus dem Hetzner-Storagebox SFTP Beispiel oben als Repository mit angegebenem SSH-Key folgende Zeile resultiert:

```
restic -r sftp:u12345@u12345.your-storagebox.de:ResticBackup/DockerServer -o sftp.args="-i /config/ssh_keys/i
d_ed25519 -p 23 -o UserKnownHostsFile=/config/ssh_keys/known_hosts" check
```

Danach das repository-Passwort eingeben:

[![image.png](https://wiki.folkerts.it/uploads/images/gallery/2025-09/scaled-1680-/g0Mimage.png)](https://wiki.folkerts.it/uploads/images/gallery/2025-09/g0Mimage.png)
## <span aria-label="Dokumenttitel" class="sc-eKtvVk dJowfB" contenteditable="false" data-placeholder="Ohne Titel">Backup wiederherstellen (Restic CLI)</span>

### In die Shell des Containers backrest gehen

```

# mit hz-03 verbinden
ssh hz-03

# mit lazydocker in den container backrest gehen:
lazydocker
# mit J/K hoch und runter zum Container "backrest" navigieren und Shift+E drücken für exec in shell:
```

[![image.png](https://wiki.folkerts.it/uploads/images/gallery/2026-03/scaled-1680-/ZEQimage.png)](https://wiki.folkerts.it/uploads/images/gallery/2026-03/ZEQimage.png)
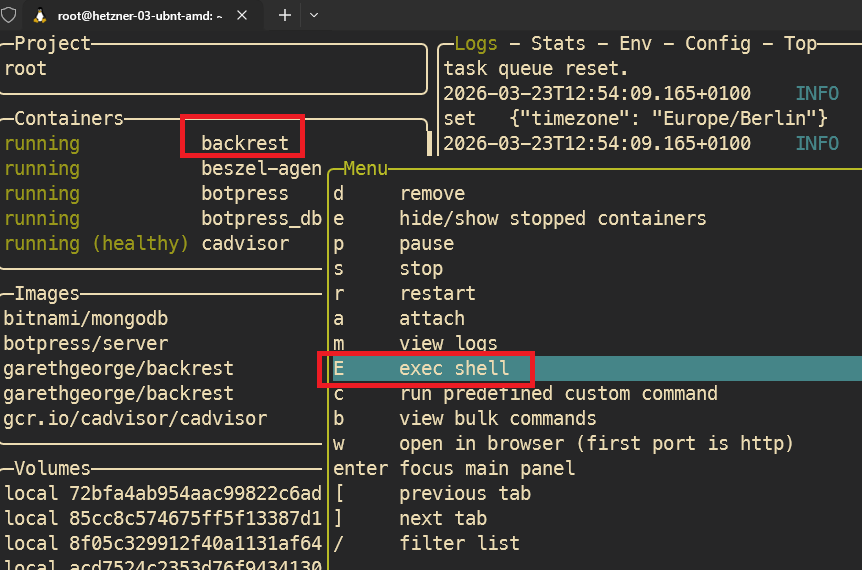
lazydocker &gt; exec shell in Container "backrest"

### config.json des repositories anzeigen

```
# config des restic repositories anzeigen:
cat config/config.json
```

[![image.png](https://wiki.folkerts.it/uploads/images/gallery/2026-03/scaled-1680-/6EMimage.png)](https://wiki.folkerts.it/uploads/images/gallery/2026-03/6EMimage.png)
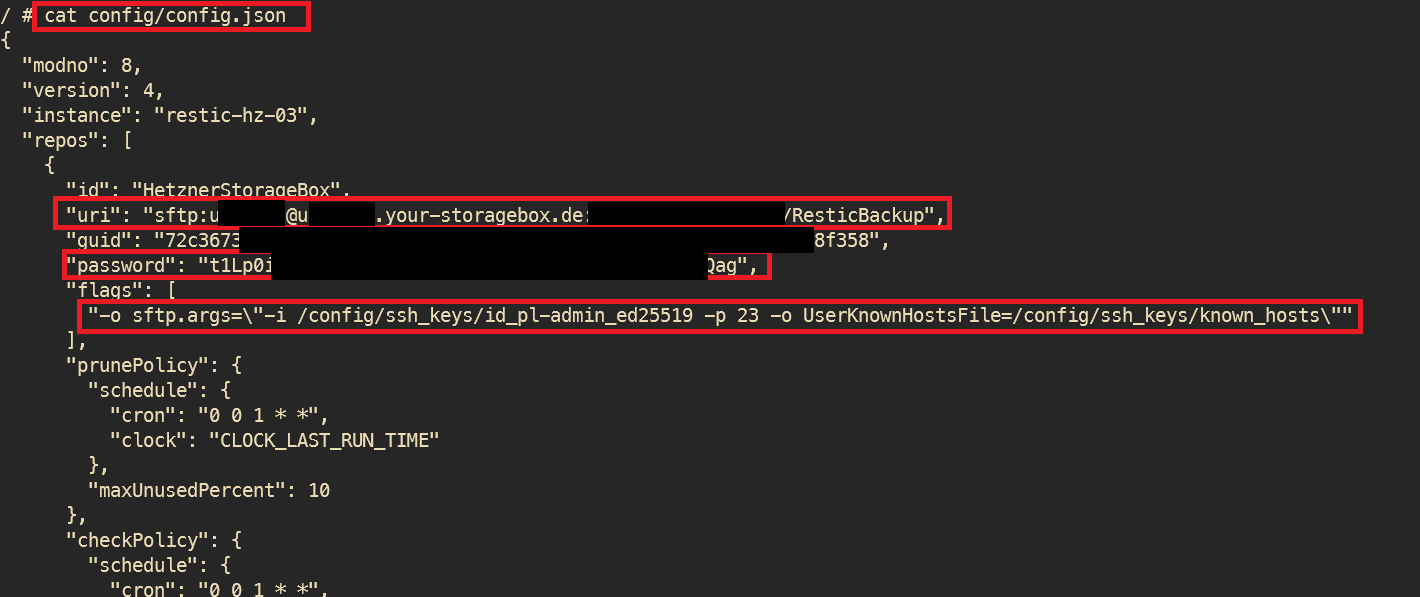
wichtig sind uri, pw und flags für sftp des repos

### restic cmd vorbereiten

```
# dann folgende ENVs im Container festlegen (aus config.json kopiert) mit
export RESTIC_REPOSITORY="sftp:u123456@..................de:MEINEPRAXIS/ResticBackup"
export RESTIC_PASSWORD="t1Lp0iF......................KnTqEQag"

# und zuletzt einen alias für restic setzen mit
alias restic='restic -o sftp.args="-i /config/ssh_keys/id_pl-admin_ed25519 -p 23 -o UserKnownHostsFile=/config/ssh_keys/known_hosts"'
```

### restic Befehle anwenden und Dateien / Pfade suchen

```
# snapshots anzeigen mit repo-name und plan-name
restic snapshots
# oder kompakt
restic snapshots --compact
# oder nur bestimmter host
restic snapshots --host meinserver

# nach PDF-Dateien in bestimmtem Ordner suchen:
restic find --tag "plan:daily-docker-nextcloud" "*/PatientInnen MAX MUSTERMANN/MUSTERFRAU, MAXI Gruppe ACT W1263456/Dokumentation Therapie/*.pdf"
# alle dateien in bestimmtem Ordner:
restic find --tag "plan:daily-docker-nextcloud" "/backup/docker-praxis-volume-03/nextcloud_aio_nextcloud_data/_data/admin/files/PLoud-Ordner/2_Praxismgmt/PatientInnen___alle_/PatientInnen MAX MUSTERMANN/MUSTERFRAU, MAXI Gruppe ACT W1263456/Dokumentation Therapie/*.*"

```

Je genauer der Pfad, desto schneller die Suche

### Beispiel für langsame Suche

```
restic find --tag "plan:daily-docker-nextcloud" "*(W040499)/Dokumentation Therapie/*.pdf"
```

= dauert ca 1min pro Snapshot!

[![image.png](https://wiki.folkerts.it/uploads/images/gallery/2026-03/scaled-1680-/jq3image.png)](https://wiki.folkerts.it/uploads/images/gallery/2026-03/jq3image.png)

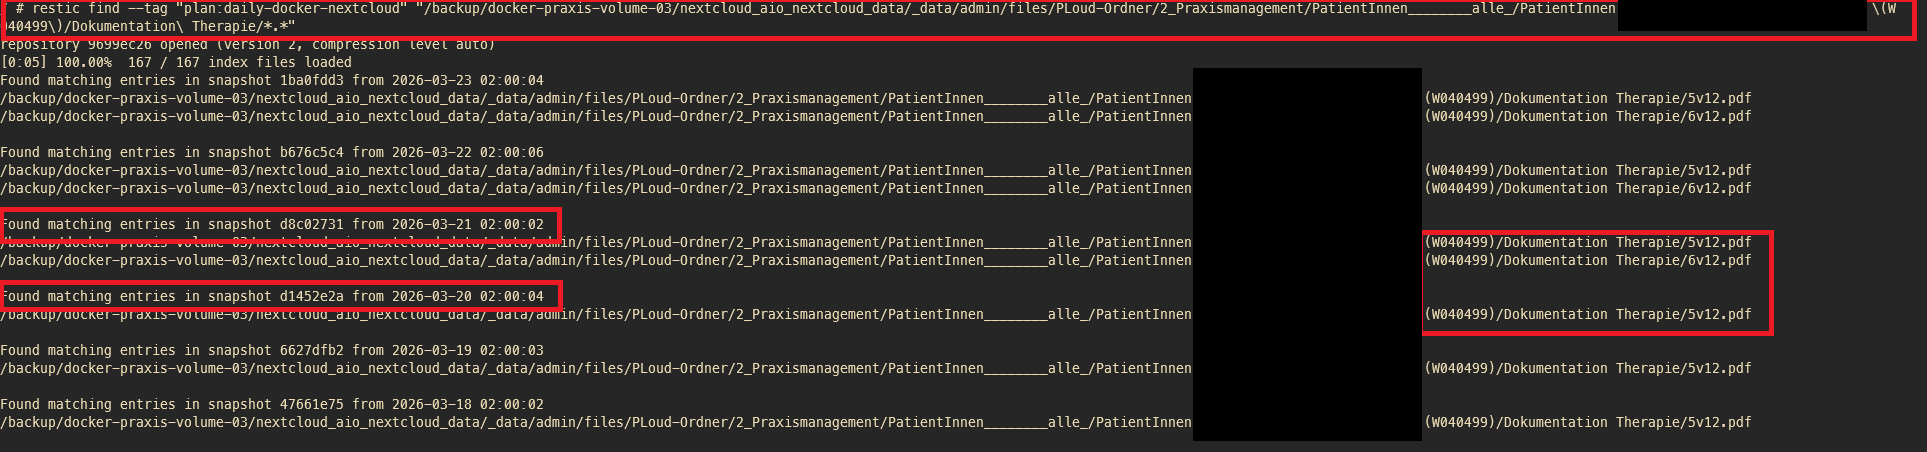
### Beispiel für schnelle Suche

```
restic find --tag "plan:daily-docker-nextcloud" "/backup/docker-praxis-volume-03/nextcloud_aio_nextcloud_data/_data/admin/files/PLoud-Ordner/2_Praxismanagement/PatientInnen________alle_/PatientInnen Behandler-Vorname\ Behandler-Nachname/Pat-Nachname,\ Pat-Vorname\ \(W
040499\)/Dokumentation\ Therapie/*.*"
```

= innerhalb von 20sek alle Snapshots durchsucht

[![image.png](https://wiki.folkerts.it/uploads/images/gallery/2026-03/scaled-1680-/XKrimage.png)](https://wiki.folkerts.it/uploads/images/gallery/2026-03/XKrimage.png)
### Dateien wiederherstellen

Wiederherstellen entweder über GUI direkt zum richtigen Snapshot navigieren und herunterladen   
(siehe [https://wiki.praxisluebberding.de/doc/backup-wiederherstellen-backrest-gui-w04w1wkGAJ](https://wiki.praxisluebberding.de/doc/backup-wiederherstellen-backrest-gui-w04w1wkGAJ) )  
oder im CLI:

```
restic restore b676c5c4 --target "/backrest-restored/mein-wiederhergesteller-ordner" --include "/backup/docker-praxis-volume-03/nextcloud_aio_nextcloud_data/_data/admin/files/.../Dokumentation Therapie"
# danach im ordner /mnt/backrest-restored nachsehen und auf Dateien zugreifen (evtl über mountain duck > sftp hz-03)
```

<div class="notice-block warning" id="bkmrk--14"><div class="icon"><svg fill="currentColor" height="24px" viewbox="0 0 24 24" width="24px" xmlns="http://www.w3.org/2000/svg"><path clip-rule="evenodd" d="M12 20C7.58172 20 4 16.4183 4 12C4 7.58172 7.58172 4 12 4C16.4183 4 20 7.58172 20 12C20 16.4183 16.4183 20 12 20ZM12 15C12.5523 15 13 15.4477 13 16C13 16.5523 12.5523 17 12 17C11.4477 17 11 16.5523 11 16C11 15.4477 11.4477 15 12 15ZM12 14C13 14 13 13 13 13L13 10.5L13 8C13 8 13 7 12 7C11 7 11 8 11 8L11 13C11 13 11 14 12 14Z" fill-rule="evenodd"></path></svg></div><div class="content">  
</div></div>Achtung, immer wenn über die Web-UI (GUI) wiederhegestellt wird, landen die restores auf hz-01 im Ordner /mnt/backrest-restored, weil dort der backrest container für [https://backrest.praxisluebberding.de/](https://backrest.praxisluebberding.de/) läuft.

Wenn man jedoch wie hier über die CLI wiederherstellt, gibt man einen lokalen Ordner an, zb auf hz-03 /mnt/backrest-restored

## Backup wiederherstellen (Backrest GUI)

1\) [https://backrest.praxisluebberding.de](https://backrest.praxisluebberding.de/) öffnen

2\) Backrest User &amp; Passwort eingeben (in Bitwarden hinterlegt: [https://bw.praxisluebberding.de](https://bw.praxisluebberding.de/))

3\) Den Backup-Plan ‘daily\_docker\_backup‘ auswählen

[![image.png](https://wiki.folkerts.it/uploads/images/gallery/2026-03/scaled-1680-/b1rimage.png)](https://wiki.folkerts.it/uploads/images/gallery/2026-03/b1rimage.png)

4\) letztes erfolgreichen Snapshot auswählen (grünes Icon)

5\) Rechts den Snapshot Browser ausklappen

6\) Den gewünschten Ordner oder Datei suchen

[![image.png](https://wiki.folkerts.it/uploads/images/gallery/2026-03/scaled-1680-/oKtimage.png)](https://wiki.folkerts.it/uploads/images/gallery/2026-03/oKtimage.png)

7\) Restore to Path

[![image.png](https://wiki.folkerts.it/uploads/images/gallery/2026-03/scaled-1680-/lObimage.png)](https://wiki.folkerts.it/uploads/images/gallery/2026-03/lObimage.png)

8\) restore-pfad angeben:

`/backrest-restored/NAME`

zb `/backrest-restored/2024-12-31_IT-HowTo-Restore`

[![image.png](https://wiki.folkerts.it/uploads/images/gallery/2026-03/scaled-1680-/F77image.png)](https://wiki.folkerts.it/uploads/images/gallery/2026-03/F77image.png)

9\) Zurück zur Übersicht, den Restore auswählen und auch Download Files drücken:

[![image.png](https://wiki.folkerts.it/uploads/images/gallery/2026-03/scaled-1680-/VPBimage.png)](https://wiki.folkerts.it/uploads/images/gallery/2026-03/VPBimage.png)

10\) .tar.gz Datei herunterladen und entpacken